Crochet Winter Textured Scarf Instructions

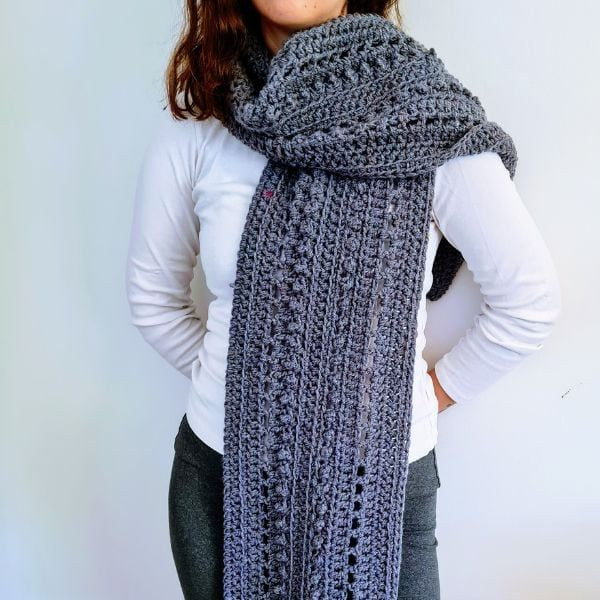
A Crochet Winter Textured Scarf is not just a cozy accessory but also a stylish way to stay warm during the chilly months. The intricate stitching adds a touch of charm and character to your outfit, making even the simplest winter ensemble stand out. Whether you're a beginner or an experienced crocheter, this project is sure to bring a sense of accomplishment and warmth with every stitch. So grab your favorite yarn, needles, and get ready to create a fabulous scarf that will not only keep you toasty but also make heads turn with its unique texture and design. Happy crocheting!
Materials Used
Materials I used:
King Cole Limited edition DK 100% recycled- I used two strands to make it bulky yarn- so I used 3 skeins, but if you use aran or bulky weight yarn 2.5 skeins will do!
Hook: US Size 5mm
Yarn Needle, Scissors, Measuring Tape
Sizes
This sample is: Length: 200cm 78.74” Width: 24 cm 9.45”
Stitch Key
- Ch = Chain
- Sc = Single Crochet
- St = Stitch
- Dc = Double Crochet
- Hdc = Half Double Crochet
- Tr = Treble Crochet
Specialty Stitches
Spuff st –
Sc 1 (or SlSt) in next st, Tr 1 in next
Notes
- This pattern uses US terminology.
- The pattern is worked in rows.
- Ch 1 at the beginning of the row does not count as st.
- Ch 3 at the beginning of the row does count as st.
- This pattern uses pattern repeats.
- You can work this pattern with one color or multiple as you wish - I used one solid color.
Instructions
Foundation chain: ch 180 +1 st
Row Instructions
R1: Hdc 1 in 2nd ch from hook, hdc 1 in every ch across to end of row, ch 1 and turn your work.
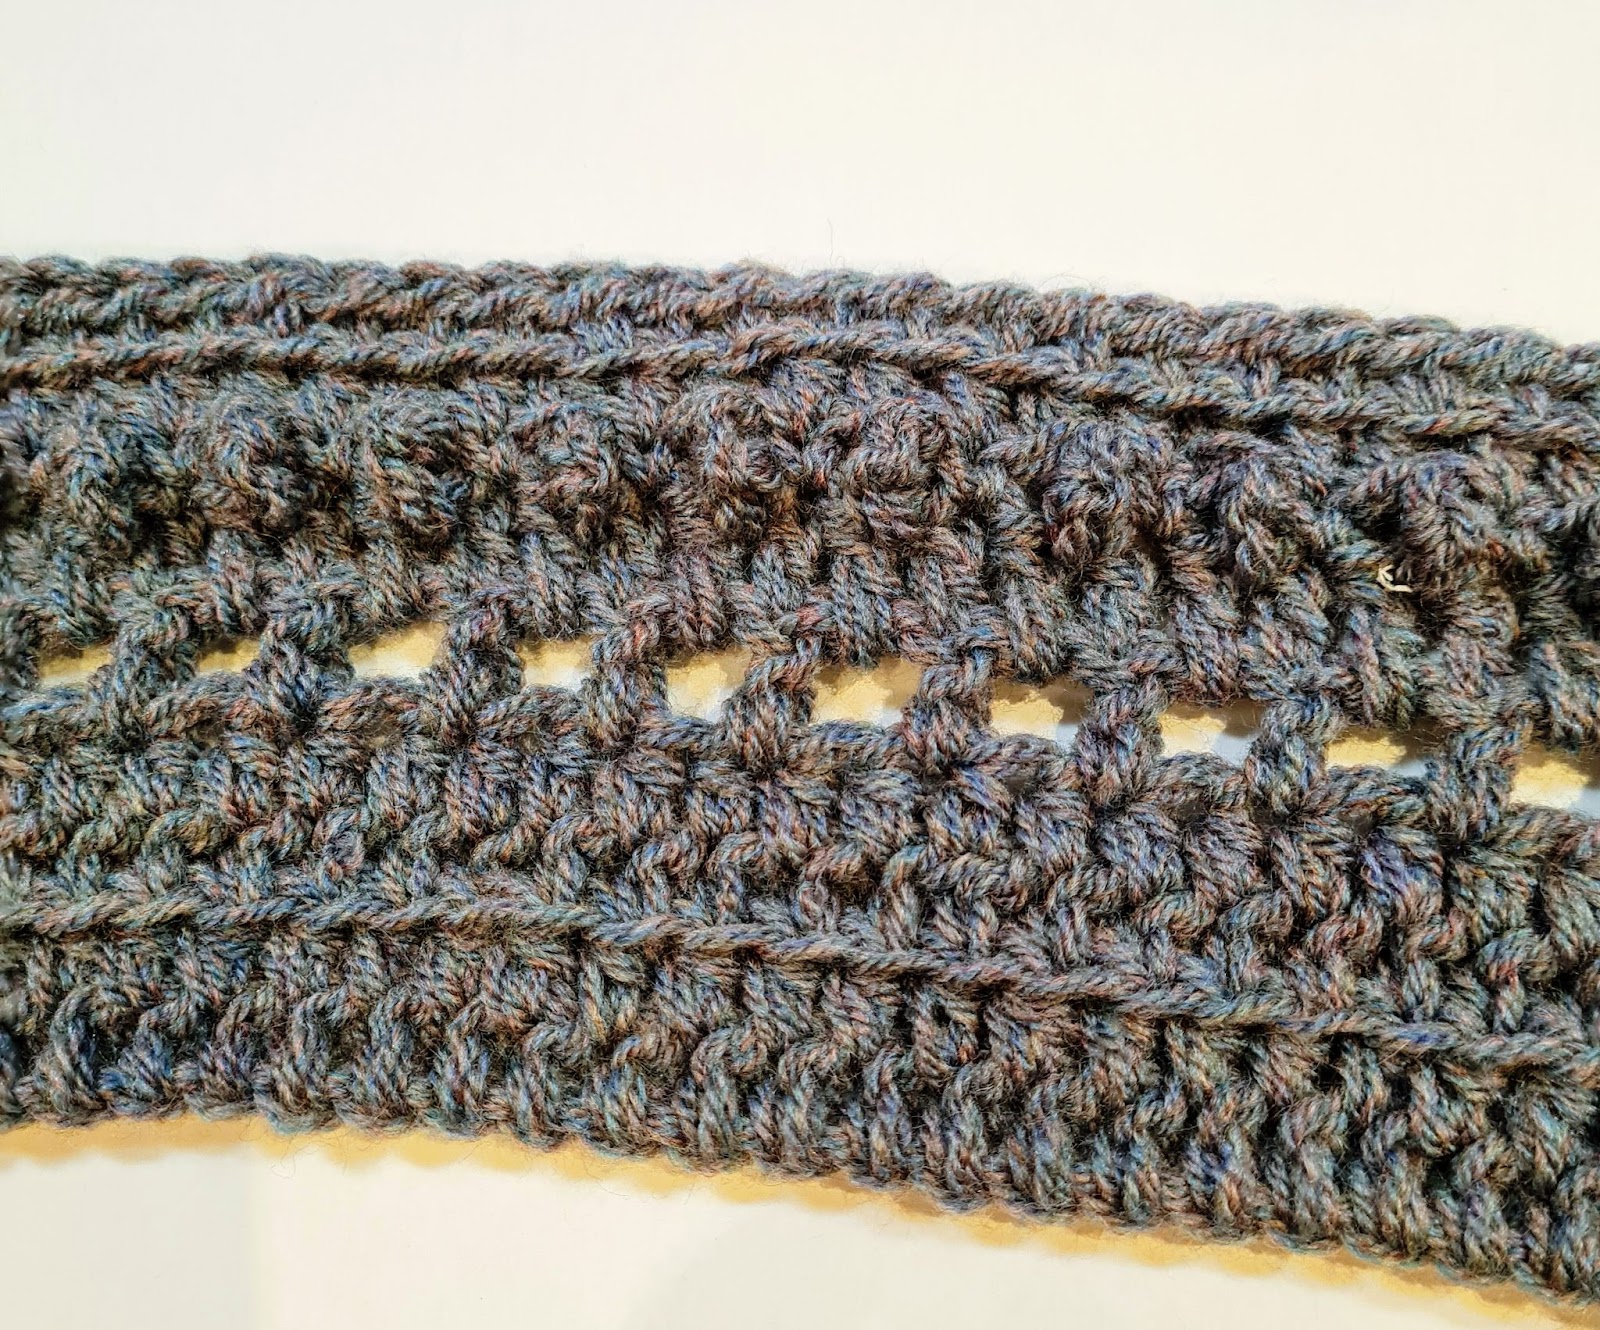
R2 + 3: Hdc 1 in 1st st from hook, now we will make a special HDC – if you look at your stitch you see the V top of the stitch- look at the loop beneath the V it is called the 3rd loop. It is in front of the stitch - this is where you will yo and make your Hdc - so it makes the fabric more textured and reveals a line on each row - now 3rd loop hdc on each stitch from the prev row to the end.
R4: Ch 4 (counts as 1st st + ch space), dc in 3rd st from hook, ch 1, skip 1, dc 1, and so on across to end of row - You should have windows all across; turn.
R5: Ch 1 and hdc in 1st st from hook, hdc 1 in ch space, hdc 1 on dc from prev row, hdc 1 in ch space and so on 1 hdc in every st across to end of row. Count your stitches to ensure you have the same amount from the start. Turn work.
R6: Now we will make the sPUFF st. It is very simple: ch 1, sc in first st from hook, tr in next st, sc in next st, tr in next st, sc in next, and so on across to the end of row - 1 tr, 1 sc. This gives us the simple puff stitch - finish with a sc turn work.
R7: Ch 1, hdc in 1st st from hook on top of sc from prev row, hdc in next st (on top of tr from prev row), and so on across to end of row. 1 hdc on top of each st from the prev row. Now, we repeat rows.
R8 + 9: Repeat rows 2 + 3.
R10: Repeat row 6.
R11: Ch 1, hdc in 1st st from hook on top of sc from prev row, hdc in next st (on top of tr from prev row), and so on across to end of row. 1 hdc on top of each st from the prev row.
R12: Ch 4 counts as 1st st + ch space, dc in 3rd st from hook, ch 1, sk 1, dc 1 and so on across to end of row - You should have windows all across.
R13: Ch 1 and hdc in 1st st from hook, hdc in ch space, hdc on dc from prev row, hdc in ch space and so on 1 hdc in every st across to end of row. Count your stitches to ensure you have the same amount from the start. Turn work.
R14 + 15: Repeat rows 2 + 3.
R16: Ch 1, hdc in 1st st from hook and hdc in every ch across to end of row.
- Funny Pictures
-
 Hilarious Memes for Those Bored to Tears
-
 Weekly Treat of Funniest Parenting Memes for Good Laugh out Loud Right Now
-
 Really Funny Pics to End These Weekend Perfectly
- Recipes
-
 Crispy Baked Avocado Fries
-
 Scrambled Chickpea and Spinach Pitas
-
 Cinnamon Pancakes
- Lifehacks
-
 Crochet Basics: Aligned Cobble Stitch
-
 Brick Stitch Crochet Tutorial
-
 Crochet Basics: Wattle Stitch
- Crochet Ideas
-
 Crochet Snorlax Plushie Doll
-
 Crochet Beautiful Penguin Toy
-
 Crochet Tiny Snowman
- DIY
-
 DIY Santa Craft For Kids
-
 Paper Plate Angel Craft
-
 Upcycled Mason Jar Chicken Vase
- Knitting Ideas
-
 Knitted Bridger Cowl
-
 Knitted Keepsake Bag
-
 Knitted Cutie Cupcake Dolls