Crochet Textured Granny Stitch

Crochet Textured Granny Stitch
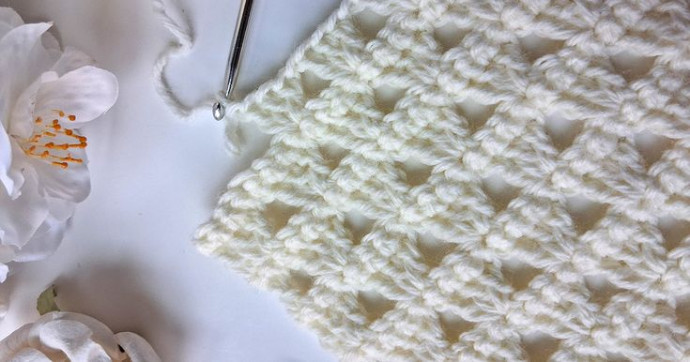
Crochet stitches like the Textured Granny Stitch are a delight to work with! This versatile stitch combines simplicity with a touch of elegance, perfect for adding depth and dimension to your projects. Whether you're a seasoned crafter or a newbie trying your hand at crocheting, the Textured Granny Stitch offers a fun and engaging way to create beautiful textures in your designs. Give it a try, and watch as your crochet creations come to life with a unique charm!
Abbreviations
Here are the abbreviations we are using in the tutorial for a Textured Granny Stitch. It is from a list of crochet abbreviations used in patterns by yarn industry designers and publishers, according to Craft Yarn Council (in US terminology).
- ch – chain
- dc – double crochet
- st – stitch
- sk – skip
- BL – back loops only
- FHDC – foundation half double crochet
How to Start
As illustrated, this textured granny stitch was used for a triangular shawl. You’ll start on the bottom of your triangle and work up until the shawl reaches the desired size.
To practice, you can use any leftover yarn and a corresponding crochet hook.
Starting Rows
Row 1
Ch 4, dc twice into the first ch (4th ch from the hook). You made the first cluster of three dc stitches. Ch 2, turn. (3 dc)
Row 2
For row 2, we will be working sc stitches into back loops only of the previous row:
sc twice into the BL of the first stitch; sc into next 3 st, sc into the same last st (5 sc).
Row 3 (and all odd rows)
Note, for this row (and all odd rows) we are working as regular crochet stitches under the V (not back loops).
Ch 3, dc twice into the very first st, ch 1, sk 3 st, 3 dc into the last st of the previous row. Ch 2, turn (2 dc clusters, ch 1).
Row 4 (and all even rows) – BL row
BL sc twice into first st, sc into next 7 st, 2 sc into last st (9 sc st).
Row 5
Ch 3, dc twice into the very first st, ch 1, sk 3 st, 3 dc into next st, sk 3 st, 3 dc into the last st of the previous row. Ch 2, turn (3 dc clusters, 2 ch 1 st).
Exhale! From now on, it’s smooth sailing. Repeat rows 4 & 5 until you feel that your project reached its desired size. As a result, each row of double crochet stitches will have one more granny cluster compared with the previous row of dcs. All you have to remember is to skip 3 stitches and make a double crochet into that sc stitch that separates 2 clusters.
Textured Granny Stitch Blanket
If you are wondering if you can use this stitch for a blanket, the short answer is yes. Of course, for a blanket, you would need to start with a foundation chain.
First, chain (FHDC) a multiple of 4+3. In our sample, we have 7×4+3= 28+3=31 ch.
Row Instructions
Row 1
Next, we are going to make a ‘neat’ starting dc (instead of the usual ch 3 at the start of the row): sc (do NOT CHAIN, just single crochet in the very first st); 2nd sc – put your hook under the V of this first sc, grab the yarn and pull through, grab the yarn and pull through 2 loops. You’ve made starting dc!
As a result, you have a nice-looking starting dc instead of traditional ch 3. Most importantly, it makes the edge look nice and straight for the blanket or granny stitch scarf.
Row 2
sk 2 st, 3 dc into the next st, ch 1. Note, we are skipping 2 st just at the beginning of the row. Next, *sk 2 st, 3 dc into the next st, ch 1*. Repeat between ** 5 more times, dc into the last st.
Row 3
Ch 1, sc BL into every st (31 st).
Row 4
Starting dc, 2 dc into the next st, ch 1; *sk 3 st, 3 dc into next st, ch 1*; repeat 5 times to the end of the row, sk 3 st, 2 dc, dc into the last st.
Row 5
Ch 1, sc BL into every st (31 st).
To continue, keep repeating these 4 rows until you feel comfortable with the stitch. Consequently, you can start on your textured granny stitch blanket or granny stitch scarf.
By repeating 2 easy rows of basic crochet stitches, you’ll create a beautiful texture. Can you count to 3? That’s all you have to remember to master this beautiful modified granny stitch.
- Funny Pictures
-
 Hilarious Memes for Those Bored to Tears
-
 Weekly Treat of Funniest Parenting Memes for Good Laugh out Loud Right Now
-
 Really Funny Pics to End These Weekend Perfectly
- Recipes
-
 Crispy Baked Avocado Fries
-
 Scrambled Chickpea and Spinach Pitas
-
 Cinnamon Pancakes
- Lifehacks
-
 Crochet Basics: Aligned Cobble Stitch
-
 Brick Stitch Crochet Tutorial
-
 Crochet Basics: Wattle Stitch
- Crochet Ideas
-
 Crochet Snorlax Plushie Doll
-
 Crochet Beautiful Penguin Toy
-
 Crochet Tiny Snowman
- DIY
-
 DIY Santa Craft For Kids
-
 Paper Plate Angel Craft
-
 Upcycled Mason Jar Chicken Vase
- Knitting Ideas
-
 Knitted Bridger Cowl
-
 Knitted Keepsake Bag
-
 Knitted Cutie Cupcake Dolls