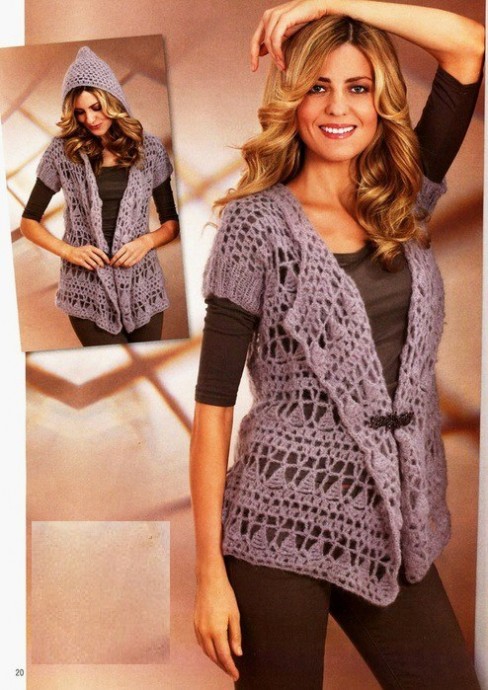
Ultimate Crochet Garment Instructions: Yarn, Patterns, and Assembly

You’ll Need:
About 4 (5) 6 skeins of yarn (57% mohair, 43% microfiber; 200m/50g);
Crochet hook 4.5;
Clasp.
Size:
S (M) L.
Used Patterns
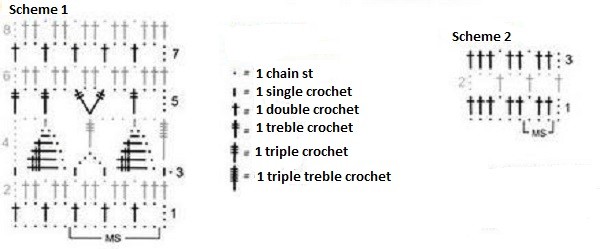
Main Pattern
The quantity of sts is multiplied by 9 + 7 sts. Work according to scheme 1. Start each row with sts before pattern repeat, pattern repeat, and finish with sts after pattern repeat. Make 1st-8th rows once, after that, repeat 3rd-8th rows.
Starting from the 2nd row, work with double crochets through the chain st of the previous row.
Fillet Pattern
The quantity of sts is multiplied by 3 + 1. Make in the same way as the main pattern, but keep the scheme 2: make 1st-3rd rows once, after that, repeat 2nd-3rd rows.
2 x 2 rib.
Stitches Control
Main pattern: 18 sts x 5.5 rows = 10 x 10 cm;
Fillet pattern: 18 sts x 8 rows = 10 x 10 cm.
Instructions
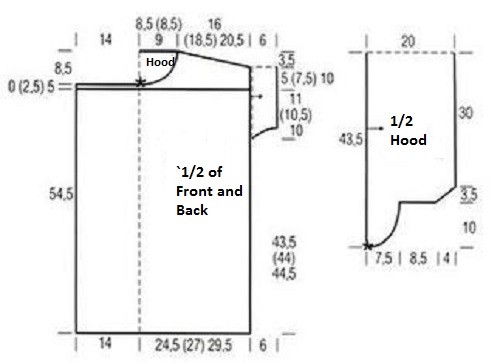
Back
Make 88 (97) 106 chain sts + 3 chain sts increase, then work with the main pattern to 54.5 cm height (about 30 rows); then, turn to the fillet pattern.
After making 5 cm – 4 rows (7.5 cm – 6 rows), 10 cm – 8 rows this way, leave 10 (12) 14 sts from both sides for shoulder chamfers and 1 x 10 (12) 14 sts and 1 x 9 (10) 11 sts in every next row. Finish work at 3.5 cm (3 rows) height.
Left Front
Make 70 (74) 79 chain sts + 3 chain sts increase and continue with the main pattern. For size M, start with sts before pattern repeat, 8 pattern repeats, and finish with sts after pattern repeat according to scheme 1. After 54.5 cm (about 30 rows) from the set-up row, start work with the fillet pattern.
Make shoulder chamfer from the right side in the same way as for the back.
At the beginning of the fillet pattern (at height 2.5 cm = 2 rows) at 5 cm = 4 rows, leave 12 (12) 13 sts from the left side for neck-hole and 1 x 10, 2 x 8, 1 x 2, and 1 x 1 sts in every row. Finish work at the same height as the back.
Right Front
Make in symmetry to the left front.
Hood
Make 157 chain sts + 3 chain sts increase and work with the fillet pattern. After making 1 row from the set-up row, leave 2 sts from both sides for smooth rounding and 1 x 2, 2 x 3, 2 x 4 sts = 121 sts.
After making 16 cm = 13 rows from the set-up row, leave 2 sts for chamfers from both sides and 2 x 2 sts in every row. Finish work in 20 cm = 16 rows from the set-up row.
Assembly
Make shoulder seams, then work with the hood: make a seam, sew the detail to the neck-hole line, matching it with the pattern design. After that, continue working with the hood: fasten its edges together with the edges of the front with 1 row of single crochets, making 3 single crochets from 1 base st in the corners.
For plackets, cast on 52 (60) 68 sts at 16 (18) 20 cm with circular knitting needles and make rib between selvedge sts, decreasing 4 sts in the 1st row = 48 (56) 64 sts. After making the plackets to 6 cm height, bind off all the sts according to the ornament and sew the sides, finishing your assembly with sewing the plackets.
- Funny Pictures
-
 Hilarious Memes for Those Bored to Tears
-
 Weekly Treat of Funniest Parenting Memes for Good Laugh out Loud Right Now
-
 Really Funny Pics to End These Weekend Perfectly
- Recipes
-
 Crispy Baked Avocado Fries
-
 Scrambled Chickpea and Spinach Pitas
-
 Cinnamon Pancakes
- Lifehacks
-
 Crochet Basics: Aligned Cobble Stitch
-
 Brick Stitch Crochet Tutorial
-
 Crochet Basics: Wattle Stitch
- Crochet Ideas
-
 Crochet Snorlax Plushie Doll
-
 Crochet Beautiful Penguin Toy
-
 Crochet Tiny Snowman
- DIY
-
 DIY Santa Craft For Kids
-
 Paper Plate Angel Craft
-
 Upcycled Mason Jar Chicken Vase
- Knitting Ideas
-
 Knitted Bridger Cowl
-
 Knitted Keepsake Bag
-
 Knitted Cutie Cupcake Dolls