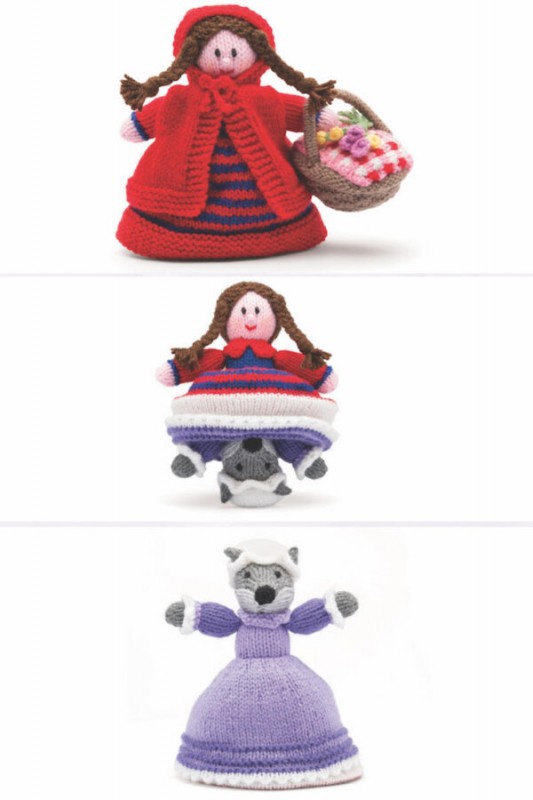
How to Create Little Red Riding Hood and Wolf Dolls with Detailed Knitting Instructions

Materials
Any DK (US: light worsted) yarn (amounts given are approximate):
- 10g royal blue (A)
- 10g pale pink (B)
- 20g lilac (C)
- 5g black (D)
- 5g silver grey (E)
- 10g dark grey (F)
- 30g white (G)
- 50g red (H)
- 10g deep lilac (I)
- 5g dark brown (J)
- 10g medium brown (K)
- 2g medium pink (L)
- 2g mauve (M)
- 2g lemon yellow (N)
- Oddments of black, red and pale pink for embroidery, and dark brown, red and bright green for making up.
- 1 pair of 3.25mm (UK10:US3) needles and 1 pair of 4mm (UK8:US6) needles for basket cloth only.
- Knitters’ blunt-ended pins and a needle for sewing up.
- Acrylic toy stuffing.
- A red pencil for shading cheeks.
- A small snap fastener and sewing needle and thread.
- 2 chenille stems.
Finished Size
Doll stands 7½in (19cm) tall.
Basket measures 3½in (9cm) long.
Tension
26 sts x 34 rows measure 4in (10cm) square over st-st using 3.25mm needles and DK yarn before stuffing.
Abbreviations
- alt – alternate
- beg – beginning
- cm – centimetres
- cont – continue
- dec – decrease/decreasing
- DK – double knitting
- foll – following
- g-st – garter stitch: knit every row
- g – grams
- k – knit/knitting
- k2tog – knit two stitches together: if these are the very last in the row, then work through back of loops
- kwise – knitwise
- m1 – make one stitch: pick up horizontal loop between the needles and work into the back of it
- mm – millimetres
- patt – pattern
- p – purl
- p2tog – purl two stitches together: if these stitches are the very first in the row, then work together through back of loops
- pwise – purlwise
- rem – remaining
- rep – repeat(ed)
- rev st-st – reverse stocking stitch: purl on the right side, knit on the wrong side
- RS – right side
- s1k – slip one stitch knitwise
- s1p – slip one stitch purlwise
- st(s) – stitch(es)
- st-st – stocking stitch: knit on the right side, purl on the wrong side
- tog – together
- WS – wrong side
- yrn – yarn round needle
- ( ) – repeat instructions between brackets as many times as instructed
- * – repeat from * as instructed
Pattern Instructions
Bodice and Head for Little Red Riding Hood
Using the thumb method and A, cast on 24 sts, WS facing to begin.
Rows 1 to 11: Begin with a p row, work 11 rows in st-st.
Rows 12 and 13: Change to B for head and work 2 rows in st-st.
Row 14: K2, (m1, k4) to last 2 sts, m1, k2 (30 sts).
Rows 15 to 25: Begin with a p row, work 11 rows in st-st.
Shape top of head:
Row 26: (K2tog, k1) to end (20 sts).
Row 27: Purl.
Row 28: (K2tog) to end (10 sts).
Thread yarn through sts on needle, pull tight and secure by threading yarn a second time through sts.
Bodice for Wolf in Granny’s Clothing
Using the thumb method and C, cast on 24 sts, WS facing to begin.
Rows 1 to 10: Begin with a p row, work 10 rows in st-st, ending with a RS row.
Row 11: (P2tog, p1) to end (16 sts).
Cast off for neck edge.
Head for Wolf
Begin at nose using the thumb method and D, cast on 8 sts.
Row 1 (RS): Purl.
Join on 2 separate balls of E (second ball 3yd/280cm approx) and F and work in intarsia (see instructions at end of pattern) in blocks of colour, twisting yarn when changing colour to avoid a hole.
Row 2: E-p2, F-p4, E (second ball)-p2.
Row 3: E-k1, m1, k1, F-k4, E-k1, m1, k1 (10 sts).
Row 4: E-p3, F-p4, E-p3.
Row 5: E-k1, m1, k2, F-k4, E-k2, m1, k1 (12 sts).
Row 6: E-p4, F-p4, E-p4.
Row 7: E-k1, m1 k3, F-k1, m1, k2, m1, k1, E-k3, m1, k1 (16 sts).
Row 8: E-p5, F-p6, E-p5.
Row 9: E-k1, m1, k4, F-k6, E-k4, m1, k1 (18 sts).
Row 10: E-p6, F-p6, E-p6.
Row 11: E-k1, m1, k5, F-k1, m1, k4, m1, k1, E-k5, m1, k1 (22 sts).
Row 12: E-p7, F-p8, E-p7.
Row 13: E-k1, m1, k6, F-(k1, m1) 3 times, k2, (m1, k1) 3 times, E-k6, m1, k1 (30 sts).
Row 14: E-p8, F-p14, E-p8.
Row 15: E-k7, F-k16, E-k7.
Row 16: E-p6, F-p18, E-p6.
Row 17: E-k5, F-k20, E-k5.
Rows 18 to 22: Continue in F and begin with a p row, work 5 rows in st-st.
Row 23: (K2tog, k1) to end (20 sts).
Row 24: Purl.
Row 25: (K2tog) to end (10 sts).
Thread yarn through sts on needle, pull tight and secure by threading yarn a second time through sts.
Skirt for Little Red Riding Hood
Begin at lower edge using the thumb method and G, cast on 72 sts, WS facing to begin.
Rows 1 to 9: Begin with a p row, work 9 rows in st-st (this part is turned under).
Rows 10 to 23: Change to H and work 14 rows in g-st.
Rows 24 to 39: Join on A and work 16 rows in st-st in stripes carrying yarn loosely up side of work and begin with a k row, work 2 rows in A then 2 rows in H and repeat this.
Continue in stripes pattern as set and decrease:
Row 40: (K2tog, k4) to end (60 sts).
Rows 41 to 45: Begin with a p row, work 5 rows in stripes.
Row 46: (K2tog, k2) to end (45 sts).
Row 47: Purl.
Row 48: (K2tog, k1) to end (30 sts).
Row 49: Purl.
Cast off in A.
Skirt for Wolf in Granny’s Clothing
Begin at lower edge using the thumb method and G, cast on 72 sts, WS facing to begin.
Rows 1 to 10: Begin with a p row, work 10 rows in st-st, ending with a RS row (this part is turned under).
Row 11 (picot edge): P1, k1, (yrn, k2tog) to end.
Rows 12 and 13: K 1 row then p 1 row.
Change to I and join on C and work in stripes carrying yarn loosely up side of work.
Rows 14 and 15: Using B, work 2 rows in g-st.
Rows 16 and 17: Using F, k 1 row then p 1 row.
Rows 18 to 21: Repeat rows 14 to 17 once.
Rows 22 and 23: Using B, work 2 rows in g-st.
Rows 24 to 37: Continue in F and begin with a k row, work 14 rows in st-st.
Row 38: (K2tog, k4) to end (60 sts).
Rows 39 to 43: Begin with a p row, work 5 rows in st-st.
Row 44: (K2tog, k2) to end (45 sts).
Row 45: Purl.
Row 46: (K2tog, k1) to end (30 sts).
Row 47: Purl.
Cast off.
Sleeves, Cuffs and Hands for Little Red Riding Hood (make 2)
Begin at shoulder using the thumb method and H, cast on 10 sts.
Row 1 (WS): Purl.
Row 2: K1, (m1, k2) to last st, m1, k1 (15 sts).
Rows 3 to 15: Begin with a p row, work 13 rows in st-st.
Change to A for cuff and decrease:
Row 16: (K2tog, k3) to end (12 sts).
Row 17: Knit.
Rows 18 to 21: Change to B for hand and begin with a k row, work 4 rows in st-st.
Row 22: (K2tog, k1) to end (8 sts).
Thread yarn through sts on needle, pull tight and secure by threading yarn a second time through sts.
Sleeves and Paws for Wolf in Granny’s Clothing (make 2)
Begin at shoulder using the thumb method and I, cast on 10 sts.
Row 1 (WS): Purl.
Row 2: K1, (m1, k2) to last st, m1, k1 (15 sts).
Rows 3 to 11: Begin with a p row, work 9 rows in st-st.
Row 12: (K2tog, k3) to end (12 sts)
Rows 13 to 19: Change to F for paw and begin with a p row, work 7 rows in st-st.
Row 20: (K2tog, k1) to end (8 sts).
Thread yarn through sts on needle, pull tight and secure by threading yarn a second time through sts.
Sleeve Frills for Wolf in Granny’s Clothing (make 2)
Begin at inside edge of frill and using the thumb method and G, cast on 16 sts, WS facing to begin.
Rows 1 and 2: P 1 row then k 1 row (this part is turned under).
Row 3 (picot edge): P1, k1, (yrn, k2tog) to end.
Rows 4 and 5: K 1 row then p 1 row.
Row 6: Change to C and k 1 row.
Cast off kwise.
Hair for Little Red Riding Hood (make 2)
Begin at lower edge using the thumb method and J, cast on 14 sts and work in g-st.
Row 1 (RS): Knit.
Row 2: K2, (m1, k2) to end (20 sts).
Row 3: Knit.
Row 4: K1, m1, k to last st, m1, k1 (22 sts).
Rows 5 to 18: Repeat rows 3 and 4, 7 times more (36 sts).
Row 19: K2, k2tog, (k4, k2tog) to last 2 sts, k2 (30 sts).
Row 20 and following 2 alternate rows: Knit.
Row 21: (K2tog, k3) 3 times, (k3, k2tog) 3 times (24 sts).
Row 23: (K2tog, k1) 4 times, (k1, k2tog) 4 times (16 sts).
Row 25: (K2tog) to end (8 sts).
Row 26: Knit.
Thread yarn through sts on needle, pull tight and secure by threading yarn a second time through sts.
Collar for Little Red Riding Hood
Using the thumb method and H, cast on 26 sts and work in g-st.
Row 1 (RS): K2tog, k5, turn.
Row 2: S1k, k to end (25 sts).
Row 3: K4, turn.
Row 4: S1k, k to end.
Row 5: K across all sts.
Rows 6 to 9: Repeat rows 1 to 4 once (24 sts).
Cast off in g-st.
Cloak and Hood for Little Red Riding Hood
Begin at lower edge of cloak using the thumb method and H, cast on 76 sts and begin in g-st, RS facing to begin.
Rows 1 to 6: Work 6 rows in g-st.
Row 7: Knit.
Row 8: K4, p to last 4 sts, k4.
Rows 9 to 12: Repeat rows 7 and 8 twice more.
Row 13: K14, (k2tog, k4) 4 times, (k4, k2tog) 4 times, k14 (68 sts).
Row 14: As row 8.
Row 15: Knit.
Row 16: As row 8.
Row 17: K10, (k2tog, k2) 6 times, (k2, k2tog) 6 times, k10 (56 sts).
Row 18: As row 8.
Divide for armholes:
Row 19: K13, cast off 2 sts, k25, cast off 2 sts, k to end (52 sts).
Work left side:
Row 20: K4, p8, k1, turn and work on these 13 sts.
Row 21: Knit.
Row 22: K4, p8, k1.
Rows 23 to 32: Repeat rows 21 and 22, 5 times more.
Break yarn and rejoin to remaining sts.
Work back:
Row 33: K1, p24, k1, turn and work on these 26 sts.
Row 34: K2, (k2tog, k2) to end (20 sts).
Row 35: K1, p18, k1.
Row 36: Knit.
Rows 37 to 45: Repeat rows 35 and 36, 4 times more then row 35 once.
Break yarn and rejoin to remaining sts.
Work right side:
Row 46: K1, p8, k4 (13 sts).
Row 47: Knit.
Rows 48 to 58: Repeat rows 46 and 47, 5 times more then row 46 once.
Row 59: Push stitches together and k12, k2tog, k18, k2tog, k to end (44 sts).
Row 60: K4, p to last 4 sts, k4.
Row 61: K3, (k2tog, k1) to last 2 sts, k2 (31 sts).
Cast off in pattern.
Hood
Begin at face edging using the thumb method and H, cast on 32 sts and begin in g-st, RS facing to begin.
Rows 1 to 5: Work 5 rows in g-st ending with a RS row.
Row 6: P2, (m1, p4) to last 2 sts, m1, p2 (40 sts).
Row 7: K35, turn.
Row 8: S1p, p29, turn.
Row 9: S1k, k to end.
Row 10: Purl.
Rows 11 to 14: Repeat rows 7 to 10 once.
Rows 15 and 16: Work 2 rows in st-st.
Row 17: K18, (m1, k1) twice, (k1, m1) twice, k to end (44 sts).
Rows 18 to 20: Begin with a p row, work 3 rows in st-st.
Cast off.
Mob Cap for Wolf in Granny’s Clothing
Using the thumb method and G, cast on 24 sts.
Row 1 (WS): Purl.
Row 2: (K1, m1, k1, m1, k1) to end (40 sts).
Rows 3 to 7: Begin with a p row, work 5 rows in st-st.
Row 8: (K2tog, k2) to end (30 sts).
Row 9 and following alternate row: Purl.
Row 10: (K2tog, k1) to end (20 sts).
Row 12: (K2tog) to end (10 sts).
Thread yarn through stitches on needle, pull tight and secure by threading yarn a second time through sts.
Frill
Using the thumb method and G, cast on 68 sts and work in g-st.
Row 1 (RS): Knit.
Row 2: (K2tog) to end (34 sts).
Cast off in g-st.
Ears for Wolf in Granny’s Clothing (make 2)
Using the thumb method and F, cast on 8 sts, WS facing to begin.
Rows 1 to 3: Begin with a p row, work 3 rows in st-st.
Row 4: (K2tog) to end (4 sts).
Row 5: Purl.
Thread yarn through sts on needle, pull tight and secure by threading yarn a second time through sts.
Neck Frill for Wolf in Granny’s Clothing
Using the thumb method and C, cast on 39 sts.
Row 1 (RS): (K2tog, k1) to end (26 sts).
Cast off kwise.
Making Up
Note: Sew up all row-end seams on right side using mattress stitch one stitch in from the edge, unless otherwise stated; a one-stitch seam allowance has been allowed for this.
Bodice and Head for Little Red Riding Hood and Bodice for Wolf in Granny’s Clothing
Sew up row ends of bodice and head for Little Red Riding Hood and stuff. Sew up row ends of bodice for Wolf and stuff. Place lower edges of both bodices together matching seams and oversew cast-on stitches leaving a gap. Add more stuffing to waist and sew up gap. To shape neck for Little Red Riding Hood, take a double length of royal blue yarn and sew a running stitch round last row of body at neck, sewing in and out of every half stitch. Pull tight and knot yarn and sew ends into neck.
Head for Wolf in Granny’s Clothing
Weave in loose ends around intarsia. Sew up row ends leaving a gap in middle, stuff head pushing stuffing into nose and sew up gap. Pin and sew head to neck of bodice by taking a small horizontal stitch from head, then a small horizontal stitch from bodice, and do this alternately all the way round.
Skirt
Sew up row ends of both skirts and turn under lower edge and hem cast-on stitches to last row of border on wrong side. Place one skirt on doll over head and with seam at centre back sew cast-off stitches at waist to first row of bodice. Turn doll the other way up and pull skirt down to lower edge and place second skirt on doll over head. With seam at centre back sew cast-off stitches at waist to first row of bodice.
Sleeves, Cuffs and Hands for Little Red Riding Hood
Sew up row ends of hands and place a small ball of stuffing into hands. Sew up row ends of cuffs and sleeves from wrist to ½in (13mm) below shoulder. Stuff sleeves and finish sewing up row ends. With seam at centre of inside edge, sew across cast-on stitches. Sew cast-on stitches of arms to third row below neck at each side by oversewing, so that the arms are ‘hinged’ and can fall below head.
Arms, Paws and Sleeve Frills for Wolf in Granny’s Clothing
Sew up row ends of paws and sleeves from paw to ½in (13mm) below shoulder. Stuff paws and sleeves and finish sewing up row ends. With seam at centre of inside edge, sew across cast-on stitches. Fold picot edge of sleeve frills under and sew in place. Place sleeve frills around last row of arms at wrists and sew up row ends. Sew cast-off stitches of sleeve frills to wrist using back stitch on right side. Sew cast-on stitches of arms to third row below neck at each side by oversewing, so that the arms are ‘hinged’ and can fall below head.
Features
Embroider features for Little Red Riding hood, as follows: Mark position of eyes with two pins on 7th row above neck spacing two knitted stitches apart. Embroider eyes in black (see instructions below for how to begin and fasten off the embroidery invisibly) and make a small chain stitch beginning at marked position and ending on row above, and work a second chain stitch on top of first. Embroider mouth in red making a shallow ‘V’ shape on the 3rd and 4th rows below eyes over two stitches. Embroider nose in pale pink on row below eyes making a bundle of five stitches over one stitch. Shade cheeks with a red pencil.
Embroider two eyes in black for Wolf in Granny’s Clothing, making a small chain stitch for each eye and a second chain stitch on top of first (see instructions below for how to begin and fasten off the embroidery invisibly).
Hair and Plaits for Little Red Riding Hood
Sew up hair and make two plaits using dark brown. Oversew row ends of decreasing rows of hair pieces from crown to forehead. Place hair on head and pull down to neck at back. Pin and sew outside edge of hair to head using back stitch all the way round.
Collar for Little Red Riding Hood
Place collar around neck and sew together beneath chin. Sew collar to neck all the way round and sew points of collar to chest and sew all edges of collar down.
Cloak, Hood and Bow for Little Red Riding Hood
Note: Cloak is removable.
Fold cast-off stitches of hood in half and oversew. Sew lower edge of hood to cast-off stitches of cloak behind borders, all the way round. To make bow, make a twisted cord out of two strands of red yarn beginning with the yarn 36in (90cm) long. Tie a small bow at centre and stitch this bow to right side of cloak beneath chin and sew through knot to secure. Knot and trim ends of bow to ½in (13mm). Sew a snap fastener to fasten cloak using sewing needle and thread.
Mob Cap and Ears for Wolf in Granny’s Clothing
Sew up row ends of mob cap and stuff. Pin and sew mob cap to top of Wolf’s head. Sew up row ends of ears and with this seam at centre back, sew ears to head in front of mob cap. Place frill around mob cap taking frill in front of ears and oversew row ends. Sew cast-off stitches of frill around lower edge of mob cap.
Neck Frill for Wolf in Granny’s Clothing
Place neck frill around neck and sew up row ends. Sew cast-off stitches of frill to neck all the way round.
Basket
Using the thumb method and K, cast on 48 sts and begin in rev st-st, RS facing to begin.
Rows 1 to 5: Begin with a p row, work 5 rows in rev st-st.
Rows 6 and 7: Work 2 rows in g-st.
Row 8: (K3, p3) to end.
Row 9: As row 8.
Row 10: (P3, k3) to end.
Row 11: As row 10.
Rows 12 to 17: Repeat rows 8 to 11 once, then rows 8 and 9 once.
Row 18: (K2tog, k2) to end (36 sts).
Row 19: Knit.
Rows 20 and 21: P 2 rows.
Row 22: *(K1, k2tog) twice, k6, (k2tog, k1) twice; repeat from * once (28 sts).
Row 23: Purl.
Row 24: *(K1, k2tog) twice, k2, (k2tog, k1) twice; repeat from * once (20 sts).
Cast off pwise.
Top of Basket
Using the thumb method and K, cast on 48 sts, WS facing to begin.
Rows 1 to 3: Begin with a p row, work 3 rows in st-st.
Row 4: *(K1, k2tog) twice, k12, (k2tog, k1) twice; repeat from * once (40 sts).
Row 5 and following alternate row: Purl.
Row 6: *(K1, k2tog) twice, k8, (k2tog, k1) twice; repeat from * once (32 sts).
Row 8: *(K1, k2tog) twice, k4, (k2tog, k1) twice; repeat from * once (24 sts).
Cast off pwise.
Handle
Using the thumb method and K, cast on 30 sts, WS facing to begin.
Rows 1 to 5: Begin with a p row, work 5 rows in st-st.
Cast off.
Cloth
Using the thumb method, 3.25mm needles and L, cast on 22 sts. Change to 4mm needles and join on G and H and work in Fair Isle (see instructions below), carrying non-working yarn loosely across back of work.
Row 1 (RS): L-k2, (G-k2, L-k2) to end.
Row 2: L-p2, (G-p2, L-p2) to end.
Row 3: H-k2, (L-k2, H-k2) to end.
Row 4: H-p2, (L-p2, H-p2) to end.
Rows 5 to 14: Repeat rows 1 to 4 twice more, then rows 1 and 2 once.
Row 15: Change to 3.25mm needles and continue in L and k 1 row.
Cast off kwise in L.
Flowers
Make 6 flowers, 3 in each of M and N.
Using the thumb method and M or N, cast on 9 sts.
Thread yarn through sts on needle, pull tight and secure by threading yarn a second time through sts.
Making Up
Basket
Fold cast-off stitches of basket in half and oversew, then oversew row ends. Fold rim of basket to the outside and hem cast-on stitches in place. Fold cast-off stitches of the top of the basket in half and oversew, and sew up row ends of the top of the basket. Stuff the basket and sew the top of the basket to the base of the rim on the inside edge. To make handle, take two chenille stems and twist them together and cut to the length of handle. Place chenille stems on the wrong side of handle and oversew cast-on and cast-off stitches of handle along the length enclosing chenille stems inside. Gather around each end of handle, pull tight and secure. Using the picture as a guide, bend handle and sew to basket. Weave in loose ends of cloth and sew cloth to basket.
Flowers
Sew together row ends of cast-on stitches of each flower. Make stems of flowers taking lengths of green yarn approximately 10in (25cm) long and tie to the underside of flowers in the middle. Place stems in a bundle and tie a knot ¾in (2cm) from flower heads. Trim ends of stems. Sew flowers to cloth on basket.
Fair Isle Instructions
Fair Isle knitting is used for small areas of colour. It uses the stranding technique, which involves picking up and dropping yarns as they are needed and carrying the non-working yarns along the wrong side of the row. These yarns must be carried loosely to avoid puckering.
Start knitting with the main colour (A), which is dropped when you need to change to the second colour (B). To pick up A again, bring A under B and knit again. To pick up B again, drop A and bring B over A and knit again.
On the purl side, the same principle applies: start purling in A and carry B loosely across the back and under A and purl the next stitch. To pick up A again, bring A over B and purl the next stitch.
Intarsia Instructions
Larger blocks of colour can be worked using the intarsia technique. Twist the two different yarns together at the back of the work with each colour change to prevent holes from appearing. Once finished, weave in ends at the back of the work.
Embroidering Features
To begin embroidery invisibly, tie a knot in the end of the yarn. Take a large stitch through the work, coming up to begin the embroidery. Allow the knot to disappear through the knitting and be caught in the stuffing.
To fasten off invisibly, sew a few stitches back and forth through the work, inserting the needle where the yarn comes out.


