

Crochet Bunny Lily Amigurumi — Full Pattern & Step-by-Step Instructions

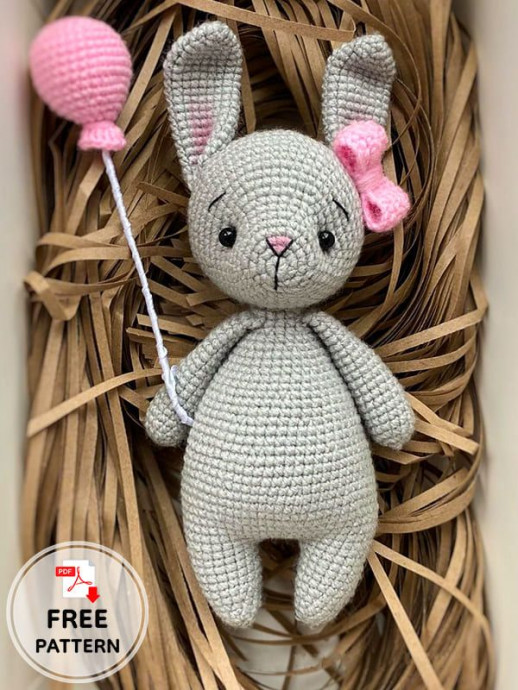
Meet Crochet Bunny Lily Amigurumi: a charming, pastel-toned handmade bunny with floppy ears, a cute tail, a removable bow and a tiny balloon. This pattern provides a complete materials list, abbreviations and step-by-step crocheting instructions for each part (arms, tail, legs, body, ears, head), plus finishing tips for assembling and adding facial details.
Below you’ll find the full pattern and notes to help you assemble and finish Lily. Follow each section in order and keep a long tail of yarn where noted for sewing pieces together. Use the dry pastel or pink pencil sparingly to tint the nose and inner ears for a soft, finished look.
The Crochet Bunny Lily Amigurumi is a delightful creation full of charm and cuteness. With its soft, pastel-colored yarn and intricate stitches, this little bunny will bring a smile to anyone's face. Its floppy ears and adorable tail make it a perfect companion for both children and adults who appreciate handmade treasures. Whether as a gift for a friend or a charming addition to your own collection, Crochet Bunny Lily Amigurumi is sure to warm hearts and spread joy wherever it goes.
Necessary Materials
1. YarnArt Baby N°195 grey, just under one skein.
2. YarnArt Baby N°217 pink, for bow and balloon.
3. Black thread for embroidering the nose and eyebrows.
4. Sew-on eyes beads 5mm.
5. Hook 2mm.
6. Filler.
7. Wire 20cm, for a ball.
8. White ribbon, for winding the wire.
9. Glue.
10. Needle for sewing on details.
11. Dry pastel or pink pencil to tint the nose and ears.
Abbreviations
MR: Magic ring
Ch: Chain
Sc: Single crochet
Inc: Increase
Dec: Decrease
Dc: Double crochet
Arms
(Make 2)
1. 6 sc in MR.
2. 6 inc (12).
3. (3 sc + inc)*3 (15).
4-19. 15 sc (16 rows).
20. Fold the handles in half and crochet 7 sc for both walls. Cut the thread and fasten off. Tie the second handle.
Tail
1. 5 sc in MR.
2. 5 inc (10).
3. 10 sc.
4. Fold the tail in half and crochet 5 sc for both walls.
Cut the thread and fasten off.
Legs
(Make 2)
1. 6 sc in MR.
2. (1 sc + inc)*3 (9)
3. (2 sc + inc)*3 (12)
4. 12 sc.
5. (3 sc + inc)*3 (15)
6. (4 sc + inc)*3 (18)
7-10. 18 sc (4 rows).
We cut the thread on the first leg. We crochet the second leg, we do not cut the thread. We continue to crochet the body.
Body
11. 6 ch, 18 sc along the first leg, 6 sc along the chain ch, 18 sc along the second leg, 6 sc along the chain ch (54).
Change the marker.
12. 8 sc, inc, 12 sc, inc, 12 sc, inc, 10 sc, inc, 2 sc (52).
13. 52 sc.
14. 10 sc, inc, 12 sc, inc, 12 sc, inc, 12 sc, inc, 2 sc (56).
15-16. 56 sc (2 rows).
17. (7 sc + inc)*7 (63). In this row we knit a ponytail.
18-20. 63 sc (3 rows).
21. (7 sc + dec)*7 (56).
22-24. 56 sc (3 rows).
25. (6 sc + dec)*7 (49).
26-27. 49 sc (2 rows).
28. (5 sc + dec)*7 (42).
29-30. 42 sc (2 rows).
31. (5 sc + dec)*6 (36).
32-33. 36 sc (2 rows).
34. (4 sc + dec)*6 (30).
35-36. 30 sc (2 rows).
37. (3 sc + dec)*6 (24).
38. 24 sc.
39. (2 sc + dec)*6 (18).
40. 18 sc. In this row we knit handles.
41. 18 sc.
Cut the thread, leave a long end for sewing on the head.
Ears
1. 6 sc in MR.
2. (1 sc + inc)*3 (9)
3. (2 sc + inc)*3 (12)
4. (3 sc + inc)*3 (15)
5. (4 sc + inc)*3 (18)
6-20. 18 sc (15 rows)
21. Fold the ear in half and crochet 8 sc for both walls.
22. Fold in half again and crochet 3 sc. Cut the thread and leave a long end for sewing.
Head
1. 6 sc in MR.
2. 6 inc (12).
3. (1 sc + inc)*6 (18).
4. (2 sc + inc)*6 (24).
5. 24 sc.
6. (3 sc + inc)*6 (30).
7. 30 sc.
8. (4 sc + inc)*6 (36).
9. 12 sc, (1 sc + inc)*6, 12 sc (42).
10. (6 sc + inc)*6 (48).
11. 48 sc.
12. (7 sc + inc)*6 (54).
13. 54 sc.
14. (8 sc + inc)*6 (60).
15. (9 sc + inc)*6 (66).
16-18. 66 sc (3 rows).
19. (9 sc + dec)*6 (60).
20. (8 sc + dec)*6 (54).
21. (7 sc + dec)*6 (48).
22. (6 sc + dec)*6 (42).
23. (5 sc + dec)*6 (36).
24. (4 sc + dec)*6 (30).
25. (3 sc + dec)*6 (24).
26. (2 sc + dec)*6 (18).
27. (1 sc + dec)*6 (12).
28. 6 dec (6).
Cut the thread, finish crocheting.
Making the Muzzle
We make a tightening for the eye and sew the eyes between the 8th and 9th rows. The distance between the eyes is 12 sc.
We embroider a spout with a black thread, we focus on 3-4 rows. We tint with pink dry pastel or pink pencil. Eyebrows are embroidered with black thread 3 rows above the eye.
Bow
We take a pink thread and begin to knit a bow in rotary rows.
1. We make 27 ch, in the 2nd loop from the hook we knit: 26 sc, 1 ch, turn (26).
2-4. 26 sc, ch 1, turn (3 rows).
We fold the bow with the right side to each other and tie with connecting loops. We leave the long end of the thread for winding the middle and sewing.
Sew to the ear or head.
Ball
We take a wire of 20 cm, bend it from above in order to insert it into the ball. And from below we make a loop in order to put on the handle. Using glue, wrap the wire with a ribbon or thread.
1. 6 sc in MR.
2. 6 inc (12).
3. (1 sc + inc)*6 (18).
4. (2 sc + inc)*6 (24).
5. (3 sc + inc)*6 (30).
6-10. 30 sc (5 rows).
11. (3 sc + dec)*6 (24)
12. 24 sc.
13. (2 sc + dec)*6 (18)
14. 18 sc
We fill a little with filler. We take the wire, grease the bent end with glue and insert it into the ball. Add filler immediately.
15. (1 sc + dec)*6 (12).
16. 12 sc.
17. 6 dec (6).
18. 2 ch, 6 inc, dc (12).
Cut the thread and fasten off.
Finishing tips: sew all parts securely, weave in ends, and use the long yarn tails left on pieces to position and attach ears, arms and tail before final stitching. Tint the nose and inner ears with dry pastel or pink pencil for a gentle blush. If using wire in the balloon, secure the wire end with glue and wrap with ribbon to prevent the yarn from sliding.