

Crochet a Beautiful Rooster: Complete Amigurumi Pattern & Step-by-Step Instructions

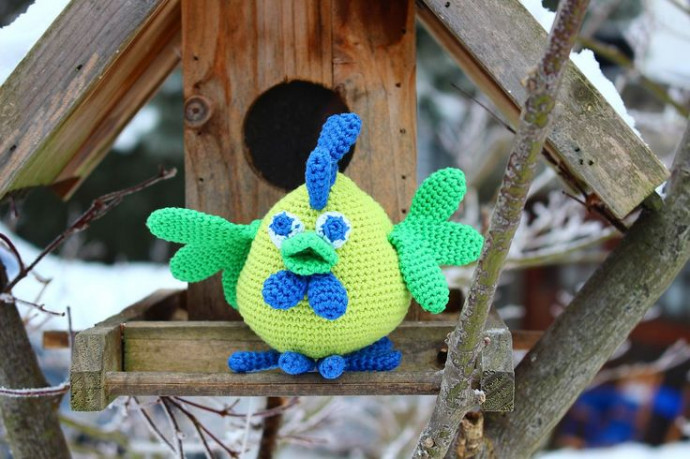
Create a charming crochet rooster with this complete amigurumi pattern. The instructions below guide you through making the head, body, wings, beak, coxcomb, eyes and feet, then assembling the finished piece. Use the suggested materials and follow the round-by-round directions for a neat, professional-looking result. Take your time stuffing and sewing pieces together for best shape.
Crocheting a beautiful rooster can be such a delightful and rewarding project! Imagine how charming and unique it would look with its vibrant colors and intricate details. You can bring this whimsical creation to life using your skillful crocheting techniques and a touch of creativity. As you work on each stitch, let your imagination soar and enjoy the process of crafting something truly special. Your finished rooster will surely add a touch of warmth and character to any space it graces. Happy crocheting!
Materials
Schachenmayr Catania 50 g/137 yds, Sport Yarn, 5ply in 3 colours, a bit of white, crochet hook C, and polyester fiber fill stuffing.
Abbreviations
- Ch = chain
- St = stitch
- Sc = single crochet
- Sl st = slip stitch
- Dec = decrease stitch (two single crochets together)
- Inc = increase stitch (two single crochets into one stitch)
- Rnd = Round
Instructions
Head and Body
RND 1: 6 sc into Magic Ring.
RND 2: inc 6 times (12 sts).
RND 3: *sc in next st, inc* (18 sts).
RND 4: *sc in each of next 2 sts, inc* (24 sts).
RND 5: *sc in each of next 3 sts, inc* (30 sts).
RND 6: *sc in each of next 4 sts, inc* (36 sts).
RND 7: *sc in each of next 5 sts, inc* (42 sts).
RND 8: *sc in each of next 6 sts, inc* (48 sts).
RND 9: sc in each of next 6 sts, *sc in next st, inc* 6 times, sc in each of next 12 sts, *sc in next st, inc* 6 times, sc in each of next 6 sts (60 sts).
RND 10-11: sc in each of next 60 sts.
RND 12: sc in each of next 6 sts, *sc in each of next 2 sts, inc* 6 times, sc in each of next 12 sts, *sc in each of next 2 sts, inc* 6 times, sc in each of next 6 sts (72 sts).
RND 13-17: sc in each of next 72 sts.
RND 18: *dec, sc in each of next 4 sts* (60 sts).
RND 19-22: sc in each of next 60 sts.
RND 23: *dec, sc in each of next 8 sts* (54 sts).
RND 24-25: sc in each of next 54 sts.
RND 26: *dec, sc in each of next 7 sts* (48 sts).
RND 27: sc in each of next 48 sts.
RND 28: *dec, sc in each of next 6 sts* (42 sts).
RND 29: *dec, sc in each of next 5 sts* (36 sts).
RND 30: *dec, sc in each of next 4 sts* (30 sts).
RND 31: sc in each of next 30 sts.
RND 32: *dec, sc in each of next 3 sts* (24 sts).
Stuff the body.
RND 33: *dec, sc in each of next 2 sts* (18 sts).
RND 34: *dec, sc in next st* (12 sts).
RND 35: *dec*.
Cast off.
Wings (2x)
3 tips of the wing:
RND 1: 6 sc into Magic Ring.
RND 2: *sc in next st, inc* (9 sts).
RND 3: *sc in each of next 2 sts, inc* (12 sts).
RND 4-6: sc in each of next 12 sts.
Cast off. Third tip don’t cast off.
RND 7: crochet one Rnd over all tips of the wing (36 sts).
RND 8: sc in each of next 36 sts.
RND 9: *dec, sc in each of next 4 sts* (30 sts).
RND 10: *dec, sc in each of next 3 sts* (24 sts).
RND 11: *dec, sc in each of next 2 sts* (18 sts).
RND 12: *dec, sc in next st* (12 sts).
RND 13-14: sc in each of next 12 sts.
Cast off leaving a long tail for sewing.
Beak
RND 1: 6 sc into Magic Ring.
RND 2: *sc in next st, inc* (9 sts).
RND 3: *sc in each of next 2 sts, inc* (12 sts).
RND 4: sc in each of next 12 sts.
RND 5: *sc in next st, inc* (18 sts).
RND 6: *sc in each of next 3 sts, inc, sc in next st, inc, sc in each of next 2 sts, inc* (24 sts).
RND 7: sc in each of next 24 sts.
Cast off leaving a long tail for sewing.
Lower Beak
RND 1: 6 sc into Magic Ring.
RND 2: *sc in next st, inc* (9 sts).
RND 3: *sc in each of next 2 sts, inc* (12 sts).
RND 4: *sc in next st, inc* (18 sts).
Cast off.
Coxcomb
3 tips:
RND 1: 6 sc into Magic Ring.
RND 2: *sc in next st, inc* (9 sts).
RND 3: *sc in each of next 2 sts, inc* (12 sts).
RND 4-6: sc in each of next 12 sts.
Cast off. Third tip don’t cast off.
RND 7: crochet one Rnd over all tips of the wing (36 sts).
RND 8: sc in each of next 36 sts.
RND 9: *dec, sc in each of next 4 sts* (30 sts).
RND 10: *dec, sc in each of next 3 sts* (24 sts).
Cast off leaving a long tail for sewing.
RND 1: 6 sc into Magic Ring.
RND 2: inc 6 times (12 sts).
RND 3-4: sc in each of next 12 sts.
RND 5: *dec*.
RND 6: sc in each of next 12 sts.
Cast off leaving a long tail for sewing.
Eyes (2x)
RND 1: 6 sc into Magic Ring.
Change colour.
RND 2: inc 6 times (12 sts).
RND 3-4: sc in each of next 12 sts.
Cast off leaving a long tail.
Feet (2x)
Fingers (3x):
RND 1: 6 sc into Magic Ring.
RND 2-6: sc in each of next 6 sts.
RND 7: crochet one Rnd over all tips of the feet (18 sts).
RND 8: *dec, sc in next st* (12 sts).
Cast off leaving a long tail.
Assembly
Sew beak and eyes on the head-body.
Sew feet on the bottom side of the body.
Sew wings on the sides of the body and coxcomb on top of the rooster.
Finishing Tips
Use polyester fiber fill to stuff parts firmly but not overstuffed so seams remain neat. Weave in ends securely and use the long tails left on pieces to sew them on with matching yarn. For safety around children, consider embroidering eyes instead of using small safety parts. Adjust yarn colors to personalize your rooster—lighter stuffing and tighter tension will produce a firmer, smaller amigurumi.