

Adorable Crochet Cat Toys: Easy Amigurumi Pattern & Step‑by‑Step Guide

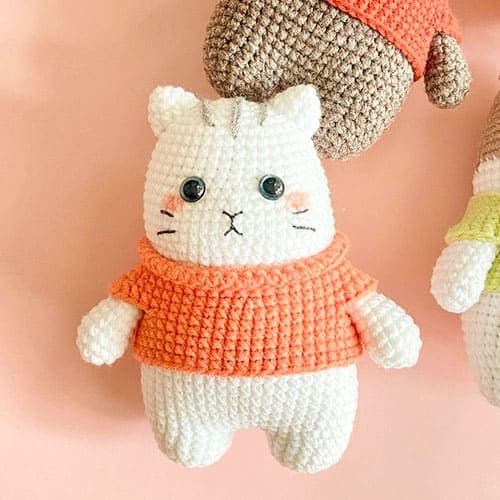
Make a cuddly amigurumi cat toy for your feline friend or as a sweet handmade gift. This pattern walks through the pieces you’ll crochet (legs, body/head, ears, arms and a removable shirt) and includes materials, abbreviations and assembly tips. Use sport or DK yarn for a small, sturdy toy; adjusting yarn weight or hook size will change the finished size. Follow the stitch counts below and stuff firmly for a durable playmate.
Crochet Cat Toys Amigurumi
Crochet cat toys amigurumi are the purr-fect way to keep your feline friend entertained and happy! These cute and colorful toys are not only delightful to look at but also provide endless fun for your beloved furry companion. Whether it's a tiny mouse, a bouncy ball, or a cozy catnip-filled creature, amigurumi cat toys are sure to be a hit with your cat. Handcrafted with love and attention to detail, these toys are great for encouraging exercise, mental stimulation, and bonding moments between you and your kitty. So grab your crochet hook, let your creativity run wild, and treat your whiskered friend to some meow-velous entertainment!
Materials
- Yarn: sport or DK. Thicker or thinner yarn yields larger or smaller products.
- Crochet hook: 2.0-2.5mm for DK or sport weight yarn.
- Black safety eyes size 6-7mm (or embroider eyes for toys for kittens).
- Black yarn or black embroidery thread for decorating.
- Fiberfill.
- Yarn needle.
- Stitch marker (if you need).
Abbreviations
- MR - magic ring
- ch - chain
- slst - Slip Stitch
- sc - single crochet
- inc - increase
- dec - decrease
- hdc - half double crochet
- hdc inc - half double crochet increase (2 hdc in one stitch)
- dc - double crochet
- BLO - Back loop only
- FLO - Front loop only
- st(s) = stitch(es)
- Rnd - round
Leg (x2)
Use white yarn.
Rnd 1: 6sc in MR (6)
Rnd 2: 6 inc (12)
Rnd 3: (2sc, inc)*4 (16)
Rnd 4-5: (2 rnds) 16sc (16)
Cut the yarn. Crochet leg 2 in the same way till round 5.
Do not cut the yarn, make 2 chains and join to leg 1 and keep going onto the body. Now you have a total of 36 stitches (16sc on first leg, 2 chains both sides, 16sc on second leg).
Body & Head
Use white yarn.
Rnd 1: (5sc, inc)*6 (42)
Rnd 2: (6sc, inc)*6 (48)
Rnd 3-10: (8 rnds) 48sc (48)
Rnd 11: (6sc, dec)*6 (42)
Rnd 12-16: (5 rnds) 42sc (42)
Rnd 17: 8sc, dec, (9sc, dec)*2, 8sc, dec (38)
Rnd 18: 38sc (38)
Rnd 19: 9sc, inc, (2sc, inc)*6, 10sc (45)
Rnd 20: 45sc (45)
Rnd 21: 17sc, inc, (3sc, inc)*2, 19sc (48)
Rnd 22-24: (3 rnds) 48sc (48)
Rnd 25: 17sc, dec, (4sc, dec)*2, 17sc (45)
Rnd 26: 17sc, dec, (3sc, dec)*2, 16sc (42)
Rnd 27: 20sc, dec, 20sc (41)
Rnd 28: (8sc, dec)*3, 9sc, dec (37)
Rnd 29: (4sc, dec)*5, 5sc, dec (31)
Rnd 30: (3sc, dec)*5, 4sc, dec (25)
Rnd 31: (2sc, dec)*5, 3sc, dec (19)
Rnd 32: (sc, dec)*5, 2sc, dec (13)
Rnd 33: 6 dec, sc (7)
Stuff the body tight with fiberfill.
Cut the yarn, leaving a long tail. Thread a needle with your yarn tail and close the remaining gap.
Ears (x2)
Use white yarn.
Rnd 1: 4sc in MR (4)
Rnd 2: 4 inc (8)
Rnd 3: (3sc, inc)*2 (10)
Rnd 4: (4sc, inc)*2 (12)
Rnd 5: (5sc, inc)*2, slst (14)
Cut the yarn. Leave a long tail for sewing.
Arms (x2)
Use white yarn.
Rnd 1: 6sc in MR (6)
Rnd 2: (sc, inc)*3 (9)
Rnd 3: (2sc, inc)*3 (12)
Rnd 4-9: (6 rnds) 12sc (12)
Rnd 10: (2sc, dec)*3, slst (9)
Cut the yarn. Leave a long tail for sewing.
Shirt
Rnd 1: ch 48, insert your hook into the first chain to make a circle, 48sc (48)
Rnd 2-4: (3 rnds) 48sc (48)
Rnd 5: (11sc, inc)*4 (52)
Rnd 6: 8sc, 8 hdc, 18sc, 8hdc, 10sc (52)
Rnd 7: 8sc, ch 8, skip 8 sts, 18sc, ch 8, skip 8 sts, 10sc (52)
Rnd 8-12: (5 rnds) 52sc (53)
Cut the yarn. Hide your yarn tail.
Assembly & Finishing Tips
- Sew ears, arms and shirt onto the body with long tails and a yarn needle. Use small, tight stitches to secure pieces firmly.
- Insert safety eyes between rounds where the head is still slightly open, before you stuff fully. If the toy is for a kitten or you are concerned about safety, embroider the eyes instead of using safety eyes.
- Stuff firmly with fiberfill so the toy holds up to play; add more stuffing to the head and body for structure.
- If you want a catnip toy, make a small inner pouch (crochet a small circle or use fabric) and fill with dried catnip before placing inside the body before final closing.
Care & Safety
- Check seams and attachments regularly; repair any loose pieces before giving to a pet.
- Hand wash gently and air dry to preserve shape and stuffing. Avoid machine washing if safety eyes are used unless they are firmly secured and rated for laundering.
Customization Ideas
- Change yarn color for different cat breeds or to add stripes and patches.
- Add small embroidered features (nose, whiskers) with black embroidery thread.
- Adjust hook size or yarn weight to make a mini or jumbo version.
Enjoy making this sweet amigurumi cat toy—it's a fun project that yields a delightful, handmade companion for play or décor.