


How to Crochet a Chubby-Cheeked Bunny Amigurumi — Free Step-by-Step Pattern

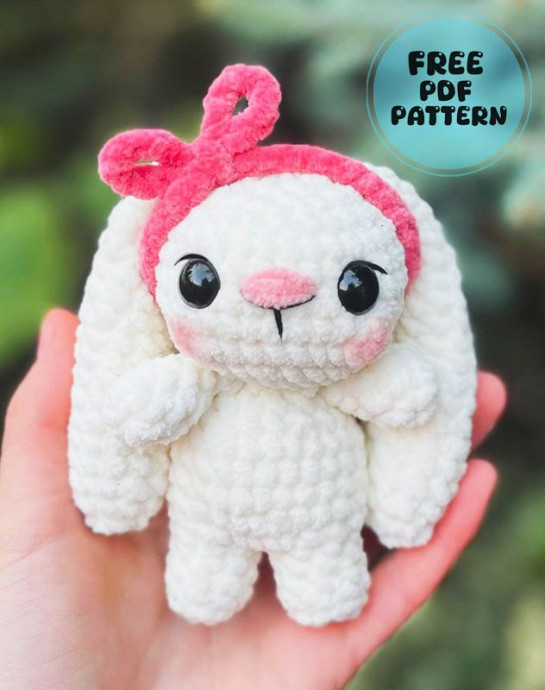
Make this adorable Crochet Chubby Cheeked Bunny Amigurumi for a charming handmade gift or a cozy shelf accent. This pattern walks you through crocheting the ears, arms, legs, body, head and finishing touches (including small bows). It's ideal for crocheters comfortable with basic amigurumi techniques such as magic ring, single crochet, increases and decreases. Use safety eyes for a polished look, or embroider eyes for toys intended for small children.
The Crochet Chubby Cheeked Bunny Amigurumi
The Crochet Chubby Cheeked Bunny Amigurumi is an adorable and cuddly handmade toy perfect for any crochet enthusiast. With its chubby cheeks and fluffy tail, this little bunny is sure to bring smiles and warmth to whoever receives it. The attention to detail in the crochet work gives this amigurumi its charm, making it a delightful gift for both children and adults. Whether displayed as a cute decorative piece or hugged tightly during snuggle time, this bunny is a lovable companion that is bound to steal hearts.
Materials
– 6.5mm hook, Sweet Snuggles Lite Yarn in Winter White
– 7 mm hook, Bernat Blanket Yarn in Vintage White
– Safety Eyes 16mm
– Poly fill, scissors, darning needle
– Pink cotton/acrylic yarn for bows
– 4.25-5mm hook for making the bow
Abbreviations
R – round
MR – magic ring
sc – single crochet
inc – increase
() * # – repeat what’s inside parentheses x number of times
st(s) – stitch(es)
blo – back loop only
flo – front loop only
ch – chain
dec – decrease
hdc – half double crochet
sc3tog – single crochet 3 stitches together (decreasing 3 stitches and turning them into the 1st)
Fo – fasten off
ch – chain
Parts of the Bunny
Ears
make 2
R1: 4sc in MR
R2: inc * 4 (8)
R3: (sc, inc) * 4 (12)
R4-10: 12sc (7 rounds)
R11: (4sc, dec) * 2 (10)
R12-13: 10sc (2 rounds)
R14: (3sc, dec) * 2 (8)
R15-16: 8sc (2 rounds)
R17: (2sc, dec) * 2 (6)
R18-19: 6sc (2 rounds)
Do NOT stuff. Fold in half and sc 3 across both sts. Fo. Leave a short tail.
Arms
make 2
R1: 6sc in MR
R2-5: 6sc (4 rounds)
Stuff lightly. Fold in half and sc 3 across both sts.
Fo. Leave a short tail.
Legs
Leg 1
R1: 8sc in MR
R2: in blo, 8sc (8)
R3-4: in both sts now, 8sc (2 rounds)
Fo. Leave a short tail.
Note:
Tail from legs or a scrap can be used to sew hole between legs closed. ARMS: We will crochet the arms into R12 by inserting hook into the arms sc st and dec on the body.
Leg 2
R1: 8sc in MR
R2: in blo, 8sc (8)
R3-4: in both sts now, 8sc (2 rounds)
DO NOT FO, ch 1. To connect both legs, sc into the 1st leg. This will be the first sc of R5. Continue onto the “body” section.
Body
R5: continue with 7sc, sc into ch, 8sc, sc into ch (18)
R6: (2sc, inc) * 6 (24)
R7-10: 24sc (4 rounds)
R11: (2sc, dec) * 6 (18)
*start stuffing legs and body*
R12: (4sc, dec) * 2, 6sc (16)
R13: dec, 3dec with arm, dec, 3dec with arm (8)
DO NOT FO, continue onto head section…
Head
R14: in flo, inc * 8 (16)
R15: in both sts now, (sc, inc) * 8 (24)
R16: (2sc, inc) * 8 (32)
R17: 14sc, in the next st 3hdc, 7sc, in the next st 3hdc, 9sc (36)
R18: 14sc, sc3tog, 7sc, sc3tog, 9sc (32)
R19-21: 32sc (3 rounds)
R22: (2sc, dec) * 8 (24)
Note:
Depending on your tension, you may have to shift the 3hdc.
The 7sc sts should be in the center of the head.
Eyes
Place eyes between R19-20, 5 sts apart. I like mine a row right above the cheeks!
Ears Attachment
We will crochet the ears into R23 by inserting the hook into the ears sc sts and either se or dec on the body (as instructed).
You may need to shift ears depending on your tension!
R23: sc, dec, sc, attach 1st ear with (dec, sc, dec), (sc, dec) * 3, sc, attach 2nd ear with dec, sc, dec (16)
R24: dec * 8
FO, leaving a long tail to sew hole closed.
Note:
Make sure to size down hook to create bows.
I personally used a 5mm hook!
Bows
make 2
Ch 60.
FO, leave a short tail.
With your darning needle, weave the chain into the sts in front of the outside of the ears or wherever you like best! (Refer to picture below)
Lastly, make your little bows!
Assembly & Finishing
Sew any remaining seams closed using the long tails left on parts. Stuff the head and body firmly but not overstuffed to keep the shape. Attach safety eyes before closing the head; if the toy is for an infant, consider embroidered eyes instead for safety. Weave in all ends neatly and attach the small bows to the ears or wherever you prefer. Use a tail from the legs or a scrap to close the gap between legs if needed.
Tips
- For a tighter fabric that hides stuffing, use a slightly smaller hook or tighter tension for body pieces.
- Lightly stuff limbs before closing so the bunny keeps its chubby shape.
- Adjust ear placement slightly if your tension differs from the pattern writer's; stitch placement can be shifted by a row or one stitch as needed.