

Cute Crochet Amigurumi Miffy Bunny — Free Complete Pattern & Step-by-Step Guide

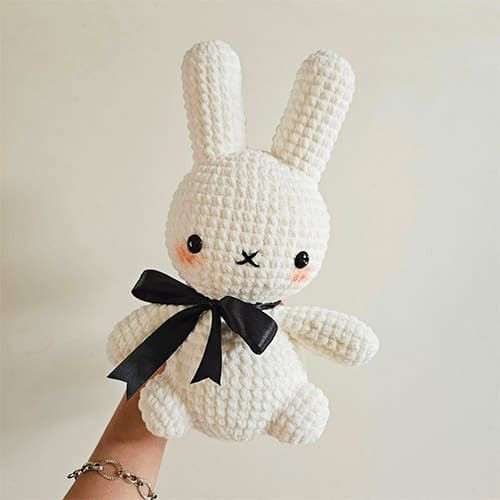
Create an adorable handmade Miffy-style amigurumi bunny with this easy-to-follow crochet pattern. Ideal for beginners through experienced crocheters, this pattern uses basic amigurumi techniques—magic ring, single crochet, increases and decreases—to build a soft, huggable toy. The final toy measures about 9 inches tall when using size 5 yarn and a 6.0mm hook (adjust yarn and hook size to change finished size).
The pattern below includes a full materials list, abbreviations, and step-by-step rounds for the head, ears, body, arms, legs and tail, plus assembly instructions and tips for finishing.
The Crochet Amigurumi Bunny Miffy Toy is an adorable and huggable creation that is sure to bring a smile to anyone's face. With its soft yarn and charming design, this bunny toy is perfect for cuddling or displaying as a cute decoration. Whether you're a seasoned crocheter or just starting out, creating this lovable Miffy toy will surely fill your heart with joy. Make one for yourself or a loved one and spread the happiness with this delightful handmade treasure!
Materials
To create this delightful bunny toy, you will need the following materials:
- Any size yarn in white (I used sweet snuggles, size 6)
- Crochet hook (I used 6.0mm)
- Yarn/darning needle
- Stitch markers
- Scissors
- Polyfill/stuffing
- Black felt or safety eyes (I used 20mm)
- Fabric glue/hot glue
The final size is around 9 inches tall when using size 5 yarn and a 6.0mm hook.
Abbreviations
- R - round
- MR - magic ring
- sc - single crochet
- sts - stitches
- slst - slip stitch
- inc - increase
- dec - decrease
- FO - fasten off
Head
Follow these instructions to create the head:
- R1. 6 sc in MR (6)
- R2. (inc)x6 (12)
- R3. (sc,inc)x6 (18)
- R4. (sc,inc,sc)x6 (24)
- R5. (3sc,inc)x6 (30)
- R6. (2sc,inc,2sc)x6 (36)
- R7. (5sc,inc)x6 (42)
- R8. (3sc,inc,3sc)x6 (48)
- R9-16. sc all around (8 rounds) (48)
- Place safety eyes in R14-15, 8 sts apart. Begin stuffing firmly.
- R17. (3sc,dec,3sc)x6 (42)
- R18. (5sc,dec)x6 (36)
- R19. (2sc,dec,2sc)x6 (30)
- R20. (3sc,dec)x6 (24)
- R21. (sc,dec,sc)x6 (18)
- R22. (sc,dec)x6 (12)
- Finish stuffing.
- R23. (dec)x6 (6)
- FO, close hole with tail.
Ears X2
Instructions for creating the ears:
- R1. 8 sc in a MR (8)
- R2. (inc)x8 (16)
- R3-13. sc all around (11 rounds) (16)
- Slst, FO, stuff firmly, leave long tail for sewing later.
Body
Create the body with these steps:
- R1. 6 sc in MR (6)
- R2. (inc)x6 (12)
- R3. (sc,inc)x6 (18)
- R4. (sc,inc,sc)x6 (24)
- R5. (3sc,inc)x6 (30)
- R6. (2sc,inc,2sc)x6 (36)
- R7. (5sc,inc)x6 (42)
- R8-12. sc all around (5 rounds) (42)
- R13. (5sc,dec)x6 (36)
- Begin stuffing as you go.
- R14. sc all around (1 round) (36)
- R15. (2sc,dec,2sc)x6 (30)
- R16. (3sc,dec)x6 (24)
- R17. sc all around (1 round) (24)
- R18. (sc,dec,sc)x6 (18)
- R19. sc all around (1 round) (18)
- Finish stuffing, slst. FO, leave long tail for sewing later.
Legs X2
Follow these instructions to create the legs:
- R1. 8 sc in MR (8)
- R2. (inc)x8 (16)
- R3-5. sc all around (3 rounds) (16)
- Slst, FO. Stuff, leave long tail for sewing later.
Arms X2
Instructions for the arms:
- R1. 5 sc in MR (5)
- R2. (inc)x5 (10)
- R3. (2sc,inc)x3, 1 sc (13)
- R4-7. sc all around (4 rounds)(13)
- R8. (2sc,dec)x3, 1 sc (10)
- R9-11. sc all around (3 rounds) (10)
- Stuff lightly, fold in half and do 4 sc to close.
- FO, leave long tail for sewing later.
Tail
Follow these steps to create the tail:
- R1. 5 sc in MR (5)
- R2. (inc)x5 (10)
- R3-4. sc all around (2 rounds) (10)
- R5. (dec)x5 (5)
- Stuff lightly, slst. FO. Leave a long tail for sewing later.
Assembly
Now it's time to assemble your bunny:
- Sew head to body on R21.
- Sew legs to bottom of body on R6-10, 7 sts apart.
- Sew arms to sides of the body, under the head on R18-19, 6 sts apart.
- Sew ears on top of head, on R2-8, 2 sts apart.
- Cut out an X shape for the mouth or embroider yarn on R14-15, in the middle of the eyes.
- Sew tail in the middle of the back of the body, on R7-8.
Finishing Tips
- Place safety eyes before closing the head and stuffing to ensure correct placement.
- Stuff firmly but evenly to keep the shape smooth; add more stuffing to the head if needed before final rounds.
- Use felt or embroider the face for a soft, child-safe finish (avoid small parts for toys intended for young children).
- Weave in and secure all thread tails neatly on the inside for a clean finish.
Enjoy making your Miffy-inspired amigurumi bunny — it's a charming handmade gift or a sweet decorative piece. Happy crocheting!