

Kalynka Crochet Bunny Amigurumi — Step-by-Step Pattern & Finishing Tips

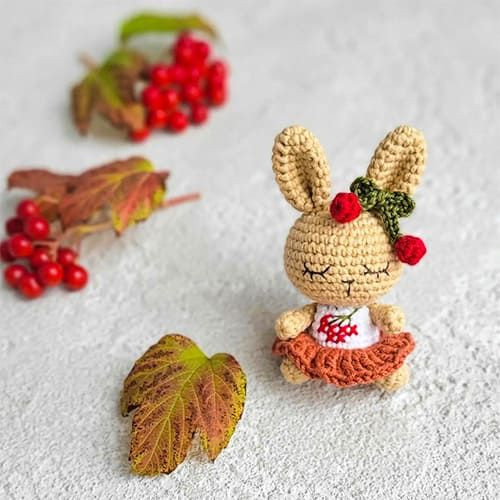
Crochet Bunny Kalynka Amigurumi
This Kalynka crochet bunny amigurumi pattern guides you through making a sweet, small bunny crafted from cotton yarn. The pattern below includes parts for the ears, head, hands, legs, body and a simple skirt. It’s suitable for crocheters familiar with basic amigurumi stitches — use the materials listed and follow the rounds carefully. Finish with embroidery or simple decorations to give Kalynka personality.
Materials
- YarArt Jeans, Gazzal baby cotton or any cotton yarn (160 m/ 50 g)
- Crochet hook: 1.6 mm
- Thread for embroidery, needle
- Fiberfill
Abbreviations
MR: Magic ring
Sc: Single crochet
Inc: Increase
Dec: Decrease
Trc: Triple crochet
Ears (Make 2)
Rnd 1. 6 sc in MR (6)
Rnd 2. (2sc,inc)*2 (8)
Rnd 3. (3sc,inc)*2 (10)
Rnd 4. (4sc,inc)*2 (12)
Rnd 5-9. 12 sc
Sew in half.
Head
Rnd 1. 6 sc in MR
Rnd 2. 6 inc (12)
Rnd 3. (1sc,inc)*6 (18)
Rnd 4. (2 sc, inc)*6 (24)
Rnd 5. (3 sc, inc)*6 (30)
Rnd 6. (4 sc, inc)*6 (36)
Rnd 7-12. 36 sc
Rnd 13. (4 sc, dec)*6 (30)
Rnd 14. (3 sc, dec)*6 (24)
Rnd 15. (2 sc, dec)*6 (18)
Rnd 16. (1 sc, dec)*6 (12)
Hands (Make 2)
Rnd 1: 6 sc in MR
Rnd 2: 6 sc
Rnd 3: 4 sc, dec (5)
Rnd 4-5: 5 sc
sew in half
Legs (Make 2)
Rnd 1: 5 sc in MR
Rnd 2: 5 inc (10)
Rnd 3: 2 sc, 3 dec, 2 sc (7)
Rnd 4: 7 sc
Body
Rnd 1: 6 sc in MR
Rnd 2: 6 inc (12)
Rnd 3: (1 sc, inc)*6 (18)
Rnd 4-5: 18 sc
Change color
Rnd 6: for the back side of loop 18 sc
Rnd 7-9: 18 sc
Rnd 10: (1 sc, dec)*6 (12)
Skirt
1 trc, 1 ch, 1 trc in each front loop of the 5th rnd.
Decorate with embroidery, flowers, berries or bows.
Assembly & Finishing Tips
Lightly stuff all parts with fiberfill as you go so the shape stays smooth. Sew the ears to the top sides of the head and attach the head to the body securely. Sew hands to the sides of the body and position legs at the bottom so the bunny can sit. Embroider the face using thread and a needle (nose, mouth and eyes) or add other preferred facial details. Add small decorative elements—flowers, bows or embroidered berries—to personalize Kalynka.
General tips: keep stitch tension even for a neat finish, use safety eyes only if appropriate for the intended recipient, and weave in ends securely. Enjoy making and gifting your Kalynka bunny!