


Cute Crochet Mary Sanderson Amigurumi Pattern — Step-by-Step Doll Tutorial

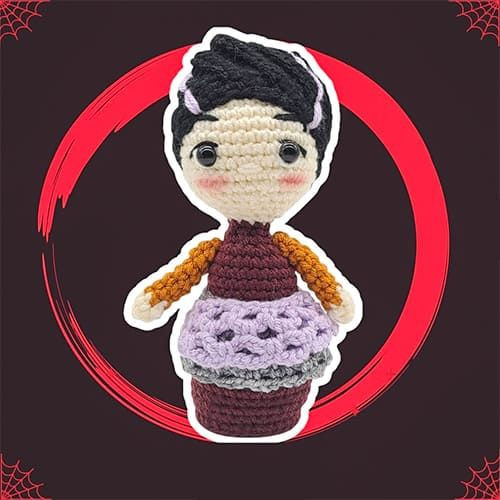
Bring a bit of Hocus Pocus charm to your crochet basket with this Crochet Mary Sanderson Doll Amigurumi pattern. This step-by-step pattern uses basic amigurumi techniques—magic ring, single crochet, increases and decreases—and shows how to create Mary’s distinctive red dress, black hair with purple accents, and a cuddly round shape. Keep stuffing light near the base so the doll will sit nicely.
Materials
Yarns: number 4 worsted yarn, 100% acrylic
• yarn bee soft and sleek
Stuffing: poly-fill
Crochet hook: 3.75mm
Abbreviations
MR: Magic ring
Ch: Chain
BLO: Back loop only
FLO: Front loop only
Fo: Fasten off
Hdc: Half double crochet
Inc: Increase
Dec: Decrease
Rnd: Round
Sc: Single crochet
Slst: Slip stitch
St: Stitch
Head
Start with skin color.
Rnd 1. 6 sc in MR
Rnd 2. 6 inc (12)
Rnd 3. (1sc,inc)*6 (18)
Rnd 4. (2sc,inc)*6 (24)
Rnd 5. (3sc,inc)*6 (30)
Rnd 6. (4sc,inc)*6 (36)
Rnd 7-12. 36 sc
Rnd 13. (4sc,dec)*6 (30)
Rnd 14. (3sc,dec)*6 (24)
Rnd 15. (2sc,dec)*6 (18)
Rnd 16. (1sc,dec)*6 (12)
Rnd 17. (2sc,dec)*3 (9)
Change color to red, continue with body.
Stop and place the 10 mm eyes between rounds 10 and 11, 7 st apart.
Don’t forget to stuff.
Body
With red yarn.
Rnd 1-2. 9 sc (9)
Rnd 3. 9 inc (18)
Rnd 4. (1sc,inc)*9 (27)
Rnd 5-8. 27 sc (27)
Rnd 9. (1sc,dec)*9 (18)
Rnd 10. (1sc,inc)*9 (27)
Rnd 11. (8sc,inc)*3 (30)
Rnd 12-20. 30 sc
Rnd 21. BLO (3sc,dec)*6 (24)
Rnd 22. (2sc,dec)*6 (18)
Rnd 23. (1sc,dec)*6 (12)
Rnd 24. 6 dec (6)
Fasten off.
Don’t stuff too much at the end so the base remains flat.
Arms (Make 2)
Start with skin color.
Rnd 1. MR, 6 sc (6)
Rnd 2. 6 sc (6)
Change color to red.
Rnd 3. (1sc,inc)*3 (9)
Rnd 4-9. 9 sc (9)
Fasten off, leave long thread to attach to the body.
Upside down FLO of round 21 (with new red thread): 30sc- fasten off.
Hair (Part 1/2)
With black yarn.
Rnd 1. Chain 20, (in the 3rd chain from the hook) inc hdc, 15 hdc, dec hdc, chain 2 turn
Rnd 2. Dec hdc, BLO 15 hdc, inc hdc, chain 2, turn
Rnd 3. Inc hdc, BLO 15 hdc, dec hdc, chain 2, turn
Repeat rounds 2 and 3 until you have enough to cover the head.
Hair (Part 2/2)
With black yarn.
Sew both ends together with slst in BLO to form a cylinder.
Close the top part.
Add purple accents with purple yarn.
Overskirt 1
With grey yarn.
Rnd 1. Chain 28, 27 sc, 1 chain, turn
Rnd 2. (sc, chain 3, skip 1 st)*13, 3 chain, turn
Rnd 3-4. sc, chain 3, (sc in the middle of the 3 chains from the previous round, chain 3)*13, chain 3, turn
Rnd 5. sc, chain 3, (sc in the middle of the 3 chains from the previous round, chain 3)*13
Fasten off and leave a long thread. Sew it to the body.
Overskirt 2
With light purple yarn.
Rnd 1. Chain 14, (sc, chain 4, skip 1 st)*6, chain 4, turn
Rnd 2. (sc in the middle of the 4 chains from the previous round, chain 4)*6, chain 4, turn
Rnd 3. (sc in the middle of the 4 chains from the previous round, chain 4)*6
Fasten off and leave long thread.
Sew it on top of the 1st overskirt.
Assembly & Finishing Tips
Sew the arms to the body securely, weave in all loose ends, and distribute stuffing evenly—avoid overstuffing the base so the doll will sit flat. Attach the hair cylinder to the head and add the purple accents as shown in the hair instructions. Use small, even stitches when sewing skirts and hair so the finished doll looks neat. Trim fringe or style the hair gently if desired. For safety, ensure eyes are firmly secured if the toy will be given to children.
- Funny Pictures
-
 Weekly Treat of Funniest Parenting Memes for Good Laugh out Loud Right Now
-
 Really Funny Pics to End These Weekend Perfectly
-
 Incredibly Relatable Pics for Your Amusement
- Recipes
-
 Chewy Oatmeal Cookies
-
 Tomato Tuna Melt
-
 Instant Pot Broccoli Cheddar and Zucchini Soup
- Lifehacks
-
 Wide Half Double Crochet Stitch Photo Tutorial
-
 How to Crochet a Sunflower Stitch Photo Tutorial
-
 Lemon Peel Crochet Stitch Photo Tutorial
- Crochet Ideas
-
 DIY Crochet Mushroom Keychain — Easy Step-by-Step Pattern with Photos
-
 Make a Leafy Texture: Easy Crochet Sprig Stitch (Free UK Pattern)
-
 Free Crochet Sleep Mask Pattern — Cute DK Cotton Eye Mask (UK Terms, Advanced Beginner)
- DIY
-
 Cozy Crochet: Free Up-and-Down Stripe Cotton Washcloth Pattern (Quick & Easy)
-
 How to Make Realistic Crepe Paper Daffodils — Easy Step-by-Step DIY
-
 Make Adorable Easter Egg Bird Feeders — Easy DIY Seed Ornaments for Your Backyard
- Knitting Ideas
-
 Knit the Fish Scale Stitch: Easy 4-Row Pattern for a Textured, Scaly Look
-
 Knitted Camisole Party Frock — Vintage Pattern with Step-by-Step Instructions
-
 DIY Knitted Cuddly Cat Toy — Free Pattern & Step-by-Step Instructions