


Crochet Winnie Sanderson Amigurumi Doll — Step-by-Step Pattern

Introduction
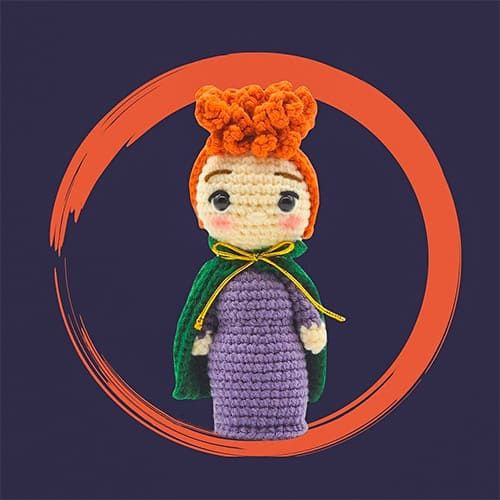
If you're a fan of Hocus Pocus and enjoy crochet amigurumi, this Winnie Sanderson doll pattern will guide you through making a charming handmade replica. The pattern below covers the head, body, arms, layered hair wig, cape and collar, and includes eye placement guidance. Follow the rounds carefully and use the abbreviations listed to complete the doll. This project is ideal for crocheters familiar with basic amigurumi techniques.
Notes
Work in continuous rounds unless otherwise stated. Use a stitch marker to mark the beginning of each round. Stuff pieces firmly where indicated, but leave the base of the body slightly less stuffed so it sits flat. Place the 10mm eyes before closing the head as instructed.
Abbreviations
MR: Magic ring
Ch: Chain
BLO: Back loop only
FLO: Front loop only
Fo: Fasten off
Hdc: Half double crochet
Inc: Increase
Dec: Decrease
Rnd: Round
Sc: Single crochet
Slst: Slip stitch
St: Stitch
Head
Start with skin color.
Rnd 1. 6 sc in MR (6)
Rnd 2. 6 inc (12)
Rnd 3. (1sc,inc)*6 (18)
Rnd 4. (2sc,inc)*6 (24)
Rnd 5. (3sc,inc)*6 (30)
Rnd 6. (4sc,inc)*6 (36)
Rnd 7-12. 36 sc
Rnd 13. (4sc,dec)*6 (30)
Rnd 14. (3sc,dec)*6 (24)
Rnd 15. (2sc,dec)*6 (18)
Rnd 16. (1sc,dec)*6 (12)
Rnd 17. (2sc,dec)*3 (9)
Change color to purple, continue with body.
Stop and place the 10mm eyes between rounds 10 and 11, 7 st apart.
Body
With purple yarn.
Rnd 1-2. 9 sc (9)
Rnd 3. 9 inc (18)
Rnd 4. (1sc,inc)*9 (27)
Rnd 5-8. 27 sc (27)
Rnd 9. (1sc,dec)*9 (18)
Rnd 10. (1sc,inc)*9 (27)
Rnd 11. (8sc,inc)*3 (30)
Rnd 12-20. 30 sc
Stuff.
Rnd 21. BLO- (3sc,dec)*6 (24)
Rnd 22. (2sc,dec)*6 (18)
Rnd 23. (1sc,dec)*6 (12)
Rnd 24. 6 dec (6)
Fasten off.
Don’t stuff too much at the end so the base remains flat.
Arms (Make 2)
Start with skin color.
Rnd 1. 6 sc in MR
Rnd 2. 6 sc (6)
Change color to purple.
Rnd 3. (2sc,inc)*3 (9)
Rnd 4-9. 9 sc (9)
Fasten off, leave long thread to attach to the body.
Upside down FLO of round 21 (with new thread): 30 sc
Fasten off.
Hair
With orange yarn.
Rnd 1. 6 sc in MR (6)
Rnd 2. (1sc,inc)*3 (9)
Rnd 3. BLO- (2sc,inc)*3 (12)
Don’t fasten off.
1st Layer
Rnd 1-4. 13 ch, 12 hdc, slst (12)
Rnd 5-8. 4 ch, 3 inc, slst (6)
Rnd 9-13. 13 ch, 12 hdc, slst (12)
(12 and 13 strands in same st)
Fasten off.
2nd Layer
(in free loop of round 2- new thread)
Rnd 1-10. 10 ch, 9 inc, slst
(9 and 10 strands in same st)
Fasten off.
2nd layer goes here.
1st layer- you’ll count 12 strands in the picture, but it covers the head better with 13 strands.
2nd layer- 10 strands.
Stick the hair wig to the head.
Cape
With green yarn.
Rnd 1. ch 20 (start on 3rd ch from hook), 18 hdc, ch 1, turn
Rnd 2-14. BLO 18 hdc, ch 1, turn
Rnd 15. BLO 18 hdc
Fasten off and leave long thread.
Collar
Rnd 1. ch 15 (start on 2nd ch from hook), 14 sc, ch 1, turn
Rnd 2. (1sc,ch1)*14, turn
Rnd 3. (1sc,ch1)*14, (sc in the ch of previous round)
Fasten off and leave a long thread.
With a threading needle, make a running stitch along top edge of the cape, in and out of the rounds (see picture above).
Once you get to the other end, pull the thread firmly to shorten that end a bit.
Use the long thread to join the collar to the top of the cape (the side that you shortened in the step above).
Finishing & Assembly
Sew arms to the sides of the body using the long threads left from the arms. Attach the wig to the head as directed, and position the layered pieces so they cover the head evenly. Join the cape and collar and position them around the neck. Make any final adjustments to stuffing and shape before weaving in all loose ends. Check eye placement and secure eyes firmly.
This finished amigurumi makes a whimsical display piece or gift for fans of the character.
- Funny Pictures
-
 Weekly Treat of Funniest Parenting Memes for Good Laugh out Loud Right Now
-
 Really Funny Pics to End These Weekend Perfectly
-
 Incredibly Relatable Pics for Your Amusement
- Recipes
-
 Chewy Oatmeal Cookies
-
 Tomato Tuna Melt
-
 Instant Pot Broccoli Cheddar and Zucchini Soup
- Lifehacks
-
 Wide Half Double Crochet Stitch Photo Tutorial
-
 How to Crochet a Sunflower Stitch Photo Tutorial
-
 Lemon Peel Crochet Stitch Photo Tutorial
- Crochet Ideas
-
 DIY Crochet Mushroom Keychain — Easy Step-by-Step Pattern with Photos
-
 Make a Leafy Texture: Easy Crochet Sprig Stitch (Free UK Pattern)
-
 Free Crochet Sleep Mask Pattern — Cute DK Cotton Eye Mask (UK Terms, Advanced Beginner)
- DIY
-
 Cozy Crochet: Free Up-and-Down Stripe Cotton Washcloth Pattern (Quick & Easy)
-
 How to Make Realistic Crepe Paper Daffodils — Easy Step-by-Step DIY
-
 Make Adorable Easter Egg Bird Feeders — Easy DIY Seed Ornaments for Your Backyard
- Knitting Ideas
-
 Knit the Fish Scale Stitch: Easy 4-Row Pattern for a Textured, Scaly Look
-
 Knitted Camisole Party Frock — Vintage Pattern with Step-by-Step Instructions
-
 DIY Knitted Cuddly Cat Toy — Free Pattern & Step-by-Step Instructions