


Adorable Crochet Amigurumi Doll Pattern — Step-by-Step, Beginner-Friendly

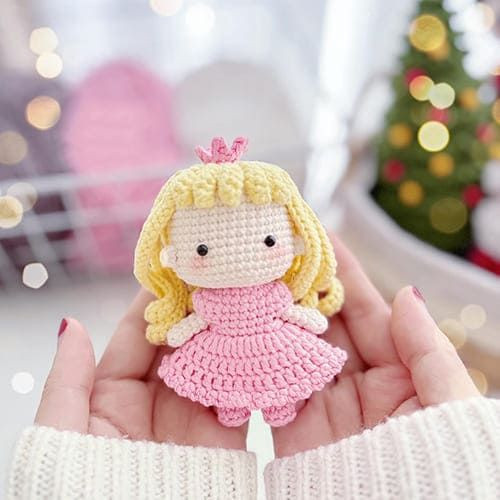
Crochet Amigurumi Dolls are simply adorable creations that add a touch of whimsy to any room or make delightful handmade gifts. This step-by-step pattern walks you through creating a small amigurumi doll — head, body, limbs, hair, dress and accessories — using sport or DK weight yarn. Whether you're new to amigurumi or looking for a quick, customizable project, follow the rounds below and personalize colors, hair and facial details to make a unique doll.
Quick tips before you begin: use a slightly smaller hook than recommended for your yarn to achieve tight stitches and avoid stuffing showing through; stuff firmly but evenly; and pin pieces in place before sewing to check positioning. Safety eyes, embroidery for the face, and secure sewing are recommended if the doll is intended for small children.
Abbreviations
MR - magic ring
sc - single crochet
hdc - half double crochet
dc - double crochet
inc - increase (2 single crochet in 1 stitch)
dec - decrease (invisible decrease)
FLO - front loop only
slst - slip stitch
Materials
Yarn: sport or DK light weight yarn. (I used HELLO cotton yarn)
Crochet hook: 2mm- 2.5mm
Safety eyes size 4mm
Black embroidery thread
Fiberfill
Yarn needles
Creating the Doll
Head
Start with skin tone yarn
Rnd 1. 6sc in MR (6)
Rnd 2. 6 inc (12)
Rnd 3. (sc, inc)x6 (18)
Rnd 4. (2sc, inc)x6 (24)
Rnd 5. sc, inc, (3sc, inc)x5, 2sc (30)
Rnd 6. (4sc, inc)x6 (36)
Rnd 7. 2sc, inc, (5sc, inc)x5, 3sc (42)
Rnd 8-13. (6 rnds) 42sc (42)
Rnd 14. (6sc, inc)x6 (48)
Insert the eyes between rnd 14 & 15, with 8 stitches space between them
Rnd 15-18. (4 rnds) 48sc (48)
Rnd 19. (4sc, dec)x8 (40)
Rnd 20. (3sc, dec)x8 (32)
Rnd 21. (2sc, dec)x8 (24)
Rnd 22. (sc, dec)x8 (16)
Rnd 23. (2sc, dec)x3, 4sc (13)
Rnd 24-29. (6 rnds) BLO 13sc (13)
Rnd 30. 6dec, sc (7)
Cut the yarn. Pull the neck inside the head.
Legs
Start with pink yarn
Rnd 1. 5sc in MR (5)
Rnd 2. 5 inc (10)
Rnd 3. BLO 10sc (10)
Rnd 4. 3sc, 2dec, 3sc (8)
Rnd 5. 8sc (8)
Switch to skin tone yarn
Rnd 6-8. (3 rnds) 8sc (8)
Rnd 9. 6sc end round here (6)
Crochet the second leg in the same way till rnd 8
Rnd 9. 11sc
Ch 3, join with the first leg.
Body
Start with skin tone yarn
Rnd 1-3. 22sc (22)
Rnd 4. 4sc, dec, 9sc, dec, 5sc (20)
Rnd 5-8. (4 rnds) 20sc (20)
Rnd 9. (2sc, dec)x5 (15)
Rnd 10. (sc, dec)x5 (10)
Rnd 11. dec, 8sc (9)
Rnd 12-17. (6 rnds) 9sc (9)
Rnd 18. 4 dec, sc (5)
Cut the yarn. Close the remaining gap.
Hair
With yellow yarn
Rnd 1. 6sc in MR (6)
Rnd 2. 6 inc (12)
Rnd 3. (sc, inc)x6 (18)
Rnd 4. (5sc, inc)x3 (21)
Rnd 5. (ch 8, (2sc, 5hdc) on chains, slst to next st)x5, (ch 31, (2sc, 28 hdc) on chains, slst to the next st)x16,
Cut the yarn. Hide your yarn tail.
Dress
Start with pink yarn.
Ch 16, insert your hook to the foundation chain to make a circle
Rnd 1. (3sc, inc)x4 (20)
Rnd 2. 3sc, 3 inc, 6sc, 3inc, 5sc (26)
Rnd 3. 3sc, 2 hdc, 2 hdc inc, 2 hdc, 6sc, 2 hdc inc, 2 hdc, 5sc (30)
Rnd 4. 5sc, 2 dec, 10sc, 2 dec, 7sc (26)
Rnd 5. 4sc, ch 5, skip 6 sts, 6sc, ch 5, skip 6 sts, 5sc (26)
Rnd 6. 26sc (26)
Rnd 7. ch 2, (dc, dc inc)x13 (39)
Rnd 8-9. ch 2, 39dc (39)
Rnd 10. (ch 3, slst to the next st)x38
Cut the yarn. Hide your yarn tail.
Arms (Make Two)
With skin tone yarn
Rnd 1. 6sc in MR (6)
Rnd 2-7. (6 rnds) 6 sc (6)
Cut the yarn. Leave a long yarn tail for sewing. Sew to the body round 9.
Ears (Make Two)
With skin tone yarn
Rnd 1. 3sc in MR (3)
Cut the yarn. Leave a long yarn tail for sewing. Sew to the head spanning round 15 to round 16.
Crown
With pink yarn
Rnd 1. 5sc in MR (5)
Rnd 2. (slst, ch 3, (slst, sc) on chains)x5
Cut the yarn. Leave a long yarn tail. Sew the crown to the head.
Finishing & Assembly
Before sewing pieces together, arrange and pin limbs, head and hair to check proportions. Sew parts using mattress or whip stitch with a yarn needle, making sure seams are secure. Embroider mouth or blush cheeks lightly if desired. Weave in all yarn tails and trim excess. If using safety eyes for toys intended for young children, follow safety guidelines for attachment.
- Funny Pictures
-
 Weekly Treat of Funniest Parenting Memes for Good Laugh out Loud Right Now
-
 Really Funny Pics to End These Weekend Perfectly
-
 Incredibly Relatable Pics for Your Amusement
- Recipes
-
 Chewy Oatmeal Cookies
-
 Tomato Tuna Melt
-
 Instant Pot Broccoli Cheddar and Zucchini Soup
- Lifehacks
-
 Wide Half Double Crochet Stitch Photo Tutorial
-
 How to Crochet a Sunflower Stitch Photo Tutorial
-
 Lemon Peel Crochet Stitch Photo Tutorial
- Crochet Ideas
-
 DIY Crochet Mushroom Keychain — Easy Step-by-Step Pattern with Photos
-
 Make a Leafy Texture: Easy Crochet Sprig Stitch (Free UK Pattern)
-
 Free Crochet Sleep Mask Pattern — Cute DK Cotton Eye Mask (UK Terms, Advanced Beginner)
- DIY
-
 Cozy Crochet: Free Up-and-Down Stripe Cotton Washcloth Pattern (Quick & Easy)
-
 How to Make Realistic Crepe Paper Daffodils — Easy Step-by-Step DIY
-
 Make Adorable Easter Egg Bird Feeders — Easy DIY Seed Ornaments for Your Backyard
- Knitting Ideas
-
 Knit the Fish Scale Stitch: Easy 4-Row Pattern for a Textured, Scaly Look
-
 Knitted Camisole Party Frock — Vintage Pattern with Step-by-Step Instructions
-
 DIY Knitted Cuddly Cat Toy — Free Pattern & Step-by-Step Instructions