


Crochet Eve the Winter Fox Amigurumi — Step-by-Step Pattern & Finishing Tips

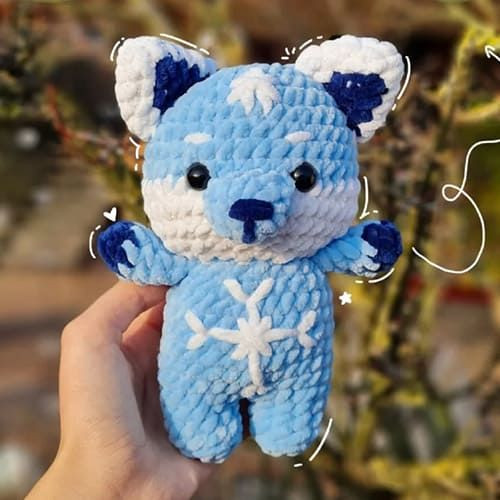
Crochet Eve the Winter Fox Amigurumi is a charming winter-themed toy worked in chenille yarn with contrasting colors and a sweet snowflake detail. This pattern includes a full materials list, abbreviations, round-by-round instructions for head, body, arms, ears, snout and tail, plus sewing and finishing guidance. Perfect as a decorative piece or a thoughtful handmade gift — adjust safety features if making for small children.
Materials
Hook: 5mm.
- Light blue chenille size 4 medium.
- Dark blue chenille size 4 medium.
- White chenille size 4 medium.
- 12mm safety eyes.
- Stuffing.
- Tapestry needle.
- Stitch markers.
- Scissors.
Notes & Tips
- Work with a tight tension so the stuffing doesn’t show through the chenille yarn.
- Start stuffing early and often to keep shapes smooth and rounded (especially the head and limbs).
- If the amigurumi is intended for an infant, substitute embroidered eyes instead of safety eyes for safety.
- Use stitch markers to mark the beginning of each round. An invisible join is suggested when fastening off where indicated.
- When changing colour (cc), carry the yarn carefully inside the piece or fasten off and weave in ends to keep the inside tidy.
Abbreviations
- mr: magic ring
- ch: chain
- sc: single crochet
- st: stitch
- hdc: half double crochet
- dc: double crochet
- inc: increase
- dec: decrease
- FO: fasten off
- cc: change colour
- R: round
Head
Use light blue yarn:
R1. 8 sc in a mr (8)
R2. 8 inc (16)
R3. (sc, inc)*8 (24)
R4. (3sc, inc)*6 (30)
R5. (2sc, inc, 2sc)*6 (36)
R6-9. 36 sc (36) – 4 rounds
R10. cc to white and make 9 sc, 3 inc, 12 sc, 3 inc, 9 sc (42)
R11. (5sc, dec)*6 (36)
R12. (4sc, dec)*6 (30)
R13. (3sc, dec)*6 (24)
R14. (4sc, dec)*4 (20)
Cut yarn, fasten off with invisible join.
Insert safety eyes on R9-10, 4 visible sts apart.
Add fiber fill, stuff a lot to get a rounded face, paying attention to filling the cheeks.
Body
Use light blue yarn:
R1. 5 sc in a MR (5)
R2. 5 inc (10)
R3. BLO: 10 sc (10)
R4. 10 sc (10)
Cut yarn and fasten off with an invisible join.
Make another leg, but this time don’t cut yarn and ch 2 (pic 2).
R5. Insert the hook in any of the first leg sts (pic 2) and make 10 sc, 2 sc in the 2 ch, 10 sc, 2 sc in the 2ch (24) (pic 3).
R6. 2sc, inc, (5sc, inc)*3, 3 sc (28)
R7-12. 28 sc (28) – 6 rounds
R13. (5sc, dec)*4 (24)
Start stuffing as you go, when you stuff the feet remember to keep them flat.
R14. (4sc, dec)*4 (20)
Finish stuffing.
Cut yarn leaving a long tail for sewing.
Arms (Make 2)
Start with dark blue yarn:
R1. 4 sc in a MR (4)
R2. 4 inc (8)
Cc to light blue yarn:
R3-5. 8 sc (8) – 3 rounds.
R6. Fold the arm and close it making 3/4 sc (3/4) – don’t stuff the arm.
Cut yarn leaving a long tail for sewing (pic 4).
Ears (Make 2)
Start with white yarn:
R1. 5 sc in a MR (5)
R2. sc, 4 inc (9)
R3. sc, cc to dark blue inc, cc to white sc, inc, 4 sc, inc (12)
R4. sc, cc to dark blue, 3sc, cc to white, 8 sc (12)
R5. sc, cc to dark blue, sc, inc, sc, cc to white, sc, inc, 5sc, inc (15)
Cut yarn leaving a long tail for sewing.
Snout
Use light blue yarn:
R1. 5 sc in a MR (5)
R2. 5 inc (10)
R3. sc, inc, 8 sc (11)
Cut yarn leaving a long tail for sewing.
Tail
Start with dark blue yarn:
R1. 7 sc in a MR (7)
R2. 7 sc (7)
R3. dec, sc, 3 inc, sc (9)
R4. 9 sc (9)
R5. dec, sc, 5 inc, sc (13)
Cc to light blue:
R6. 13 sc (13)
R7. dec, 2sc, 5 inc, 2 sc, dec (16)
R8. 16 sc (16)
R9. (2sc, dec)*4 (12)
R10. (sc, dec)*4 (8)
Cut yarn and leave a long tail for sewing and stuff.
Sewing & Finishing
Sew the head to the body.
Sew ears between R3-7.
Sew arms between R13-14.
Sew snout between R9-11 and stuff it while sewing.
Sew tail on R7-8 in the center.
Sew the snowflake on the head like in pic 14.
Sew the snowflake on the body following the pics 11-13.
Final tips: secure safety eyes with their washers, weave in and hide all yarn tails, and use small, neat stitches when sewing parts together to keep seams tidy and durable.
- Funny Pictures
-
 Weekly Treat of Funniest Parenting Memes for Good Laugh out Loud Right Now
-
 Really Funny Pics to End These Weekend Perfectly
-
 Incredibly Relatable Pics for Your Amusement
- Recipes
-
 Chewy Oatmeal Cookies
-
 Tomato Tuna Melt
-
 Instant Pot Broccoli Cheddar and Zucchini Soup
- Lifehacks
-
 Wide Half Double Crochet Stitch Photo Tutorial
-
 How to Crochet a Sunflower Stitch Photo Tutorial
-
 Lemon Peel Crochet Stitch Photo Tutorial
- Crochet Ideas
-
 DIY Crochet Mushroom Keychain — Easy Step-by-Step Pattern with Photos
-
 Make a Leafy Texture: Easy Crochet Sprig Stitch (Free UK Pattern)
-
 Free Crochet Sleep Mask Pattern — Cute DK Cotton Eye Mask (UK Terms, Advanced Beginner)
- DIY
-
 Cozy Crochet: Free Up-and-Down Stripe Cotton Washcloth Pattern (Quick & Easy)
-
 How to Make Realistic Crepe Paper Daffodils — Easy Step-by-Step DIY
-
 Make Adorable Easter Egg Bird Feeders — Easy DIY Seed Ornaments for Your Backyard
- Knitting Ideas
-
 Knit the Fish Scale Stitch: Easy 4-Row Pattern for a Textured, Scaly Look
-
 Knitted Camisole Party Frock — Vintage Pattern with Step-by-Step Instructions
-
 DIY Knitted Cuddly Cat Toy — Free Pattern & Step-by-Step Instructions