


Crochet Amigurumi Bunny Freya — Step-by-Step Pattern & Finishing Tips

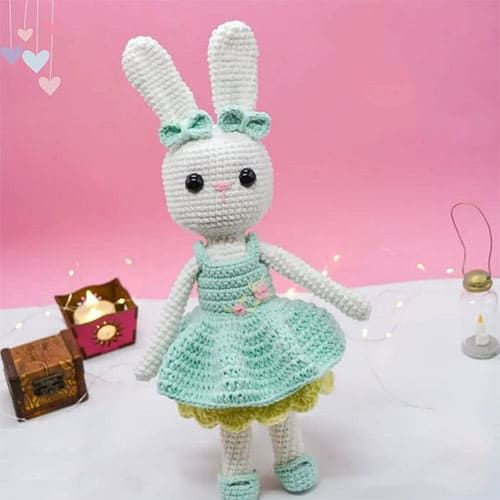
Bring Freya the amigurumi bunny to life with this complete crochet pattern. This cute bunny features floppy ears, a pink embroidered nose, a decorative yoke dress with floral embroidery, and small shoes — a lovely handmade gift or decor piece for craft lovers. The pattern below includes materials, abbreviations, step-by-step instructions for each part, and final finishing details so you can assemble and personalize Freya easily.
This pattern uses standard amigurumi techniques (magic ring, single crochet, increases and decreases). Read through the full pattern before you start and keep a stitch marker handy to track rounds.
Meet the adorable Crochet Amigurumi Bunny, Freya! With her fluffy white yarn and cute pink nose, Freya is the perfect snuggle buddy for kids and adults alike. Her floppy ears and sweet expression will surely bring a smile to anyone's face. Whether you're a seasoned crocheter or just starting out, creating Freya will be a delightful and rewarding experience. So grab your hooks and yarn, and let's bring this lovable bunny to life!
Materials and Tools
White, aqua, light yellow, pink and yellow yarn.
Pink and green embroidery thread.
Fiberfill for stuffing.
Tapestry needle.
2 small buttons.
I used 8/6 cotton yarn and a size 3 crochet hook.
Abbreviations
MR - magic ring
sc - single crochet
ch - chain
dc - double crochet
inc - increase
dec - decrease
FLO - front loop only
BLO - back loop only
slst - slip stitch
hdc - half double crochet
First Leg
With white yarn.
In a magic ring, 6 sc
1. 6 inc (12)
2. In BLO, 12 sc (1 round)
3. To round 23, 12 sc (20 rounds)
4. 1 slst in BLO
Second Leg and Body
Repeat the leg sequence from the previous leg until round 23
24. 12 sc, crochet 2 ch, join the other leg with 1 sc, 11 sc, 2 sc in the chains, 12 sc in the other leg, 2 sc in the chains.
Place the stitch marker in the next sc.
25 to 44. 28 sc (18 rounds)
45. (4 sc, 1 dec) x 4, 4 sc (24)
46. (4 sc, 1 dec) x 4 (20)
47. (3 sc, 1 dec) x 4 (16)
48. 16 sc (1 round)
49. (1 sc, 1 inc) x 8 (24)
50. (3 sc, 1 inc) x 6 (30)
51. (4 sc, 1 inc) x 6 (36)
52. (5 sc, 1 inc) x 6 (42)
53. (6 sc, 1 inc) x 6 (48)
54 to round 66. 48 sc (13 rounds)
Between rounds 60 and 61, place the eyes with a distance of 5 or 6 sc, depending on the size of the eyes. Continue stuffing.
67. (6 sc, 1 dec) x 6 (42)
68. (5 sc, 1 dec) x 6 (36)
69. (4 sc, 1 dec) x 6 (30)
70. (3 sc, 1 dec) x 6 (24)
71. (2 sc, 1 dec) x 6 (18)
72. (1 sc, 1 dec) x 6 (12)
Finish stuffing.
73. 6 dec (6). Cut the yarn and leave a long tail to close with the tapestry needle.
Arms X2
With white yarn.
1. Magic ring with 8 sc
2-20. 8 sc (21 rounds)
Do not stuff, flatten the piece in half and close with 4 sc.
Cut the yarn and leave a long tail to attach to the body in round 47.
I recommend not attaching them until the dress is finished to avoid mistakes.
Underpants
With yellow yarn.
1. 32 chains, join to the other end with 1 sc, and crochet 31 more sc (26)
2. (1 hdc, 1 hdc inc) x 16 (48)
3. 48 hdc (1 round)
4. (2 hdc, 1 hdc inc) x 16 (64)
5-6. 64 hdc (2 rounds)
6. 32 hdc, 1 hdc inc, 31 hdc (65)
7. (1 slst, skip 1 hdc, 6 hdc in the same stitch, skip 2 hdc) x 13
Cut the yarn and hide the leftover.
Ears X2
With white yarn.
1. Magic ring with 6 sc.
2. 6 inc (12)
3. (2 sc, 1 inc) x 6 (18)
4-7. 18 sc (4 rounds)
8. (4 sc, 1 dec) x 3 (15)
9-17. 15 sc (9 rounds)
18. (3 sc, 1 dec) x 3 (12)
Do not stuff, flatten the piece in half and close with 6 sc.
Cut the yarn and leave a long tail to attach to the head.
With a tapestry needle, adjust the bottom part of the ear.
Use pins to help position them and sew them correctly, between rounds 69 and 70 of the head.
Bows X2
With aqua yarn – do not work in rounds.
1. 8 ch, turn the work.
2-6. 7 sc, 1 ch and turn the work (5 rows)
Without cutting, single crochet around the entire piece.
Cut the yarn and hide the leftover.
With the same color, position yourself at the center of the rectangle and wrap the yarn around it about eight times, adjusting until the desired shape is achieved.
Finally, secure it at the back, cut the yarn, and leave a long tail to attach at the center of the ears.
Dress Yoke
With aqua yarn – do not crochet in a spiral.
1. 35 ch, turn the work, skip 1 ch and crochet 34 sc.
2-8. 34 sc, 1 ch and turn the work (7 rows)
9. 6 sc, 6 ch, skip 6 sc, 10 sc, 6 ch, skip 6 sc, 6 sc, 1 ch and turn the work.
10. 6 sc, 6 sc in the chains, 10 sc, 6 sc in the chains, 6 sc.
Without cutting the yarn, position yourself at the end where you made the last stitch (arrow) and crochet 1 slst, 3 ch, 3 slst, 3 ch, and 1 slst.
This will form the buttonholes.
Dress Skirt
With aqua yarn.
You will close each round with 1 slst.
Resume crocheting at the bottom of the yoke (photo).
1. (1 sc, 1 inc) x 17 (51), join to the other end with 1 slst.
2. 2 ch, 51 hdc, 1 slst (1 round)
3. 2 ch, (2 hdc, 1 hdc inc) x 17, close the round with 1 slst (64)
4. 2 ch, (2 hdc, 1 hdc inc) x 17, close the round with 1 slst (85)
5. 2 ch, (3 hdc, 1 hdc inc) x 17, close the round with 1 slst (102)
Cut the yarn and hide the leftover.
Shoes X2
With aqua yarn.
1. Magic ring with 9 sc.
2. 9 inc (18)
3. In BLO, 18 sc (1 round)
4-5. 18 sc (2 rounds)
6. 4 sc, 4 ch, skip 4 sc, 10 sc
7. 18 slst
Cut the yarn and hide the leftover.
Final Details
With fine pink and green yarn, embroider flowers and leaves on the yoke using the spider web stitch.
With pink yarn and a tapestry needle, embroider the nose between rounds 58 and 59.
If you wish, you can add fake eyelashes and blush.
Assembly & Tips
- Attach arms to the body at round 47 (use long tails left from finishing the arms).
- Sew ears to the head between rounds 69 and 70 — use pins to position before stitching.
- Place safety eyes between rounds 60 and 61 with a spacing of 5–6 sc depending on eye size; secure eyes before final stuffing.
- Use a stitch marker to mark the start of rounds and maintain consistent tension for a neat finish.
- Hide yarn tails carefully inside the body or under clothing pieces for a clean look.
Enjoy making Freya and personalize her dress and embroidery to suit your style!
- Funny Pictures
-
 Weekly Treat of Funniest Parenting Memes for Good Laugh out Loud Right Now
-
 Really Funny Pics to End These Weekend Perfectly
-
 Incredibly Relatable Pics for Your Amusement
- Recipes
-
 Chewy Oatmeal Cookies
-
 Tomato Tuna Melt
-
 Instant Pot Broccoli Cheddar and Zucchini Soup
- Lifehacks
-
 Wide Half Double Crochet Stitch Photo Tutorial
-
 How to Crochet a Sunflower Stitch Photo Tutorial
-
 Lemon Peel Crochet Stitch Photo Tutorial
- Crochet Ideas
-
 DIY Crochet Mushroom Keychain — Easy Step-by-Step Pattern with Photos
-
 Make a Leafy Texture: Easy Crochet Sprig Stitch (Free UK Pattern)
-
 Free Crochet Sleep Mask Pattern — Cute DK Cotton Eye Mask (UK Terms, Advanced Beginner)
- DIY
-
 Cozy Crochet: Free Up-and-Down Stripe Cotton Washcloth Pattern (Quick & Easy)
-
 How to Make Realistic Crepe Paper Daffodils — Easy Step-by-Step DIY
-
 Make Adorable Easter Egg Bird Feeders — Easy DIY Seed Ornaments for Your Backyard
- Knitting Ideas
-
 Knit the Fish Scale Stitch: Easy 4-Row Pattern for a Textured, Scaly Look
-
 Knitted Camisole Party Frock — Vintage Pattern with Step-by-Step Instructions
-
 DIY Knitted Cuddly Cat Toy — Free Pattern & Step-by-Step Instructions