Crochet Adorable Flamingo

Penelope
May 15, 2025 08:54 AM
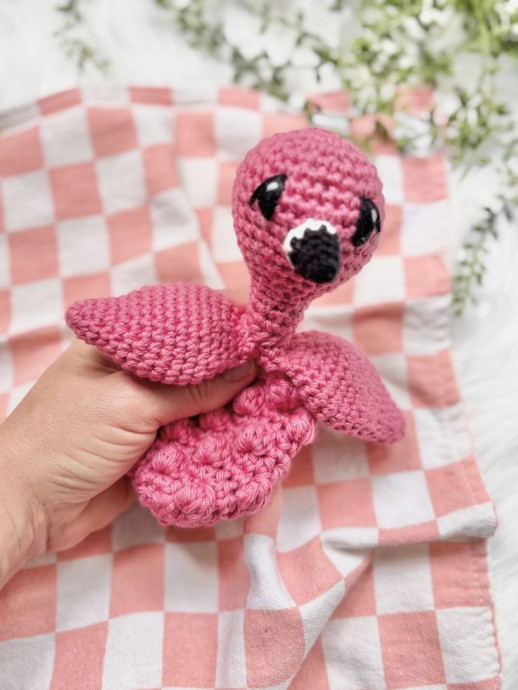
Crocheting an adorable flamingo is such a delightful project that is sure to bring a smile to your face! With its vibrant pink color and charming details, this little flamingo will brighten up any room or make a lovely gift for a friend. From creating the fluffy body to crafting the elegant long legs, every stitch is filled with joy and creativity. So grab your yarn and crochet hook, and let's embark on a fun and heartwarming journey of making your very own cute flamingo companion!
MATERIALS:
Materials needed for this little free flamingo crochet pattern will vary based on the type of yarn you choose. If you choose a size 4 yarn as pictured, you will need smaller hooks and slightly less yardage of yarn whereas if you use a size 5 or 6 yarn, you will need larger hooks and slightly more yardage of yarn. A quick note about bulkier yarns – these patterns can work well with size 5 bulky yarn or with a very thin “size 6” yarn. I do not recommend using this pattern with Bernat Blanket Yarn as I feel that it just comes out far too bulky! See the bitty butterfly pattern in my shop if you’d like a body style that works well with super bulky!
HOOK(S): [My all-time favorite hooks are Clover Amour hooks]
For Size 4 Cotton/Acrylic Yarn:
2.75 mm • US size C // 4.0 mm • US size G
For Bulkier Yarn (Parfait Chunky):
4.0 mm • US size G // 5.0 mm • US size H
YARN: [I’ve used Hobby Lobby and Premier Parfait Chunky for this project]
Weight : Worsted
Hobby Lobby, I Love This Cotton Yarn
Rosey II, ~ 100 yds
Black and White, scrap amount (for eyes/beak)
NOTIONS
Darning Needle
Embroidery Thread
Measuring Tape
Polyfil Stuffing
Rattle Insert (if desired)
Scissors
Stitch Marker (if desired)
Teething Ring (if desired)
GAUGE
Exact gauge is not necessary for this project
FINAL HEIGHT
~7 inches from top to bottom
STITCH ABBREVIATIONS:
SPECIAL STITCHES:
BOBBLE STITCH (bobble): tutorial here
To make a bobble stitch you will work multiple double crochets into the same stitch.
(Yo, insert hook into st, draw up a loop, yo, pull through first two loops on hook) and repeat 3 more times. End with 5 loops on the hook – yo, pull through all 5 loops.
You can choose to make the bobbles on the right or the wrong side of your project, just make sure they are on the outside of the body when finished.
DECREASE STITCHES (hdc2tog/sc2tog): To decrease stitches, you will hdc or sc 2 stitches together to decrease the stitch count. Pattern indicates which stitch to use for these decreases.
INCREASE STITCHES (inc): To increase stitches, you will sc or hdc 2 stitches into the same spot.
PATTERN:
MAKING THE WINGS: (Make Two)
Use a 2.75 mm hook for the wings. Make the wings in the main color. Stitch counts are included at the end of each round.
Round 1: To begin, make a magic circle. Place 6 sc in the magic circle.
Do not join. Continue to work in the round. [6]
Round 2: [sc inc, sc] x 3. [9]
Round 3: sc x 9 around. [9]
Round 4: [sc inc, sc x 2] x 3. [12]
Round 5: sc x 12 around. [12]
Round 6: [sc inc, sc x 3] x 3. [15]
Round 7: [sc inc, sc x 4] x 3. [18]
Round 8: [sc inc, sc x 5] x 3. [21]
Round 9: sc x 21 around. [21]
Round 10: [sc inc, sc x 6] x 3. [24]
Rounds 11-13: sc x 24 around. (3 rounds, 72 sts) [24]
Round 14: [sc2tog, sc x 2] x 6. [18]
Round 15: [sc2tog, sc] x 6. [12]
Round 16: Pinch the top of the wing together and place 6 sc across the top, making sure to go through stitches on each side in order to close off the wing. Cut yarn, tie off and weave in ends. Leave wings unstuffed. Make two wings and set aside for assembly. [6]
MAKING THE BEAK:
Use a 2.75 mm hook for the beak. Stitch counts are included at the end of each round. Use stitch markers as desired.
Round 1: Use black yarn to begin. Make a magic circle and place 4 sc around. Do not join. Continue to work in the round. [4]
Round 2: [sc inc, sc] x 2. [6]
Round 3: sc x 2, sc inc, sc x 3. [7]
Round 4: sc x 2, [sc inc] x 2, sc x 3. [9]
Round 5: sc x 4. This is a partial round. Switch to white on the last st. [4]
Round 6: In white, sc x 9 around. Sl st to the first st. This is the bottom of the beak. Leaving a tail to sew the beak to the face, cut yarn and tie off. Set aside for assembly. [9]
MAKING THE HEAD:
Use a 4.0 mm hook for the head. Make the head in the main color. Stitch counts are included at the end of each round.
Round 1: To begin, make a magic circle. Place 6 sc in the magic circle. Do not join. You will continue to work in the round. [6]
Round 2: [sc inc] in each st around. [12]
Round 3: [sc inc, sc] x 6. [18]
Round 4: [sc inc, sc x 2] x 6. [24]
Round 5: [sc inc, sc x 3] x 6. [30]
Rounds 6-10: sc x 30 around. (5 rounds, 150 sts) [30]
Round 11: [sc2tog, sc x 3] x 6. [24]
*Stop here and add safety eyes in round 8, if desired. Begin stuffing head firmly and continue as you work the rounds of the neck. Add rattle insert before closing head, if desired.
Round 12: [sc2tog, sc x 2] x 6. [18]
Round 13: [sc2tog, sc] x 6. [12]
Round 14: sc x 12 around. [12]
Round 15: [sc2tog, sc x 4] x 2. [10]
Rounds 16-18: sc x 10 around. (3 rounds, 30 sts) [10]
Round 19: Working in the BLO, [sc2tog] in each st around.
Leaving a bit of a tail, cut and tie off your yarn. Thread a needle and sew under the front loop of each remaining stitch. Cinch tightly together to close the neck of the head. Tie off and weave in your ends.

MAKING THE BODY:
Use a 4.0 mm hook for the head. Make the head in the main color. Stitch counts are included at the end of each round.
Round 1: To begin, make a magic circle. Place 6 hdc stitches in the magic circle. Do not join. You will continue to work in the round.[6]
Round 2: [hdc inc] x 6. [12]
Round 3: [hdc inc, hdc] x 6. [18]
Round 4: [sc x 2, bobble] x 6. [18, 6 bobbles]
Round 5: [hdc inc, hdc x 2] x 6. [24]
Round 6: sc x 2, bobble, [sc x 3, bobble] x 5, sc. [24, 6 bobbles]
Round 7: hdc x 24 around. [24]
Round 8: sc, [bobble, sc x 3] x 5, bobble, sc x 2. [24, 6 bobbles]
Round 9: hdc x 24 around. [24]
Round 10: [bobble, sc x 3] x 6. [24, 8 bobbles]
Round 11: [hdc x 2, hdc2tog] x 6. [18]
Round 12: [sc x 2, bobble] x 6. [18, 6 bobbles]
Round 13: [hdc x 4, hdc2tog] x 3. [15]
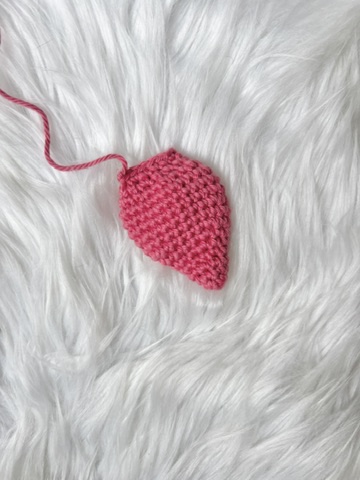
At this point, you will add the wings to your bird, to avoid having to sew them in later. Both wings should be closed with six stitches across. Wing should look as pictured below. Either side can be the “front” side.
Round 14: sc x 1. Now, place your wing on the outside of the body and sc x 6 through both the wing and the stitches of the body to attach. sc x 2. Now, place your wing on the outside of the body and sc x 6 through both the wing and the stitches of the body to attach. [15]
Round 15: [sc, sc2tog] x 5. [10]
Slip stitch to first stitch and then leaving a long tail to attach the head to the body, cut yarn and tie off.
ASSEMBLY OF YOUR FLAMINGO:
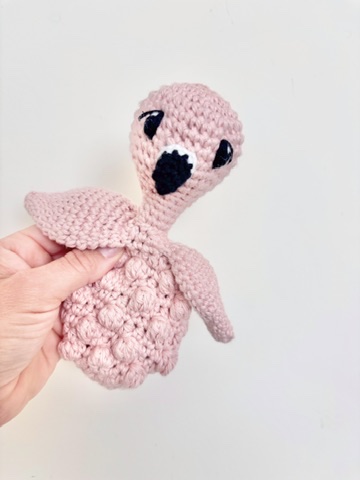
You should now have the body with two attached wings and the unattached head and beak of your bitty buddy.
First, attach the body to the head/neck. I highly recommend using pins to make sure that your head is sewn on straight and centered. Aim to sew the body in a circular fashion. There are ten stitches on both the neck and the opening of the body, so should be stitched 1:1. I prefer starting from the back of the body/head and moving around the front. Carefully stitch through both the body and head to attach.
Now, add the features to the face of your flamingo.
To add the beak, center the beak on the head with the top of the beak reaching to round 8 and the bottom reaching to round 11. Pins are helpful to hold the beak in place. Use the tail of the beak to sew to the face. Remember, the tail is on the bottom side of the beak.
Embroider the eyes on either side of and slightly higher than the beak. You can embroider simple eyes in an upside down “V” shape or more realistic eyes. Eyes pictured are sewn across rounds 7-9, 1-2 stitches wide and with 5 stitches between.
Once you have finished the features and assembly, that’s it! Enjoy your new bitty buddy!
No comments
Write a comment
- Funny Pictures
-
 Cute Cat Memes That Will Make Your Day Brighter
-
 Spot-on and Funny Memes About Introverts Struggles
-
 Top Wonderful Cat Memes on Their Way to Better Your Day
- Recipes
-
 Creamy Old Fashioned Rice Pudding
-
 Russian Tea Cakes (Snowball Cookies)
-
 Rigatoni with Sausage, Tomatoes, and Zucchini
- Lifehacks
-
 How to Crochet a Harlequin Stitch
-
 Removing The Toughest Stains
-
 Crochet Basics: Crumpled Griddle Stitch
- Crochet Ideas
-
 Crochet Christmas Tree
-
 Crochet Goblet of Fire
-
 Crochet Adorable Ammonite
- DIY
-
 DIY Snowman Wreath
-
 Mini Santa Sleigh Ornament
-
 Crochet Gingerbread House Blanket
- Knitting Ideas
-
 Knitted Easter Bunny
-
 Knitted Mobile Phone/Glasses Case
-
 Knitted Cabled Wallet