How to Crochet an Adorable Alpaca

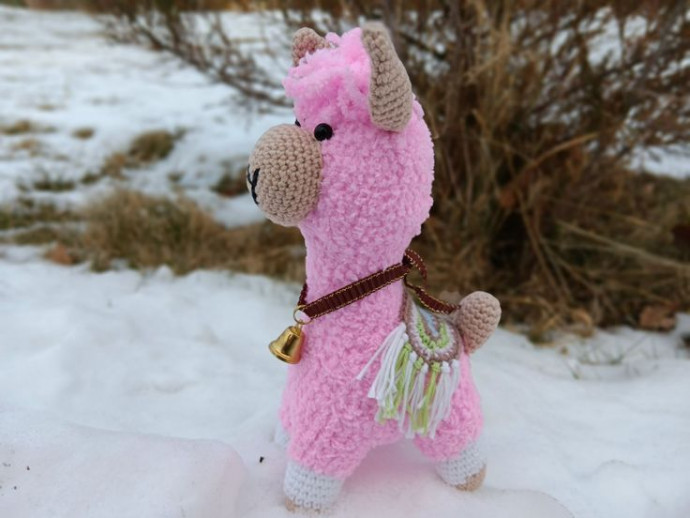
Crocheting an adorable alpaca can be such a delightful and rewarding project! From their fluffy fur to their charming faces, these sweet creatures make for a fun and cozy addition to your crafting repertoire. With a few skeins of soft yarn and a trusty crochet hook, you'll be on your way to creating your very own cute alpaca in no time. Whether you're a beginner or a seasoned crocheter, this project is sure to bring a smile to your face and warmth to your heart. So grab your materials, settle in a cozy spot, and let the creativity flow as you craft your very own lovable alpaca companion!
Supplies You Need
For this project, you will need the following materials:
- Cotton yarn (e.g. Schachenmayr Catania 125m/50g) in the following colors: rose and beige.
- Schachenmayr Tabby yarn in rose or any color of your choice (any kind of fuzzy yarn can work).
- Some yarn rests.
- Crochet hook (3 mm).
- Black beads or safety eyes.
- Scissors.
- Tapestry needle.
- Fiberfill stuffing.
Skill Level
Intermediate
Size
The completed amigurumi is approximately 21 cm (8.25 in) high, but can be modified to be bigger or smaller depending on the yarn and hook used.
Skills You Need
- Chain
- Single crochet
- Double crochet
- Half double crochet
- Slip stitch
- Increase
- Decrease
Abbreviations
- Ch = chain
- St = stitch
- Sc = single crochet
- Sl st = slip stitch
- Dec = decrease stitch (two single crochets together)
- Inc = increase stitch (two single crochets in one stitch)
- Dc = double crochet
- Hdc = half double crochet
- Tc = triple crochet
- Rnd = round
- * = repeat the instructions for the times indicated
- (...) = total amount of stitches
Tips
- Do not join rounds; work in a continuous spiral.
- Use a stitch marker or a piece of yarn to keep track of the last stitch in each round.
- All stitches are worked into both loops unless stated otherwise in the pattern.
- When filling with polyester stuffing, pull apart each large chunk into many smaller pieces for even distribution of firmness.
- Amigurumi can be made in any preferred colors.
Seamless Way of Changing Color When Working in the Round
Pick up the new color at the end of the round: insert your hook into the stitch, yarn over the new color, and pull through the stitch and the loop on your hook to complete the stitch.
To Make a Magic Ring
- Loop the thread twice around your middle finger.
- Insert the hook under both loops, pull the yarn under the loops, and hook the thread again.
- Pull the thread through the new loop. The first crochet stitch is ready!
- Repeat the needed number of times.
- Pull the inner threads to tighten the ring.
Shift Stitch
During the spiral amigurumi work, you may need to keep the work symmetrical. As the work tends to twist to the right, adjust the position of the marker periodically at the beginning of the round.
The shift stitch is an extra stitch worked at the end of a round to maintain symmetry. If the marker moves to the right, work one extra stitch at the end of the round to adjust it (the last stitch of the round now becomes the first). The shift stitch is not included in the round description.
To check if it’s time to work a shift stitch, fold your work in half and check the marker's alignment, or use a contrast yarn that marks a straight line.
This method does not increase or decrease the total number of stitches; the stitch count remains the same.
Instructions
The alpaca consists of several parts which you crochet separately and then sew them together.
Leg (4x)
Begin crocheting with Schachenmayr Catania beige yarn.
Round 1: 6 single crochets into magic ring.
Round 2: Increase 6 times (12 stitches).
Round 3: Single crochet in each of the next 12 stitches.
Round 4: *Single crochet in each of the next 3 stitches, increase* (15 stitches).
Round 5: Single crochet in each of the next 15 stitches.
Change the yarn color to white.
Round 6: *Single crochet in each of the next 4 stitches, increase* (18 stitches).
Rounds 7-10: Single crochet in each of the next 18 stitches.
Continue crocheting with Schachenmayr Tabby yarn.
Rounds 11-14: Single crochet in each of the next 18 stitches.
Stuff the legs firmly.
Bind off. Do not bind off legs 2 and 4; they will be joined together with the other two legs.
Sew or crochet the legs in pairs together. Crochet the first and the second legs together: single crochet in each of the next 4 stitches (insert the hook through both loops of the first and second legs at the same time). Bind off.
Join the 3rd and 4th legs together the same way.
Body
Continue with Schachenmayr Tabby yarn.
Count 5 stitches to the right of the seam and join yarn to the 6th stitch from the seam to crochet the belly.
Round 1: Single crochet in each of the next 12 stitches (6 stitches of the 1st leg and 6 stitches of the second leg), chain 1 stitch, turn the work.
Rounds 2-6: Single crochet in each of the next 11 stitches, chain 1 stitch, turn the work.
Now we will join the other 2 legs to the belly.
Join legs 3 and 4 to the belly: single crochet in each of the next 12 stitches (insert the hook through both loops of the legs and belly at the same time).
Round 1: Work one round in single crochets: single crochet in each of the next 8 stitches of the leg + increase + single crochet in each of the next 8 stitches of the leg + single crochet in each of the next 6 stitches of the belly + single crochet in each of the next 8 stitches of the leg + increase + single crochet in each of the next 8 stitches of the leg + single crochet in each of the next 6 stitches of the belly (48 stitches).
Mark the beginning of the round with a stitch marker.
Rounds 2-3: Single crochet in each of the next 48 stitches.
Round 4: Single crochet in each of the next 3 stitches, decrease, *single crochet in each of the next 6 stitches, decrease*, repeat from * to * twice, single crochet in each of the next 27 stitches (45 stitches).
Round 5: Single crochet in each of the next 3 stitches, decrease, *single crochet in each of the next 5 stitches, decrease*, repeat from * to * twice, single crochet in each of the next 26 stitches (42 stitches).
Round 6: Single crochet in each of the next 2 stitches, decrease, *single crochet in each of the next 4 stitches, decrease*, repeat from * to * twice, single crochet in each of the next 26 stitches (39 stitches).
Round 7: Single crochet in the next stitch, decrease, *single crochet in each of the next 3 stitches, decrease*, repeat from * to * twice, single crochet in each of the next 26 stitches (36 stitches).
Round 8: *Single crochet in the next stitch, decrease*, repeat from * to * 5 times, single crochet in each of the next 19 stitches, decrease (30 stitches).
Round 9: Single crochet in each of the next 30 stitches.
Round 10: *Single crochet in each of the next 3 stitches, decrease*, repeat from * to * 6 times (24 stitches).
Stuff firmly and shape the amigurumi while stuffing.
Neck and Head
Continue crocheting using Schachenmayr Tabby yarn.
Rounds 11-18: Single crochet in each of the next 24 stitches.
Stuff your amigurumi while crocheting.
Round 19: *Single crochet in the next stitch, increase* (36 stitches).
Round 20: *Single crochet in each of the next 5 stitches, increase* (42 stitches).
Rounds 21-28: Single crochet in each of the next 42 stitches.
Round 29: *Decrease, single crochet in each of the next 5 stitches* (36 stitches).
Round 30: *Decrease, single crochet in each of the next 4 stitches* (30 stitches).
Round 31: *Decrease, single crochet in each of the next 3 stitches* (24 stitches).
Round 32: *Decrease, single crochet in each of the next 2 stitches* (18 stitches).
Stuff the body firmly.
Round 33: *Decrease, single crochet in the next stitch* (12 stitches).
Round 34: *Decrease*, repeat 6 times. Bind off and hide yarn ends.
Tail
Crochet using beige yarn.
Round 1: 6 single crochets into magic ring.
Round 2: Increase 6 times (12 stitches).
Round 3: *Single crochet in each of the next 3 stitches, increase* (15 stitches).
Rounds 4-7: Single crochet in each of the next 15 stitches.
Stuff the tail slightly.
Round 8: *Decrease, single crochet in each of the next 3 stitches* (12 stitches).
Round 9: Single crochet in each of the next 12 stitches.
Bind off, leaving a long tail for sewing.
Ear (2x)
Crochet with beige color yarn.
Round 1: 6 single crochets into magic ring.
Round 2: *Increase, single crochet in the next stitch* (9 stitches).
Round 3: Single crochet in each of the next 9 stitches.
Round 4: *Single crochet in each of the next 2 stitches, increase* (12 stitches).
Round 5: *Single crochet in each of the next 3 stitches, increase* (15 stitches).
Round 6: *Single crochet in each of the next 4 stitches, increase* (18 stitches).
Rounds 7-9: Single crochet in each of the next 18 stitches.
Round 10: *Decrease, single crochet in each of the next 4 stitches* (15 stitches).
Round 11: Single crochet in each of the next 15 stitches.
Round 12: *Decrease, single crochet in each of the next 3 stitches* (12 stitches).
Do not stuff the ears.
Cut the yarn leaving a long tail for sewing. Make the second ear the same way. Set the ears aside.
Muzzle
Crochet with beige color yarn.
Round 1: 6 single crochets into magic ring.
Round 2: Increase 6 times (12 stitches).
Round 3: *Single crochet in the next stitch, increase* (18 stitches).
Round 4: *Single crochet in each of the next 2 stitches, increase* (24 stitches).
Round 5: Single crochet in each of the next 18 stitches.
Round 6: *Single crochet in each of the next 3 stitches, increase* (30 stitches).
Rounds 7-10: Single crochet in each of the next 30 stitches.
Cut the yarn leaving a long tail for sewing. Set the muzzle aside.
Saddle Blanket
Chain 11 stitches.
Round 1: Single crochet into the second chain from the hook, single crochet in each of the next 10 stitches, 2 single crochets in the next stitch, then, working on the other side of the foundation chain, single crochet in each of the next 9 stitches, and 2 single crochets in the next stitch.
Change the yarn color.
Round 2: 2 single crochets in the next stitch, single crochet in each of the next 10 stitches, 2 single crochets in each of the next 2 stitches, single crochet in each of the next 10 stitches, and 2 single crochets in the next stitch.
Change the yarn color.
Round 3: 2 single crochets in each of the next 2 stitches, single crochet in each of the next 10 stitches, 2 single crochets in each of the next 4 stitches, single crochet in each of the next 10 stitches, and 2 single crochets in each of the next 2 stitches.
Change the yarn color.
Round 4: *Single crochets in the next stitch, 2 single crochets in the next stitch*, repeat from * to * twice, single crochet in each of the next 10 stitches, *single crochets in the next stitch, 2 single crochets in the next 2 stitches*, repeat from * to * 4 times, single crochet in each of the next 10 stitches, *single crochets in the next stitch, 2 single crochets in the next stitch*, repeat from * to * twice.
Work one round of single crochets all around the saddle.
Add fringe to both sides of the saddle blanket by cutting the yarn twice as long as the desired length of fringe. Insert the hook through the loop where you want the fringe, grab a strand of your yarn, and pull it through. Grab the end of the yarn and pull that through the loop. Check for any long stragglers and trim them.
Assembly
Always pin the body parts together before sewing to help maintain their position and visualize the final shape.
Attach the tail to the body of your alpaca.
The muzzle is attached to the head next. Thread a needle onto the yarn tail from the muzzle and sew it to the head of your alpaca. Embroider a nose with black yarn and add a mouth if desired, then finish with a smile. You can also add eyelashes and eyebrows. Weave in all ends.
Pinch the bottom of the ear to create a little crease and sew a few stitches to hold the shape. Position the ears correctly, using the leftover yarn to sew them to the head. Ensure the ears are even by stepping back and checking the overall appearance.
Place the eyes in their proper position and sew them to the head of the alpaca. Embroider the nose with black yarn and add a smile if desired. You can also enhance the appearance with eyebrows and eyelashes. Weave in all ends.
Add some fur to the head by cutting strands of rose yarn, looping them through the single crochets of the head, knotting, and trimming as necessary.
- Funny Pictures
-
 These are the Pics That Simply Describe Your Life
-
 Hilariously Accurate Parenting Memes That Show the Other Side of Parenthood
-
 Great Pics That Just Depict Our Lives
- Recipes
-
 Crispy Baked Avocado Fries
-
 Baked Beans and Hot Dogs with Biscuit Topping
-
 Roasted Rosemary Lemon Chicken Breasts
- Lifehacks
-
 Crochet Basics: Twisted Fringe
-
 7 Crochet Tips And Tricks
-
 How To Work Crochet Into Denim
- Crochet Ideas
-
 Crochet Snorlax Plushie Doll
-
 Crochet Cat in 1 Row
-
 Crochet Beautiful Penguin Toy
- DIY
-
 Popsicle Stick and Jingle Bell Christmas Tree Ornament
-
 Upcycled Mason Jar Chicken Vase
-
 Crochet Namaste Stephanie Doll
- Knitting Ideas
-
 Knitted Keepsake Bag
-
 Knitted Textured Heart Dishcloth
-
 Knitted Snowfall Dishcloth