How to Crochet an Adorable Tiger: A Fun Project for All Skill Levels

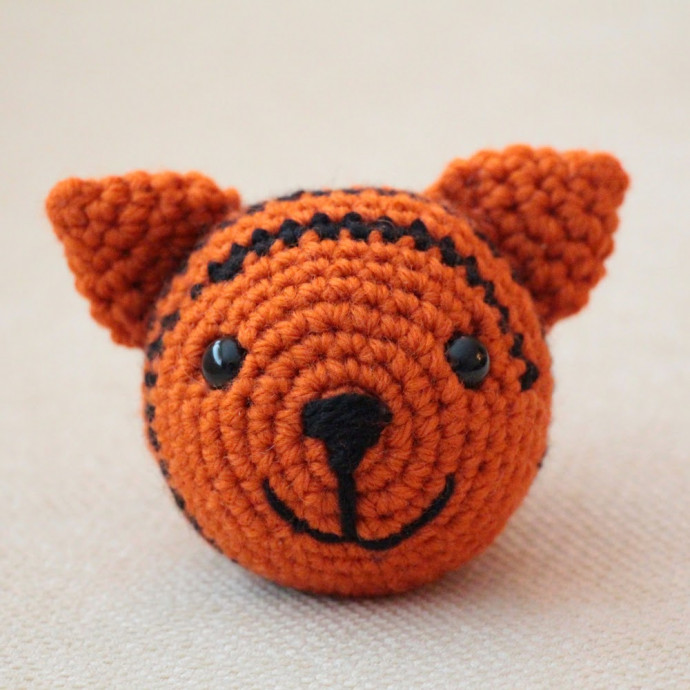
Crocheting an adorable tiger is a delightful project that combines creativity with cuteness. With just a few colorful yarns and a crochet hook, you can bring to life a huggable and charming tiger that will add a touch of whimsy to any room. Whether you're a seasoned crocheter or a beginner looking for a fun challenge, crafting this lovable creature is sure to bring a smile to your face. The intricate details that you can carefully stitch, from the stripes to the tiny whiskers, make the finished tiger not only a joy to create but also a wonderful gift for yourself or a loved one. So gather your supplies, settle into your favorite crafting spot, and let your imagination run wild as you crochet your way to a one-of-a-kind tiger that is as cute as can be.
You Will Need:
Here is a list of materials you will need to crochet your tiger:
- Orange yarn
- Black yarn in worsted weight
- Stuffing (polyfill or wool)
- Safety eyes (8 or 9mm for this size)
- Crochet hook (size A recommended for a tight fabric, but up to size G will work)
- Tapestry needle
Key:
- Ch = chain
- INC = 2 single crochet into one stitch
- #INC = do # increases in a row
- DEC = invisible decrease turns the next 2 stitches into one stitch
- # or sc# = separate single crochet stitches (no increasing or decreasing)
Begin Here:
We will use orange yarn to start. Please note: as written in the pattern below, after the 8th round, change to black and crochet half a round with black before changing back to orange. Crochet 2 orange rounds. On the next round, insert some black segments. Then crochet 2 orange rounds. You can be creative and make it up as you go along! Just remember to leave slack when you drop the yarn and pick it up again to change colors. To keep it even simpler, just cut the old color leaving a small tail to tie old and new yarns together to hold them. No one will know since all the ends will be inside your amigurumi!
Pattern Rounds:
R1: With orange, magic circle with 6 stitches into the loop.
R2: INC around. (12)
R3: (1, INC) around (18)
R4: 1, INC, 2, INC, 3, INC, 2, INC, 3, INC, 2 (23)
R5: INC, 4, INC, 3, INC, 4, INC, 3, INC, 4 (28)
R6: 3, INC, 6, INC, 6, INC, 6, INC, 3 (32)
R7: 5, INC, 9, INC, 9, INC, 6 (35)
R8: 3, INC, 10, INC, 11, INC, 8 (38)
Change to black after this round to do part of R9. I have chosen the portion where his forehead is. Remember to change back to orange mid-round.
R9: 12, INC, 25 (39)
R10: INC, 38 (40) Orange round.
R11: sc around in orange (insert eyes between R6/7, nine stitches apart)
R12: 38, DEC (39) Use some black on this round.
R13: 25, DEC, 12 (38) Orange round.
R14: 8, DEC, 11, DEC, 10, DEC, 3 (35) Orange round.
R15: 6, DEC, 9, DEC, 9, DEC, 5 (32) Use some black on this round.
R16: 3, DEC, 6, DEC, 6, DEC, 6, DEC, 3 (28) Orange round.
Tie any knots you have from changing colors. Fill with stuffing almost to the top.
R17: 4, DEC, 3, DEC, 4, DEC, 3, DEC, 4, DEC (23) Orange round.
R18: 2, DEC, 3, DEC, 2, DEC, 3, DEC, 2, DEC, 1 (18) Use some black on this round. Tie off all knots before moving on.
R19: (DEC, 1) repeat around (12) Orange.
R20: (DEC, 1) repeat around. Fasten off. Weave loose end through each stitch in the opening. Fill completely with stuffing. Pull tightly to close. Sew in your ends.
Embroidering the Nose and Mouth:
Embroider the nose and mouth after you finish the body/head. Thread about 18 inches of black yarn on your needle.
- Go in from the bottom of the tiger and make a triangle going back and forth with the black yarn for the nose starting at the wide edge. Keep your stitches close together so you see minimal orange showing through. Our tiger had 6 stitches.
- Come out with your needle at the base of the triangle and go back in where you want the center of the mouth to be (we will call this point X). You will end up with a small vertical line below his nose. (Did you know this is called the "philtrum"???)
- Come back out at one corner of the mouth. Enter back in at "X".
- Come back out at the other corner of the mouth. Enter back in at "X".
- Now have a look at the 2 sides of the mouth. To make sure the little smile/curve stays put, come out midway between the corner of the mouth and "X". Catch the horizontal yarn and go back in at the same place.
- Do this for the other side of the mouth.
You may have to do this a few times until you have something that you like. When you are happy, go back out to where you started at the bottom of the tiger, tie a knot and push the knot into the tiger's head/body.
Ears (Make 2 in Orange):
R1: Magic Circle with 4 sts in the loop.
R2: (1, INC) twice around (6)
R3: (2, INC) twice around (8)
R4: (3, INC) twice around (10).
R5: (4, INC) twice around (12).
R6: (5, INC) twice around (14). Bind off leaving a tail to sew to the top of head. Flatten and sew the opening shut. Sew on. Repeat for the other ear.
Yay! The Tiger is complete!
- Funny Pictures
-
 Hilarious Memes for Those Bored to Tears
-
 Weekly Treat of Funniest Parenting Memes for Good Laugh out Loud Right Now
-
 Really Funny Pics to End These Weekend Perfectly
- Recipes
-
 Crispy Baked Avocado Fries
-
 Baked Beans and Hot Dogs with Biscuit Topping
-
 Roasted Rosemary Lemon Chicken Breasts
- Lifehacks
-
 Crochet Basics: Twisted Fringe
-
 7 Crochet Tips And Tricks
-
 How To Work Crochet Into Denim
- Crochet Ideas
-
 Crochet Snorlax Plushie Doll
-
 Crochet Cat in 1 Row
-
 Crochet Beautiful Penguin Toy
- DIY
-
 Popsicle Stick and Jingle Bell Christmas Tree Ornament
-
 DIY Santa Craft For Kids
-
 Paper Plate Angel Craft
- Knitting Ideas
-
 Knitted Bridger Cowl
-
 Knitted Keepsake Bag
-
 Knitted Cutie Cupcake Dolls