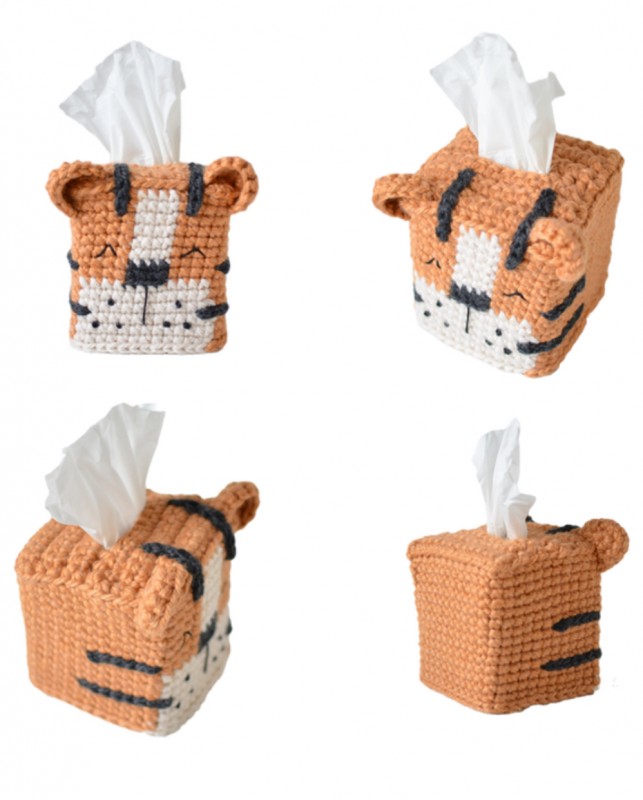
Exquisite Tiger Tissue Box Cover Crochet Pattern

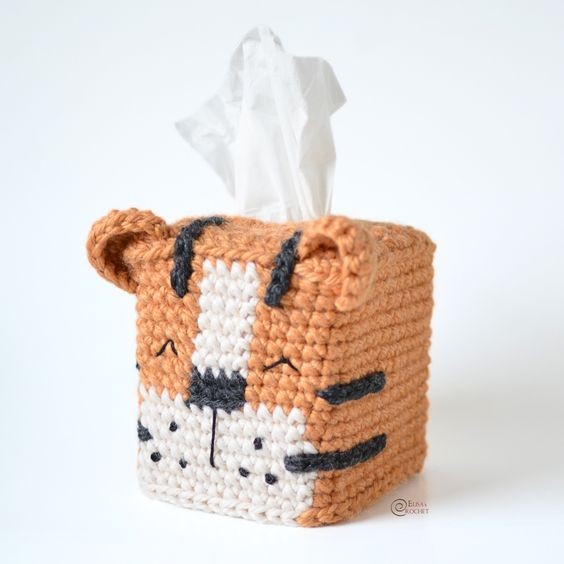
Step into the wild side of crochet with our exquisite Tiger Tissue Box Cover. This unique and eye-catching design will add a touch of untamed beauty to any room. Crafted with love and attention to detail, this crochet masterpiece is sure to impress both nature enthusiasts and crochet lovers alike. Immerse yourself in the art of crochet as you embark on this exciting project. With its vibrant orange and black stripes, the Tiger Tissue Box Cover captures the essence of the majestic big cat. The intricate crochet stitches bring the tiger's fur to life, creating a stunning texture that is both visually appealing and tactile. Not only is the Tiger Tissue Box Cover a functional accessory, but it also serves as a conversation starter. Imagine the delight of your guests as they spot this striking crochet masterpiece adorning your living room or bedroom. It's a true testament to your crochet skills and your love for all things wild and wonderful.
Here is the FREE Pattern
Difficulty Level
EASY
Size
About 6 in. (15 cm) tall.
Materials
- Yarn
Additional Materials
- Crochet hook size J/6 mm
- Black Embroidery Floss
- Embroidery Needle
Gauge
10 sc + 12 rnds = about 4 in. (10 cm).
Abbreviations
- ch = chain
- rep = repeat
- rnd(s) = round(s)
- sc = single crochet
- hdc = half double crochet
- sl st = slip stitch
- st(s) = stitch(es)
Cover
Top
With A.
Row 1: Ch 13, 1 sc in the 2nd ch from the hook, sc in the next 11 chs – 12 sc; Turn.
Rows 2 - 5: Ch 1, sc in each st along – 12 sc; Turn.
Row 6: Ch 1, hdc in next 3 sts, ch 6, skip 6 sts and hdc in next st, hdc in next 2 sts – 12 sts; Turn.
Row 7: Ch 1, sc in next 3 sts, 6 sc in ch-6 space, sc in next 3 sts – 12 sc; Turn.
Rows 8 - 11: Ch 1, sc in each st along – 12 sc; Turn.
From now on we’ll be working in round.
Rnd 12: Ch 1, sc in next 11 sts, 3 sc in next st, sc in next 9 sts, 3 sc in next st, sc in next 10 st, 3 sc in next st, sc in next 9 st, 2 sc in next st that already contains 1 sc – 50 sc.
Work in tapestry crochet, working over the top of the carried strand.
Sides
Rnd 13: With A, ch 1, working in back loop, sc in next 12 sts, sc2tog, sc in next 10 sts, sc2tog, sc in next 3 sts; with B, sc in next 4 sts; with A, sc in next 4 sts, sc2tog, sc in next 9 sts, sc2tog – 46 sc.
Rnd 14: With A, ch 1, sc in next 27 sts; with B, sc in next 4 sts; with A, sc in next 15 sts – 46 sc.
Rnds 15 - 18: Rep Rnd 14.
Rnd 19: With A, ch 1, sc in next 27 sts; with C, sc in next 4 sts; with A, sc in next 15 sts – 46 sc.
Rnd 20: Rep Rnd 19.
Rnd 21: With A, ch 1, sc in next 23 sts; with B, sc in next 12 sts; with A, sc in next 11 sts – 46 sc.
Rnd 22: Rep Rnd 21.
Rnd 23: With A, ch 1, sc in next 23 sts; with B, sc in next 13 sts; with A, sc in next 10 sts – 46 sc.
Rnds 24 - 26: Rep Rnd 23.
Rnd 27: With A, sl st in next 23 sts; with B, sl st in next 13 sts; with A, sl st in next 10 sts – 46 sl sts.
Fasten off and weave in ends.
With black floss, embroider Eyes between rnds 17 and 19, approximately 6 sts apart.
With black floss, embroider a vertical line below the Nose between Rnds 21 and 25.
With black floss, embroider the dots (French knot, with a double wrap) on the white section.
With C, outline the stripes with surface crochet.
Ears (Make Two)
With A, make a magic ring.
Row 1: Work 6 sc in ring (close the ring but do not join 1st and last sts) – 6 sc; Turn.
Row 2: Ch 1, 2 sc in next st, sc in next 4 sts, 2 sc in next st – 8 sc; Turn
Row 3: Ch 1, sc in each st along – 3 sc.
Fasten off leaving a long tail for sewing Ears to Cover.
- Funny Pictures
-
 Hilarious Memes for Those Bored to Tears
-
 Weekly Treat of Funniest Parenting Memes for Good Laugh out Loud Right Now
-
 Really Funny Pics to End These Weekend Perfectly
- Recipes
-
 Crispy Baked Avocado Fries
-
 Scrambled Chickpea and Spinach Pitas
-
 Cinnamon Pancakes
- Lifehacks
-
 Crochet Basics: Aligned Cobble Stitch
-
 Brick Stitch Crochet Tutorial
-
 Crochet Basics: Wattle Stitch
- Crochet Ideas
-
 Crochet Snorlax Plushie Doll
-
 Crochet Beautiful Penguin Toy
-
 Crochet Tiny Snowman
- DIY
-
 DIY Santa Craft For Kids
-
 Paper Plate Angel Craft
-
 Upcycled Mason Jar Chicken Vase
- Knitting Ideas
-
 Knitted Bridger Cowl
-
 Knitted Keepsake Bag
-
 Knitted Cutie Cupcake Dolls