Create Your Own Adorable Crochet Whale

Introduction
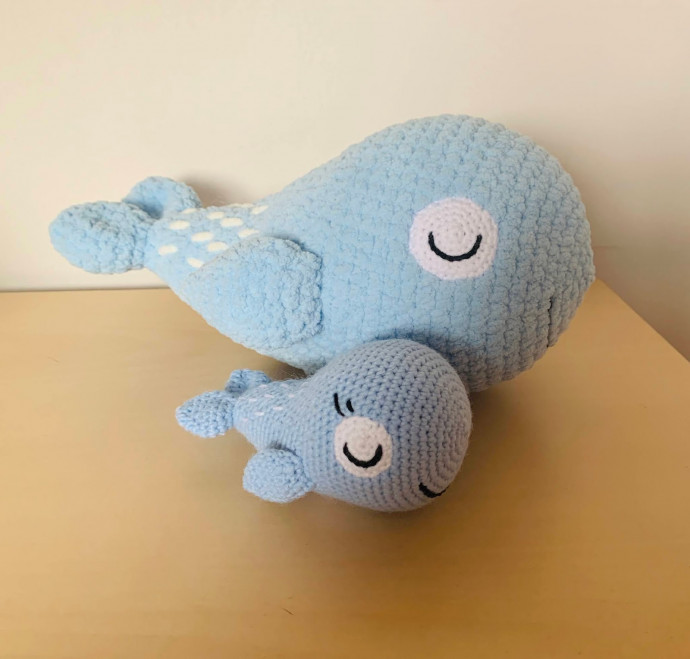
Creating a crochet adorable whale can be such a delightful and rewarding experience! From selecting the perfect yarn colors to carefully following the pattern instructions, each stitch is a step closer to bringing this charming sea creature to life. As you work on crafting its cute little fins and tail, you can't help but feel a sense of joy and satisfaction knowing that this handmade creation will soon become a cherished keepsake or a thoughtful gift for someone special. So grab your crochet hook, let your creativity flow, and prepare to dive into the wonderful world of crafting your very own adorable whale!
Materials Needed
- Yarn needle
- Soft toy filling
- 3mm crochet hook
- DK Yarn – Approx. 80m
- oWendy Peter Pan DK – Blue
- oWendy Peter Pan DK – Black
- oWendy Peter Pan DK – White
Stitches and Abbreviations Used
(US terminology)
- MR - Magic ring (sc unless otherwise specified)
- Ch - Chain
- SC - Single crochet
- Inc - Increase stitch (2 single crochets into one stitch)
- Dec - Decrease stitch (single crochet 2 stitches together)
- FLO – Front Loop Only
- YO – Yarn Over
- ST - Stitch
- SLST - Slip stitch
- R – Round or Row
- FO - Finish Off
Important Notes
- This pattern is worked in continuous rounds. It is helpful to use a stitch marker to keep track.
- The number in ( ) at the end of each round indicates the total stitch count for that round.
- * * indicates repeated series of stitches.
- Use invisible decreases for a neater finished product by using the FLO of the stitches while making the decrease.
- Stitches in [ ] are worked into one stitch.
Remember to stuff the product little and often as you work.
Body Instructions
Body - Blue
- 6sc into MR (6)
- *inc* x6 (12)
- *1sc, inc* x6 (18)
- *1sc, inc, 1sc* x6 (24)
- *3sc, inc* x6 (30)
- *2sc, inc, 2sc* x6 (36)
- *5sc, inc* x6 (42)
- *3sc, inc, 3sc* x6 (48)
- Sc (48)
- *7sc, inc* x6 (54)
- 11-19. Sc (54) – 9 rounds
- 20. 10sc, *dec, 2sc* x6, 20sc (48) - mark the decrease section in this round to help with positioning the eyes and fins later.
- 21. Sc (48)
- 22. 7sc, *dec, 2sc* x6, 17sc (42) – start stuffing and continue stuffing until closing.
- 23-24. Sc (42) – 2 rounds
- 25. 5sc, *dec, 2sc* x6, 13sc (36)
- 26. Sc (36)
- 27. 6sc, *dec, 2sc* x4, 14sc (32)
- 28. Sc (32)
- 29. *3sc, dec, 3sc* x4 (28)
- 30. Sc (28)
- 31. *5sc, dec* x4 (24)
- 32. Sc (24)
- 33. *2sc, dec, 2sc* x4 (20)
- 34. Sc (20)
- 35. *3sc, dec* x4 (16)
- 36. Sc (16)
- 37. *1sc, dec, 1sc* x4 (12)
- 38. Sc (12) – Finish stuffing, the rest of the whale and parts are unstuffed.
- 39. inc into the stitch, skip the next 6 stitches, inc into the last 5 stitches (12) – This is making one of the tail fins.
- 40. *1sc, inc, 1sc* x4 (16)
- 41-42. Sc (16) – 2 rounds
- 43. *1sc, dec, 1sc* x4 (12)
- 44. Sc (12)
- 45. *dec* x6 (6)
- FO – Close hole
- 39b. Join yarn at the unworked stitch from R39 above - *inc* x6 (12) - This is making the second tail fin.
- 40b. *1sc, inc, 1sc* x4 (16)
- 41b-42b. Sc (16) – 2 rounds
- 43b. *1sc, dec, 1sc* x4 (12)
- 44b. Sc (12)
- 45b. *dec* x6 (6)
- FO – Close hole
Eyes Instructions
Eyes x2 – White
- 6sc into MR (6)
- *inc* x6 (12)
- *1sc, inc* x6 (18)
- FO – Leaving yarn tail. This will be used to sew the eye to the head after adding the detail.
Detailing in the Eyes x2 - Black
- Insert hook into any st between R2&3 of the eyes. Surface slst into the next 7sts.
- FO – Tie off yarn tails.
- Sew eye pieces to R10-16 of the head approx. 16st apart. Use the increased stitches marked from R20 of the body to help placement.
Side Fins Instructions
Side Fins x2 – Blue
- 4sc into MR (4)
- *inc* x4 (8)
- *1sc, inc* x4 (12)
- Sc (12)
- *1sc, inc, 1sc* x4 (16)
- 6-7. Sc (16) – 2 rounds
- 8. *1sc, dec, 1sc* x4 (12)
- 9. *1sc, dec* x4 (8)
- FO – leaving yarn tail. Do not stuff. Flatten the piece. Sew to body at approx. R21. 20st apart.
Detailing
Using a strand of white yarn, sew onto the tail ensuring not to pull too tightly. See picture for placement.
Using a strand of black yarn, sew a mouth at approx. R7.
Using a strand of black yarn, add detailing above the eyes if desired.
- Funny Pictures
-
 Hilarious Memes for Those Bored to Tears
-
 Weekly Treat of Funniest Parenting Memes for Good Laugh out Loud Right Now
-
 Really Funny Pics to End These Weekend Perfectly
- Recipes
-
 Crispy Baked Avocado Fries
-
 Scrambled Chickpea and Spinach Pitas
-
 Cinnamon Pancakes
- Lifehacks
-
 Crochet Basics: Aligned Cobble Stitch
-
 Brick Stitch Crochet Tutorial
-
 Crochet Basics: Wattle Stitch
- Crochet Ideas
-
 Crochet Snorlax Plushie Doll
-
 Crochet Beautiful Penguin Toy
-
 Crochet Tiny Snowman
- DIY
-
 DIY Santa Craft For Kids
-
 Paper Plate Angel Craft
-
 Upcycled Mason Jar Chicken Vase
- Knitting Ideas
-
 Knitted Bridger Cowl
-
 Knitted Keepsake Bag
-
 Knitted Cutie Cupcake Dolls