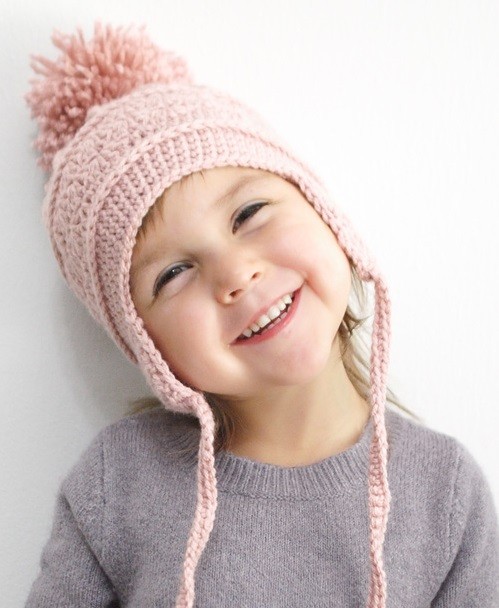
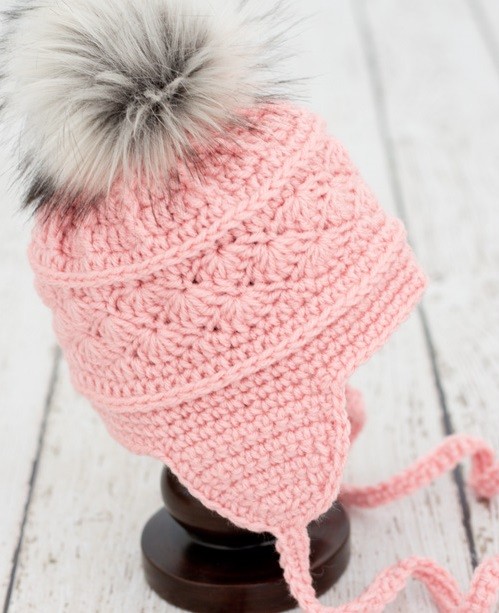
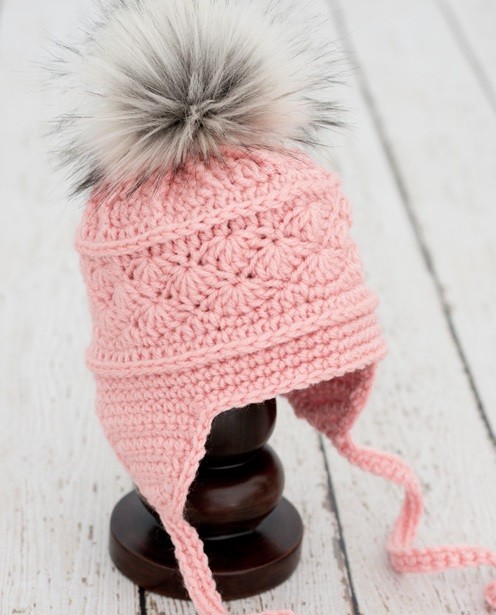
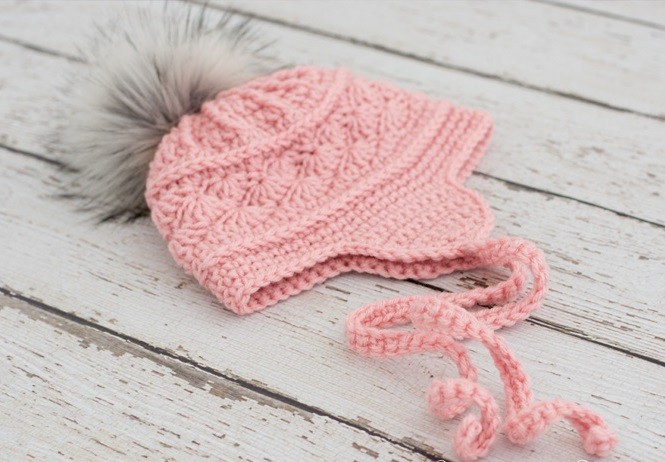
How to Crochet a Stylish Baby Hat with Earflaps

You’ll Need:
100-200 yards, depending on the size chosen, of #4 worsted weight Red Heart Comfort in Petal Pink, or Red Heart Soft in Rose Blush;
Crochet hooks 3.75 mm (for 3-6 months and 9-12 months), 4 mm (for other sizes);
Yarn needle;
Scissors;
Pom-pom maker (optional);
1/4 yd Fashion Faux Fox Fur Fabric – Silver (optional).
Size:
Does not include pom-pom, earflaps or ties:
- 3-6 month hat: 5” tall by 7 1/2″ wide;
- Toddler hat: 7” tall by about 9” wide;
- Child hat: 7 ½” tall by 9 ½” wide.
Used Patterns
- Shell = 5 dc in designated stitch;
- Stitching in the “3rd loop” of hdc. Work all stitches for that row in the 3rd loop of the hdc from the previous row. Look at the top of the stitch, and locate the sideways “V”, bend the stitch to look at the back, and you should see another “V”. You’ll be working into the back loop of that “V”, this is called the 3rd loop.
Stitches Control:
2 1/4″ across after round 2 using a 3.75mm hook, or 2 1/2″ across after round 2 using a 4mm hook.
Instructions
Round 1: 12 dc in magic circle, join with sl st to first dc. (12);
Round 2: ch 1, FPdc around first dc, dc in next st *FPdc around same dc, dc in next st; repeat from * around, you should have one FPdc around each dc with one dc in between, join with sl st to first FPdc. (24);
Round 3: ch 1, FPdc around first FPdc from prev round, dc in next 2 sts, *FPdc around FPdc from prev round, dc in next 2 sts; repeat from * around, join with sl st to first FPdc. (36);
Round 4: ch 1, FPdc around first FPdc from prev round, dc in next 3 sts, *FPdc around FPdc from prev round, dc in next 3 sts; repeat from * around, join with sl st to first FPdc. (48);
Round 5: ch 1, FPdc around first FPdc from prev round, dc in next 4 sts, *FPdc around FPdc from prev round, dc in next 4 sts; repeat from * around, join with sl st to first FPdc. (60);
Round 6: ch 1, hdc in each st around, join with sl st to first hdc. (60);
Round 7: ch 1, working in the 3rd loop of hdc, hdc in each st around, join with sl st to first hdc. (60);
Round 8: *sk 2 sts, shell in next st, sk 2 sts, sl st in next st; repeat from * around, final sl st counts as join. (10 shells);
Round 9: sl st to center of shell from prev round, *sk 2 sts, shell in sl st from prev round, sk 2 sts, sl st to top of shell from prev round; repeat from * around, final sl st counts as join. (10 shells);
Round 10: sl st to center of shell from prev round, *sk 2 sts, shell in sl st, sk 2 sts, sl st in next st; repeat from * around, final sl st counts as join. (10 shells);
Round 11: sl st over to center of shell from prev round, ch 1, sc in same st, sc in next st, hdc in next 3 sts *sc in next 3 sts, hdc in next 3 sts; repeat from * around, sc in final st of round. (60);
Round 12: ch 1, hdc in each st around, join with sl st to first hdc. (60);
Round 13: ch 1, working in 3rd loop, sc in each st around, join with sl st to first sc. (60);
Rounds 14-15: ch 1, sc in same st as join, and each st around, join with sl st to first sc. (60);
From the end of round 15, move straight into making the first earflap.
First Earflap
Row 1: ch 1, sc in next 10 sts, ch 1, turn. (10);
Row 2-3: sc in each st across, ch 1, turn. (10);
Row 4: sc2tog, sc in next 6 sts, sc2tog, ch 1, turn. (8);
Row 5: sc in each st across, ch 1, turn. (8);
Row 6: sc2tog, sc in next 4 sts, sc2tog, ch 1, turn. (6);
Row 7: sc2tog, hdc in next 2 sts, sc2tog. (4);
Fasten off, and weave in ends.
Second Earflap
Count over 20 stitches from the other earflap, attach yarn.
Row 1: ch 1, sc in next 10 sts, ch 1, turn. (10);
Row 2-3: sc in each st across, ch 1, turn. (10);
Row 4: turn, sc2tog, sc in next 6 sts, sc2tog, ch 1, turn. (8);
Row 5: sc in each st across, ch 1, turn. (8);
Row 6: sc2tog, sc in next 4 sts, sc2tog, ch 1, turn. (6);
Row 7: sc2tog, hdc in next 2 sts, sc2tog. (4);
sc evenly around the edge of the earflaps, and hat.
Fasten off, and weave in ends.
Finishing
Make a pom-pom, and then attach securely to the top of the hat.
Ties/Braids
Attach yarn to the bottom of the earflap, stitch a chain as long as you want the ties to be, and sc in the 2nd chain from hook, and in each st across. Attach securely to the bottom of the earflap. The hat pictured has ties that are 50 chains long and measure just a tiny bit over 12″ long,
or
Cut 9, 2 ft lengths of yarn for each tie, thread them through the bottom of the earflaps, and braid. Finally, fasten off with a piece of yarn wound around the bottom section of the braid.
- Funny Pictures
-
 Relatable and Funny Memes to Distract You From the Routine
-
 Hilarious Cat Snapchats That Will Leave You With the Biggest Smile
-
 Today’s Top Funny Tweets to Scroll Before Bed
- Recipes
-
 Cappuccino Brownies
-
 Chicken Mushroom Tortellini Bake
-
 Spinach Pie
- Lifehacks
-
 8 Necessary Tips for Baking Bread
-
 Tips & Hacks for Clean Carpets
-
 10 Uses For Old TV Armoires
- Crochet Ideas
-
 Crochet Watermelon Amigurumi
-
 Crochet Flower Hat for your Pet
-
 Crochet Shark Applique
- DIY
-
 Crochet Titus the Barn Owl
-
 Crochet Rainbow Bunny
-
 DIY Washer Ornaments
- Knitting Ideas
-
 Knitted Star Square Dishcloth
-
 Knitted Free 2025 Year Dishcloth
-
 Knitted Ribbed Adult Hat