Crochet Checker Stitch Mittens

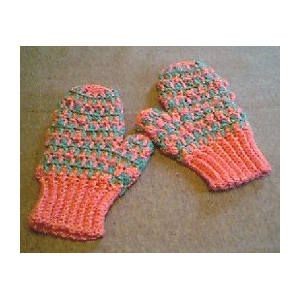
Crochet Checker Stitch Mittens are not only cozy and functional but also fun to make! This lovely checker stitch pattern adds a touch of charm to your winter wardrobe while keeping your hands warm and stylish. With a bit of yarn and some crochet hooks, you can create these adorable mittens in no time. Whether you are a crochet enthusiast looking for a new project or a beginner eager to try your hand at something exciting, these mittens are a perfect choice. So grab your supplies, cozy up in your favorite spot, and enjoy crafting your way to a fashionable winter accessory that will surely turn heads and keep your hands toasty warm!
Materials Needed
Red Heart Baby Sport Pompadour yarn in Raspberry and Parakeet.
Size G aluminum crochet hook
Yarn Needle
Specifications
Yarn Thickness: 3mm
Gauge: 4sc=1"
Finished Size: Ladies Medium
Skill Level: Intermediate
Special Stitch Used
Checker Stitch (ck): Sc in next st indicated. Insert hook in same st as sc, draw up a lp, while leaving the first lp on hook, ch3. Yo and draw lp through the two lps on hook. Then insert hook in each of the 3 chs, drawing up a loop in each one till you have a total of 4 lps on hook, then yo and draw through all 4 lps on hook.
Instructions
Make two the same.
Cuff with raspberry.
Work in back loops only throughout cuff.
Cuff Creation
ROW 1: Ch 13, sc in 2nd ch from hook and in each ch across. Ch1 turn.
ROW 2-31: Sc in each st across. Ch1 turn. Fold the cuff in half and slst the first row to the last row. Now you will be working in the round from here.
Round Instructions
RND 1: Ch1. Work one sc in each row around. Make one more sc to have 32 sc around.
RND 2: Ch1. Ck in same st as slst. Ch3. *Sk next st, ck in next st. Ch3. Rep from * around. Join w/slst to first sc. Fasten off raspberry.
RND 3: Join parakeet yarn in top of first ck. Sc in same st. Dc in skipped st of pre rnd in front of ch3 sp. *Sc in top of next ck. Dc in skipped st of pre rnd in front of ch3 sp. Rep from * around. Join w/slst to first sc.
RND 4: Ch1. Ck in same st as slst. Ch3. Sk next st, ck in next st. Rep from * around. Join w/slst to first sc. Fasten off parakeet.
RND 5: Join raspberry in top of first ck. Ch1, 2sc in same st. 2dc in skipped st of pre rnd in front of ch3 sp. *1 sc in top of next ck. 1dc in next skipped st of pre rnd in front of ch3 sp. Rep from * 13 times more. 2sc in next ck. 2dc in last skipped st of pre rnd. Join w/slst to first sc.
RND 6: Slst in next st. Ck in same st as last slst. Ch3. *Sk next st, ck in next st. Ch3. Rep from * around. Join w/slst to first sc. Fasten off raspberry.
RND 7: Join Parakeet in top of first ck. Sc in same st. *Dc in skipped st of pre rnd in front of ch3 sp. Sc in top of next ck. Rep from * around. Join w/slst to first sc.
RND 8: Ch1. Ck in same st as slst. Ch3. *Sk next st, ck in next st. Ch3. Rep from * around. Join w/slst to first sc. Fasten off parakeet.
Thumb Instructions
Flatten the mitten so the section where some increases were made are to your right, you will be making the thumb on the right-hand side of the mitten. You will be working with 6 ck stitches in the thumb: 3 on the front side and 3 on the back side. You will work a total of 7dc in the thumb on the first rnd.
Thumb Rounds
RND 1: Join Raspberry in the furthest most right ck on the front. Sc in same st. (Dc in skipped st of pre rnd in front of ch3 sp. Sc in top of next ck.) Rep 1 more time. Dc in next skipped st of pre rnd in front of ch3 sp. Now skip the next 12 ck sts. *Dc in next skipped st of pre rnd in front of ch3 sp. Sc in next ck. Rep from * one more time. Dc in next skipped st of pre rnd in front of ch3 sp. Join w/slst to first sc in rnd.
RND 2: Ch1. Ck in same st as slst. Ch3. *Sk next st, ck in next st. Ch3. Rep from * two times more. Sk the 2 dc. **Ck in next st, ch3, sc in next dc. Rep from ** around. Join w/slst to first sc. Fasten off raspberry.
RND 3: Join Parakeet in same st as slst. Sc in same st. *Dc bet the 2dc of pre rnd. Sc in top of next ck. *Dc in next skipped st of pre rnd in front of ch3 sp. Sc in next ck. Rep from * around. Join w/slst to first sc.
RND 4: Rep RND 8.
RND 5: Join raspberry and rep RND 7.
RND 6-8: Ch1. Sc in same st as slst. *Sk next st. Sc in next st. Rep from * around. Join w/slst to first sc. At the end of RND 8, fasten off. Finish later after the rest of the mitten is done.
Palm of Mitten Instructions
RND 1: Join raspberry in first ck skipped on front side of mitten to the left of the thumb. Ch1. Sc in same st as joining. *Dc in skipped st of pre rnd working in front of ch3 sp. Sc in next ck. Rep from * 10 times more. Work 2dc on the post of the first dc in the thumb and work 3dc in the next dc of the thumb. Join w/slst to first sc.
RND 2: Ch1. Ck in same st as slst. Ch3. *Sk next st, ck in next st. Ch3. Rep from * around. Join w/slst to first sc. Fasten off raspberry.
RND 3: Join parakeet in top of first ck. Sc in same st. *Dc in skipped st of pre rnd in front of ch3 sp. Sc in top of next ck. Rep from * around. Join w/slst to first sc.
RND 4: Ch1. Ck in same st as slst. Ch3. *Sk next st, ck in next st. Ch3. Rep from * around. Join w/slst to first sc. Fasten off parakeet.
RND 5: Join raspberry in top of first ck. Sc in same st. *Dc in skipped st of pre rnd in front of ch3 sp. Sc in top of next ck. Rep from * around. Join w/slst to first sc.
RND 6: Ch1. Ck in same st as slst. Ch3. *Sk next st, ck in next st. Ch3. Rep from * around. Join w/slst to first sc. Fasten off raspberry.
RND 7: Rep RND 3.
RND 8: Rep RND 4.
RND 9: Rep RND 5.
RND 10: Rep RND 6.
RND 11: Rep RND 3.
RND 12: Rep RND 4.
RND 13: Rep RND 5.
RND 14-19: Ch1, Sc in same st as slst and in next st. *Sk next st. Sc in each of the next 2 sts. Rep from * around. At the end of RND 19, you should have about 6 sts left. Fasten off. Leave a long enough end to finish. Turn the mitten inside out and using an overcast stitch, close both the tip of the palm and the tip of the thumb then weave all the ends in. Turn right side out and enjoy!
- Funny Pictures
-
 Hilarious Memes for Those Bored to Tears
-
 Weekly Treat of Funniest Parenting Memes for Good Laugh out Loud Right Now
-
 Really Funny Pics to End These Weekend Perfectly
- Recipes
-
 Crispy Baked Avocado Fries
-
 Scrambled Chickpea and Spinach Pitas
-
 Cinnamon Pancakes
- Lifehacks
-
 Crochet Basics: Aligned Cobble Stitch
-
 Brick Stitch Crochet Tutorial
-
 Crochet Basics: Wattle Stitch
- Crochet Ideas
-
 Crochet Snorlax Plushie Doll
-
 Crochet Beautiful Penguin Toy
-
 Crochet Tiny Snowman
- DIY
-
 DIY Santa Craft For Kids
-
 Paper Plate Angel Craft
-
 Upcycled Mason Jar Chicken Vase
- Knitting Ideas
-
 Knitted Bridger Cowl
-
 Knitted Keepsake Bag
-
 Knitted Cutie Cupcake Dolls