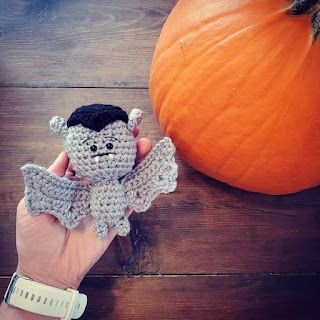
How to Crochet an Adorable Bat

Crocheting an adorable bat can be a fun and rewarding project, perfect for adding a touch of spookiness to your decorations or gifts. With some soft yarn in dark colors, a crochet hook, and a pattern to follow, you'll be on your way to creating a cute little bat friend in no time! Whether you're an experienced crocheter looking for a new challenge or a beginner wanting to try something different, this project is sure to bring a smile to your face. So grab your supplies, put on your favorite music or podcast, and enjoy the relaxing and creative process of bringing this charming creature to life stitch by stitch. Who knows, your crocheted bat might just become your favorite Halloween decoration or a beloved gift for a fellow craft enthusiast!
Supplies
3.5 Odyssey hook
Red Heart Super Saver Yarn
7mm eyes
Stuffing, scissors, needle, black thread
Head and Body
Rnd 1: Starting at the top of your bats head sc x 6 in a magic ring, or ch x 2 and do 6 sc in the second chain from your hook (6)
Rnd 2: Inc x 6 (12)
Rnd 3: [Sc, inc] x 6 (18)
Rnd 4: [Sc x 2, inc] x 6 (24)
Rnd 5: [Sc x 3, inc] x 6 (30)
Rnd 6: Sc x 30 (30)
Rnd 7: [Sc x 6, dec] x 3, sc x 4, dec (26)
Rnd 8: sc x 26 (26)
Rnd 9: You will be placing your safety eyes in this round. Sc x 11, eye in the last stitch you just did, sc x 2, eye in the last stitch, sc x 13 (26)
Rnd 10-11: Sc x 26 (26)
Rnd 12: Sc x 2, [sc x 4, dec] x 4 (22)
Rnd 13: Sc x 22 (22)
Rnd 14: Dec x 11 (11)
Rnd 15: Sc, dec x 5 (6)
Rnd 16: Inc x 6 (12)
Rnd 17: [Sc x 3, inc] x 3 (15)
Rnd 18-21: Sc x 15 (15)
Rnd 22: Sc, dec x 7 (8)
Rnd 23: Dec 4, fasten off (4)
Wing (Right)
Row 1: Ch x 13 (13)
Row 2: Turn, sc x 12 (12)
Row 3: Turn, ch, sc x 8, dec x 2 (10)
Row 4: Turn, ch, sc x 8 (8)
Row 5: Turn, ch, sc x 2, hdc, ch x 3, sc x 3, hdc, ch x 3, sc x 2 (15)
Row 6: Turn, ch, dec, [sc, hdc, ch x 3, sc all in ch3 space], sc x 3, [sc, hdc, ch x 3, sc, all in ch3 space], dec, fasten off (17)
Wing (Left)
Row 1: Ch x 13 (13)
Row 2: Turn, sc x 12 (12)
Row 3: Turn, ch, dec x 2, sc x 8 (10)
Row 4: Turn, ch, sc x 8, dec (9)
Row 5: Turn, ch, sc x 2, hdc, ch x 3, sc x 3, hdc, ch x 3, sc x 2 (15)
Row 6: Turn, ch, dec, [sc, hdc, ch x 3, sc all in ch3 space], sc x 3, [sc, hdc, ch x 3, sc, all in ch3 space], dec, fasten off (17)
Wig Cap
Rnd 1: Starting in the middle of your wig cap sc x 6 in a magic ring, or ch x 2 and do 6 sc in the second chain from your hook (6)
Rnd 2: Inc x 6 (12)
Rnd 3: [Sc, inc] x 6 (18)
Rnd 4: [Sc x 2, inc] x 6 (24)
Rnd 5: [Sc x 3, inc] x 6 (30)
Rnd 6: Sc x 12, hdc, [dc, ch, dc, all in the same stitch], hdc, sc x 15, fasten off (30)
Ear (Make 2)
Rnd 1: Sc x 5 in a magic ring, or ch x 2 and do 5 sc in the second chain from your hook (5)
Rnd 2-3: Sc x 5 (5)
Rnd 4: [Inc, sc] x 2, sc, fasten off (7)
Leg (Make 2)
Rnd 1: Sc x 5 in a magic ring, or ch x 2 and do 5 sc in the second chain from your hook (5)
Rnd 2-3: Sc x 5, fasten off at the end of Rnd 3 (5)
Assembly
Stuff your bat firmly. Use dress making pins to place your wings and sew them onto your bat. Sew on the wig cap, legs, eyebrows, and a mouth! Now enjoy your new little bat!


