Crochet Amigurumi Bat Plushie Pattern

Create your very own adorable bat plushie with this crochet amigurumi pattern. Using basic crochet stitches and techniques, you can bring this cute bat to life in no time. Choose your favorite yarn colors to customize your bat's wings and body, making it a unique addition to your amigurumi collection. Whether you're a beginner or an experienced crocheter, this project is perfect for anyone looking to add a touch of whimsy to their crafting repertoire. The finished plushie makes a great gift for Halloween or any time of year, adding a touch of handmade charm to any space. So grab your crochet hook and get ready to stitch up a one-of-a-kind bat friend that will bring a smile to your face every time you see it.
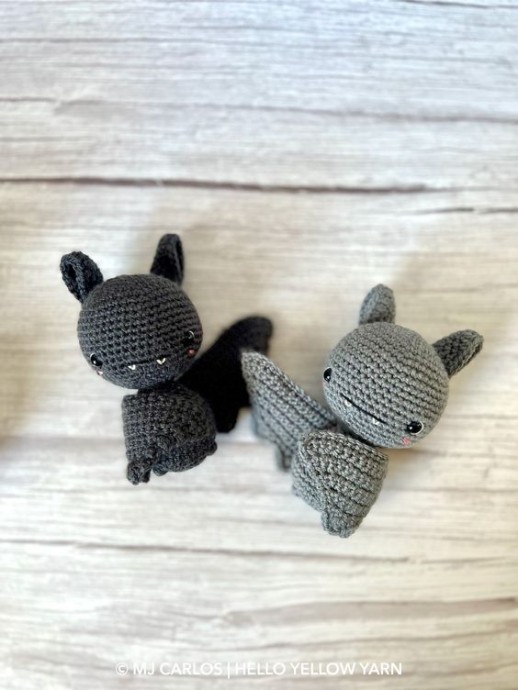
Amigurumi Bat
You Will Need:
- 3.5mm crochet hook
- 8 ply (light worsted/DK) yarn in your choice of colour
- Yarn needle
- 9mm safety eyes
- Toy stuffing
- Scissors
- Small amount of black, white and pink embroidery thread or yarn
- Stitch marker (optional)
- Sewing pins (optional)
Skill Level
Beginner
Pattern Notes:
- US Crochet Terminology.
- You’ll need to know how to make a magic ring/circle.
- You will be crocheting in spirals.
- The wings are crocheted in rows.
- Invisible decrease technique was used for this pattern – if you’re not familiar with this decrease, a regular single crochet decrease is perfectly fine to do.
Abbreviations (US Crochet Terminology)
Rnd – round
ch – chain
sc – single crochet
sl st – slip stitch
hdc – half double crochet
dc – double crochet
inc – single crochet increase (2 sc in one stitch)
dec – single crochet decrease (sc 2 together)
st / sts – stitch / stitches
rep – repeat
Head
Rnd 1: Work 6 sc in a magic ring (6 sts)
Rnd 2: Inc in each st around (12 sts)
Rnd 3: Sc 1, inc; rep 6 times (18 sts)
Rnd 4: Sc 2, inc; rep 6 times (24 sts)
Rnd 5: Sc 3, inc; rep 6 times (30 sts)
Rnd 6: Sc 4, inc; rep 6 times (36 sts)
Rnd 7: Sc 5, inc; rep 6 times (42 sts)
Rnd 8: Sc 6, inc; rep 6 times (48 sts)
Rnds 9 – 17: Sc around (48 sts)
Rnd 18: Sc 6, dec; rep 6 times (42 sts)
Rnd 19: Sc 5, dec; rep 6 times (36 sts)
Rnd 20: Sc 4, dec; rep 6 times (30 sts)
Attach safety eyes between Rounds 15 and 16, 12 stitches apart. Begin to add toy stuffing and continue stuffing as you go.
Rnd 21: Sc 3, dec; rep 6 times (24 sts)
Rnd 22: Sc 2, dec; rep 6 times (18 sts)
Rnd 23: Sc 1, dec; rep 6 times (12 sts)
Fasten off.
Body
Rnd 1: Work 6 sc in a magic ring (6 sts)
Rnd 2: Inc in each st around (12 sts)
Rnd 3: Sc 1, inc; rep 6 times (18 sts)
Rnd 4: Sc 2, inc; rep 6 times (24 sts)
Rnd 5: Sc 3, inc; rep 6 times (30 sts)
Rnd 6: Sc 4, inc; rep 6 times (36 sts)
Rnds 7 – 9: Sc around (36 sts)
Rnd 10: Sc 4, dec; rep 6 times (30 sts)
Rnd 11: Sc around (30 sts)
Rnd 12: Sc 3, dec; rep 6 times (24 sts)
Rnd 13: Sc around (24 sts)
Begin to add toy stuffing and continue stuffing as you go.
Rnd 14: Sc 2, dec; rep 6 times (18 sts)
Rnd 15: Sc around (18 sts)
Rnd 16: Sc 1, dec; rep 6 times (12 sts)
Rnd 17: Sc around (12 sts)
Fasten off and leave a long yarn tail for sewing.
Ears (Make 2)
Rnd 1: Work 6 sc in a magic ring (6 sts)
Rnd 2: Inc in each st around (12 sts)
Rnd 3: Sc 1, inc; rep 6 times (18 sts)
Rnd 4: Sc 2, inc; rep 6 times (24 sts)
Rnd 5: Sc 8, hdc 2, dc 4, hdc 2, sc 8 (24 sts)
Fold the ear in half then ch 1. Sc 5 through both layers of the ear. Fasten off and leave a long yarn tail for sewing.
Wings (Make 2)
Ch 19.
Row 1: Sc 18, ch 1. Turn (18 sts)
Row 2: Sc 18, ch 1. Turn (18 sts)
Row 3: Dec 2, sc 14, ch 1. Turn (16 sts)
Row 4: Sc 16, ch 1. Turn (16 sts)
Row 5: Dec 2, sc 12, ch 1. Turn (14 sts)
Row 6: Sc 16, ch 1. Turn (16 sts)
Row 7: Dec 2, sc 10, ch 1. Turn (12 sts)
Row 8: Sc 12, ch 1. Turn (12 sts)
Row 9: Dec 2, sc 8, ch 1. Turn (10 sts)
Row 10: Sc 10, ch 1. Turn (10 sts)
Row 11: Sl st, sc 1, hdc 1 + dc 1 + ch 1 + dc 1 + hdc 1, sc 1, sl st; rep 2 times
Fasten off and leave a long yarn tail for sewing.
Finishing and Assembly
Face Details:
- Use white embroidery thread or yarn to sew the fangs onto the face. Refer to photo below for placement. Weave in and hide the thread/yarn tails.
- Use black embroidery thread or yarn to sew the mouth onto the face. Refer to photo below for placement. Weave in and hide the thread/yarn tails.
- Use pink embroidery thread or yarn to sew the rosy cheeks onto the face. Refer to photo below for placement. Weave in and hide the thread/yarn tails.
Sewing:
- Sew the ears onto the back of the head between Rounds 9 and 10, 6 stitches apart. To prevent the ears from flopping over, make a small stitch near the bottom of the ears onto the back of the head. Weave in and hide the thread/yarn tails.
- Sew the wings onto either side of the body, towards the back of the body. The long edge of the wings should be sitting at the top of the body. Weave in and hide the thread/yarn tails.
- Embroider the feet by making several small vertical stitches over Round 4 or 5. Weave in and hide the thread/yarn tails.
- Funny Pictures
-
 Pics to Get the Excitement Today
-
 Funny Christmas Meme Dump
-
 Funniest Relatable Felines in the Form of Memes
- Recipes
-
 Cappuccino Brownies
-
 Chicken Mushroom Tortellini Bake
-
 Spinach Pie
- Lifehacks
-
 8 Necessary Tips for Baking Bread
-
 Tips & Hacks for Clean Carpets
-
 10 Uses For Old TV Armoires
- Crochet Ideas
-
 Crochet Watermelon Amigurumi
-
 Crochet Shark Applique
-
 Crochet Pineapple Amigurumi
- DIY
-
 Yarn Wrapped Christmas Wreath Ornaments
-
 Egg Carton Snowman Ornament
-
 Stick Peppermint Candy Ornament
- Knitting Ideas
-
 Knitted Star Square Dishcloth
-
 Knitted Free 2025 Year Dishcloth
-
 Knitted Ribbed Adult Hat