Crocheting a Cozy Modular Squares Throw Blanket

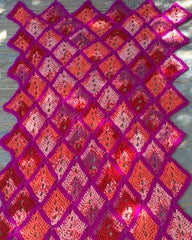
Create a Cozy and Stylish Throw Blanket
Create a cozy and stylish throw blanket by crocheting a series of modular squares. These squares can be made in various colors and patterns to add visual interest to your home decor. By joining the squares together, you can create a unique and personalized throw that will keep you warm and add a touch of handmade charm to any room. This versatile technique also allows you to experiment with different stitches and textures, making each square a mini work of art. Whether you're a seasoned crocheter or just starting out, a modular squares throw is a fun and rewarding project that will showcase your skills and creativity.
Finished Measurements
Length: 56"
Width: 42"
Materials
Premier Yarns Everyday (100% acrylic, 1.75oz/50g/126yd/115m)
- Valentine (MC) - 7 skeins
- Bright Violet (CC) - 2 skeins
Crochet Hook: Size I-9 (5.5mm) or size needed to obtain gauge
Notions: Tapestry needle
Gauge
One square measures 5 1/2" x 5 1/2 " or 7" diagonally
Save time, check your gauge.
Abbreviations
- ch = chain
- dc = double crochet
- sl st = slip stitch
- WS = wrong side
- RS = right side
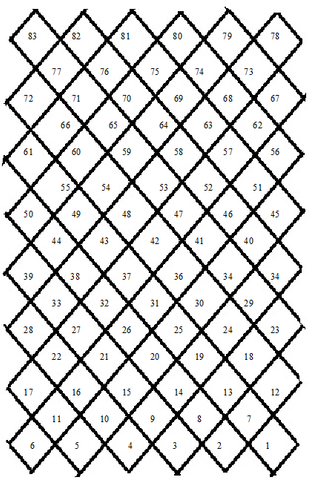
Note: The first 6 squares are made individually to make the first row. After that, each square is worked along one or two edges of previous square(s). There is no sewing needed!
Use chart to keep track of which square you are working. Fill them in as your blanket progresses.
Throw Construction
Squares #1-6 (Make 6 Individual Squares)
Using CC, ch 30.
Row 1: (WS) Dc into 4th ch from hook (skipped ch count as first dc), 1 dc in each of next 10 ch, skip next 4 ch, 1 dc in each of next 12 ch. Turn. (12 dc each side)
Cut CC.
Row 2: With right side facing, join MC with sl st to first dc, ch 3 (counts as first dc, now and throughout), dc in each of next 9 dc, skip next 4 dc, dc in each of next 10 dc. (10 dc each side)
Row 3: Ch 3, turn, dc in each of next 7 dc, skip next 4 dc, dc in each of next 8 dc. (8 dc each side)
Row 4: Ch 3, turn, dc in each of next 5 dc, skip next 4 dc, dc in each of next 6 dc. (6 dc each side)
Row 5: Ch 3, turn, dc in each of next 3 dc, skip next 4 dc, dc in each of next 4 dc. (4 dc each side)
Row 6: Ch 3, turn, dc in next dc, skip next 4 dc, dc in each of next 2 dc. (2 dc each side)
Row 7: Ch 3, turn, skip next 2 dc, dc in last dc. Fasten off.
Square 7
With right sides of Squares facing, join CC with sl st to last dc of Square 1, working in sides of rows, very close to the edge (NOT over the post), sl st in first row, work 2 sl sts in each of next 6 rows (14 sl sts), working in sides of rows (close to the edge) of Square 2, work 2 sl st in Row 1, 2 sl sts in each of next 5 rows, sl st in Row 7, sl st in last dc of Square 2. (14 sl sts)
Row 1: (WS) Ch 3, turn, skip first sl st, 1 dc in each of next 11 sl sts, skip next 4 sl sts, 1 dc in each of next 12 sl sts. Turn. (12 dc each side)
Cut CC.
Work remainder of square same as previous squares.
Squares 8-11
Work Square 8 the same as for Square 7 along the top of Squares 2 & 3.
Continue to build Squares 9-11, to join the first and second rows of squares.
Square 12
Using CC, ch 14, join with sl st to last dc on square 1 (top of square), working in sides of rows on Square 7, work 2 sl sts in each of next 6 rows, sl st in Row 7, sl st in last dc of Square 7. (15 sl sts)
Row 1: (WS) Ch 3, turn, skip first sl st, 1 dc in each of next 11 sl sts, skip last 3 sl sts, skip next 2 ch, 1 dc in each of next 12 ch. Turn. (12 dc each side)
Cut CC.
Work remainder of square same as previous squares.
Work Squares 13 – 16
Work squares 13 – 16 as established.
Square 17
Using CC, join with sl st to last dc on square 11 (top of square), working in sides of rows on Square 11, sl st in first row, work 2 sl sts in each of next 6 rows, sl st in last dc of Square 6. (15 sl sts), ch 16.
Row 1: (WS) Dc into 4th ch from hook (skipped ch count as first dc), 1 dc in each of next 10 ch, skip next 2 ch, skip next 3 sl sts, 1 dc in each of next 12 sl sts. Turn. (12 dc each side)
Cut CC.
Work remainder of square same as previous squares.
Work all of the remaining squares as established (You will have a total of 83 motifs and 15 rows when completed). Fasten off.
Edgings
(Added only on MC edges to “outline” everything in CC)
Left Edge
With RS facing, join CC with sl st to last dc on Square 6, working along MC edge, sl st in first row, work 2 sl sts in each of next 5 rows, working in Row 1, sl st in side of Row, sl st in base of first dc (3rd ch of turning ch) (14 sl sts). Ch 3, turn, skip first sl st dc in each of next 13 sl sts (14dc). Join with sl st to base of 12th dc on Square 11. Fasten off. Repeat on all inside corners on this edge.
Right Edge
With RS facing, join CC with sl st to base of dc on Row 1 of Square 1, working in sides of rows on Square 1, sl st in first row, work 2 sl sts in each of next 5 rows, sl st in next row, sl st in last dc on Square 1. (14 sl sts). Ch 3, sl st in base of 13th dc on Square 12, turn, dc in each of next 13 sl sts. (14 dc). Fasten off. Repeat on all outside corner on this edge.
Top Edge
With RS facing, join CC with sl st to base of dc on Row 1 of Square 78, working in sides of rows on Square 78, sl st in first row, work 2 sl sts in each of next 5 rows, sl st in next row, sl st in last dc on Square 78, working on other side, sl st in next row, 2 sl st in each row across; * working in next Square, work 2 sl sts in each of next 6 rows, sl st in next row, sl st in last dc at point, working on other side, sl st in next row, 2 sl sts in each of next 6 rows; rep from * across. (13 sl sts across each side and 1 sl st at each point).
Last Row: Ch 3, turn, dc in each of next 12 sl sts, *(dc, ch 4, dc) in next sl st (point), dc in each of next 11 sl sts, skip next 4 sl sts, dc in each of next 11 sl sts; rep from * across to last point, (dc, ch 4, dc) in next sl st (point), dc in each of next 13 sl sts. Fasten off.
Weave in all ends.
- Funny Pictures
-
 Hilarious Memes for Those Bored to Tears
-
 Weekly Treat of Funniest Parenting Memes for Good Laugh out Loud Right Now
-
 Really Funny Pics to End These Weekend Perfectly
- Recipes
-
 Crispy Baked Avocado Fries
-
 Scrambled Chickpea and Spinach Pitas
-
 Cinnamon Pancakes
- Lifehacks
-
 Crochet Basics: Aligned Cobble Stitch
-
 Brick Stitch Crochet Tutorial
-
 Crochet Basics: Wattle Stitch
- Crochet Ideas
-
 Crochet Snorlax Plushie Doll
-
 Crochet Beautiful Penguin Toy
-
 Crochet Tiny Snowman
- DIY
-
 DIY Santa Craft For Kids
-
 Paper Plate Angel Craft
-
 Upcycled Mason Jar Chicken Vase
- Knitting Ideas
-
 Knitted Bridger Cowl
-
 Knitted Keepsake Bag
-
 Knitted Cutie Cupcake Dolls