Adorable Crochet Baby Booties Pattern

Introduction
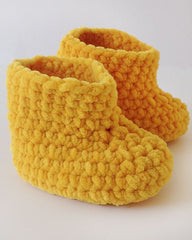
Create your own adorable pair of baby booties with this crochet parfait pattern. These booties are perfect for keeping your little one's feet warm and cozy. The pattern is easy to follow, making it a great project for beginners and experienced crocheters alike. You can customize the booties by choosing your favorite colors and adding embellishments like buttons or bows. Whether you're making them for your own baby or as a thoughtful gift for a friend, these crochet parfait baby booties are sure to be a hit. The booties are worked up quickly, so you'll have a finished pair in no time. Once you've completed the booties, you can add a cute ribbon or pom-poms for an extra touch of sweetness. Your little one will look absolutely precious in these handmade booties, and you'll feel proud knowing you made them yourself.
Level
LEVEL: Intermediate
Finished Measurements
Bootie Sole Length: 4"
Materials
Premier Yarns Parfait (100% polyester; 3.5 oz/100 gm, 192 yds/175 m)
- #30-03 Lemon Ice – 1 ball for set
Hook: US Size K (10.50 mm) crochet hook or size needed to obtain gauge
Notions: Tapestry needle
Gauge
16 sc x 16 rows = 4"
Save time, check your gauge.
Abbreviations
- ch - chain
- hdc - half double crochet
- RS - right side
- rep - repeat(ing)
- sc - single crochet
- st(s) - stitch(es)
- tog - together
- WS - wrong side
Stitch Guide
Sc2tog: Insert hook in next st and pull up loop (2 loops on hook), insert hook in next st and pull up loop (3 loops on hook), yarn over hook, pull through all 3 loops on hook.
Booties (Make 2)
Ch 10.
Rnd 1: (RS) 2 sc in 2nd ch from hook, sc in each of next 7 ch, 5 sc in last ch; working on other side of starting ch, sc in each of next 8 ch; join with sl st to first sc – 22 sc.
Rnd 2: Ch 2 (counts as first hdc), hdc in next sc, 2 hdc in next sc, hdc in each of next 6 sc, 2 hdc in each of next 2 sc, hdc in next sc (center sc of 5-sc), 2 hdc in each of next 2 sc, hdc in each of next 6 sc, 2 hdc in next sc, hdc in last sc; join with sl st to first hdc (2nd ch of ch-2) – 28 hdc.
Rnd 3: Ch 1, sc in same st as joining, sc in each of next 9 hdc, 2 sc in each of next 2 hdc, 2 hdc in each of next 5 hdc, 2 sc in each of next 2 hdc, sc in each of next 9 hdc; join with sl st to first sc – 37 sts.
Rnd 4: Ch 1, working in back loops only, sc in each st around; join with sl st to first sc – 37 sc.
Rnd 5: Ch 1, working in both loops, sc in each sc around; join with sl st to first sc – 37 sc.
Rnd 6: Ch 1, sc in same st as joining, sc in each of next 9 sc, [sc2tog, sc in each of next 2 sc] 4 times, sc2tog, sc in each of next 9 sc; join with sl st to first sc – 32 sc.
Rnd 7: Ch 1, sc in same st as joining, sc in each of next 10 sc, [sc2tog, sc in next sc] 3 times, sc2tog, sc in each of next 10 sc; join with sl st to first sc – 28 sc.
Rnd 8: Ch 1, sc in same st as joining, sc in each of next 8 sc, [sc2tog] 5 times, sc in each of next 9 sc; join with sl st to first sc – 23 sc.
Rnds 9-13: Ch 1, sc in each sc around; join with sl st to first sc – 23 sc.
At end of Rnd 13, fasten off.
Finishing
Weave in all ends.
- Funny Pictures
-
 Hilarious Memes for Those Bored to Tears
-
 Weekly Treat of Funniest Parenting Memes for Good Laugh out Loud Right Now
-
 Really Funny Pics to End These Weekend Perfectly
- Recipes
-
 Crispy Baked Avocado Fries
-
 Scrambled Chickpea and Spinach Pitas
-
 Cinnamon Pancakes
- Lifehacks
-
 Crochet Basics: Aligned Cobble Stitch
-
 Brick Stitch Crochet Tutorial
-
 Crochet Basics: Wattle Stitch
- Crochet Ideas
-
 Crochet Snorlax Plushie Doll
-
 Crochet Beautiful Penguin Toy
-
 Crochet Tiny Snowman
- DIY
-
 DIY Santa Craft For Kids
-
 Paper Plate Angel Craft
-
 Upcycled Mason Jar Chicken Vase
- Knitting Ideas
-
 Knitted Bridger Cowl
-
 Knitted Keepsake Bag
-
 Knitted Cutie Cupcake Dolls