Complete Knitting Guide for a Mixed Yarn Garment


You’ll Need:
1050; 1150g of mixed content yarn (95m/50g);
Circle knitting needles 5;
Auxiliary needle;
Button.
Size:
S; M.
Used Patterns
- 2 x 2 rib;
- Wrong side: in right-side rows – knit sts, in wrong-side rows – purls;
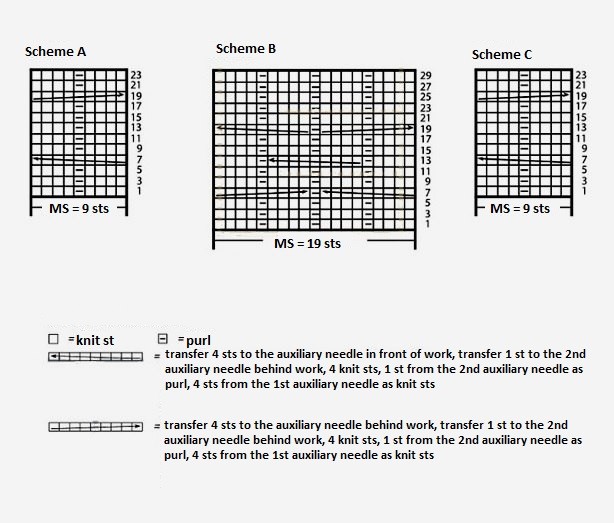
- Big cable pattern: due to the scheme.
Make wrong-side rows due to the ornament. The vertical pattern for cables A and C = 24 rows, for cable B – 30 rows;
Honeycomb pattern: the quantity of sts is multiplied by 3. There is 1 st fewer on the knitting needle after the 1st row, increase this st in the 3rd row. The width of stripes is 15 sts and 14 sts.
Honeycomb Pattern Rows
1st row: * transfer 1 st to the auxiliary needle behind work, knit2tog, 1 st from the auxiliary needle in 1 knit st, 1 yarn over*; repeat from * to *, transfer 1 st to the auxiliary needle behind work, knit2tog, 1 st from the auxiliary needle in 1 knit st. Totally, 14 sts;
2nd row: purl;
3rd row: 1 knit st, * 1 yarn over, transfer 2 sts to the auxiliary needle in front of work, 1 knit st, slip 1 st as knit st, the 2nd st from the auxiliary needle as knit st and draw it through the slipped st*; repeat from * to *, 1 yarn over, 1 knit st. Totally, 15 sts;
4th row: purl.
Repeat 1st-4th rows.
Stitches Control:
- Wrong side: 19 sts x 28 rows = 10 x 10 cm;
- Big cable A: 9 sts = 3 cm;
- Big cable B: 19 sts = 6 cm;
- Big cable C: 9 sts = 3 cm;
- Honeycomb pattern: 15 sts = 6 cm.
Instructions
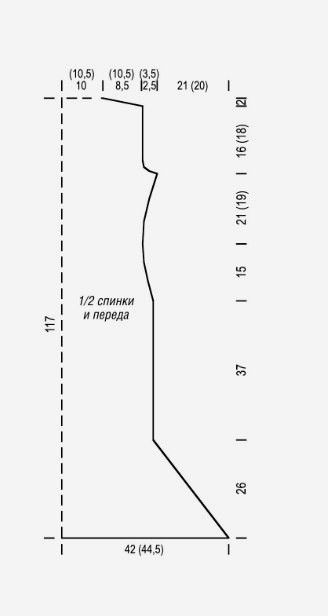
Back
Cast on 183; 193 sts and make 1 wrong side row. After that: 1 selvedge st, 19; 22 sts of wrong side pattern, 9 sts cable A, 19; 22 sts of wrong side pattern, 15 sts honeycomb pattern, 19; 20 sts of wrong side pattern, 19 sts cable B, 19; 20 sts of wrong side pattern, 15 sts honeycomb pattern, 19; 20 sts of wrong side pattern, 9 sts cable C, 19; 20 sts of wrong side pattern, 1 selvedge st.
For fringe, decrease 10 sts in the 10th row: purl2tog along the edges of pattern. Repeat the decreases in every 10th row 6 times.
At the same time, purl2tog near the selvedge st from both sides in every 20th row 3 times. You should get 107; 117 sts. After 63 cm, decrease 1 st x 1 from both sides, then, 1 st x 2 in every 10th row, 1 st x 3 in every 6th row. You should get 95; 105 sts.
Turn to making increases: 1 st x 4 in every 12th row from both sides; 1 st x 6 in every 8th row. You should get 103; 117 sts. After 99; 97 cm bind off 3 sts x 1 for the armholes. Then, 1 st x 2; 4 times in every even row. There are 93; 103 sts left.
After 115 cm, bind off 7 sts x 1 for shoulders and 6; 8 sts x 2 on every 2nd row. There are 55; 57 sts left.
In the last wrong-side row, purl2tog from the central sts, then transfer 56; 58 sts to the auxiliary needle. Total length is 117 cm.
Front
Make in the same way as back. Don’t increase the st in the last row. Transfer 55; 57 sts to the auxiliary needle.
Assembly
Sew up the shoulder seams. Lift 76; 82 sts along the armhole and make 2 cm of rib. Bind off the sts. Sew the sides.
Knit the sts from the auxiliary needle with circle knitting needles due to the ornament. Make straight/reversed knitting, save the cut on the back. At the same time, knit3tog on each shoulder. You should get 107; 111 sts. At the height of collar (8 cm) after 19 rows of cable B, bind off the sts. Sew the button.
- Funny Pictures
-
 Hilarious Memes for Those Bored to Tears
-
 Weekly Treat of Funniest Parenting Memes for Good Laugh out Loud Right Now
-
 Really Funny Pics to End These Weekend Perfectly
- Recipes
-
 Crispy Baked Avocado Fries
-
 Scrambled Chickpea and Spinach Pitas
-
 Cinnamon Pancakes
- Lifehacks
-
 Crochet Basics: Aligned Cobble Stitch
-
 Brick Stitch Crochet Tutorial
-
 Crochet Basics: Wattle Stitch
- Crochet Ideas
-
 Crochet Snorlax Plushie Doll
-
 Crochet Beautiful Penguin Toy
-
 Crochet Tiny Snowman
- DIY
-
 DIY Santa Craft For Kids
-
 Paper Plate Angel Craft
-
 Upcycled Mason Jar Chicken Vase
- Knitting Ideas
-
 Knitted Bridger Cowl
-
 Knitted Keepsake Bag
-
 Knitted Cutie Cupcake Dolls