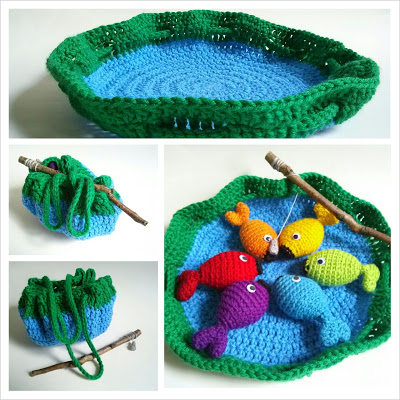
Crochet Fishing Game: A Fun DIY Project for Kids

Supplies
Worsted Weight Yarn - 7 colors needed for the rainbow, a lip color, plus 6 fish colors.
Small amount of Crochet Thread (I used Bernat's Handicrafter Cotton Thread Size 5 in Gray).
Size "B" 2.25 mm crochet hook.
Size "G" 4.25 mm crochet hook.
Small amount of stuffing.
Sew-on Craft Eyes (optional).
6 Washers (1/2" or smaller with a hole large enough to fit your hook through).
Super Strong Magnets - I used one magnet 8 mm wide by 3 mm high.
Tree Branch or Dowel Rod for fishing pole.
Stitches
Magic Circle.
sc - Single Crochet.
sl st - Slip Stitch.
sc2tog - Single Crochet two together.
The Pattern
Tailfin
The lovely heart shaping on the tailfin is achieved by creating two separate pieces, then attaching them together on Round 3. To do this, you will work Piece A through Round 2 and fasten off. For Piece B, you will follow the same first two rounds, then join Piece A and Piece B together while crocheting on Round 3.
Using body color, Ch 2.
Round 1: sc 6 times in 2nd ch from hook (6).
Round 2: *2sc, sc* repeat from * around (9).
For first tailfin, fasten off. For 2nd tailfin, continue working.
Round 3: sc in next 4 sts of the current piece (Piece B), work the next sc into the first unworked stitch of Piece A, then continue working 1 sc in next 8 sts, then work 1 sc in the 5 remaining sts of Piece B. (18).
Round 4: *sc2tog, sc* repeat from * around (12).
Round 5: *sc2tog* repeat from * around (6).
Fasten off with a short tail.
Note: You may notice a small gap where the pieces were joined together. The tail will not be stuffed, so it's ok to leave it as is. However, if you use this technique on a project that will require stuffing, you can use the yarn ends from fastening off Piece A to close the gap.
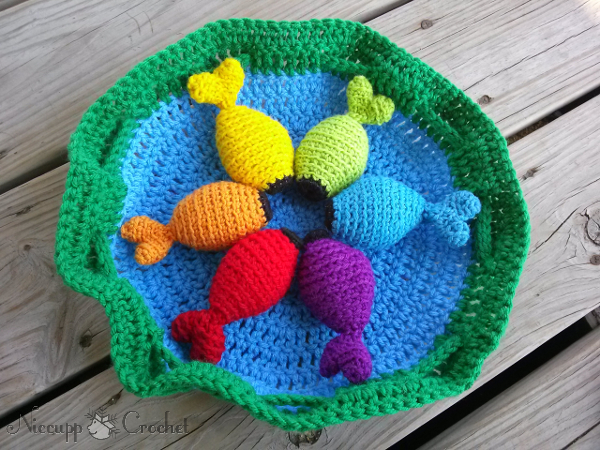
Fish Body
The fish begins by working single crochets around the washer using the lip color. To work a single crochet around the washer, draw up a loop through the hole in the center of the washer, then yarn over and pull through the loop at the edge of the washer.
Round 1: Using lip color, work 12 sc around washer. For this round only, join with sl st. Pull up a loop using the body color and ch 1. Pull the tail of the lip color tightly around the body color and fasten off leaving a short tail. (12).
Round 2: Using body color, sc in each stitch around (12).
Round 3: *2sc, sc* repeat from * around (18).
Round 4: sc in each stitch around (18).
Round 5: *2sc, sc in next 2 sts* repeat from * around (24).
Round 6-8: sc in each stitch around (24, work 3 rounds).
Round 9: *sc2tog, sc in next 2 sts* repeat from * around (18).
Round 10: sc in each stitch around (18).
Round 11: *sc2tog, sc* repeat from * around (12).
Round 12: sc in each stitch around (12).
At this point, you should stuff the fish and attach safety eyes if using them. Safety eyes should be secured at the same spot on each side of the fish.
Round 13: *sc2tog* repeat from * around (6).
Fasten off leaving a long tail for sewing.
Assemble the Fish
Thread the long tail from the fish body through a yarn needle and begin sewing the tail and fish together by picking up one loop from the tail, then one loop from the fish, and continue around. Fasten off by tying a knot and pulling it to the inside.
Note: If you used eyes, make sure you position the tail correctly (up/down) in comparison with the eyes.
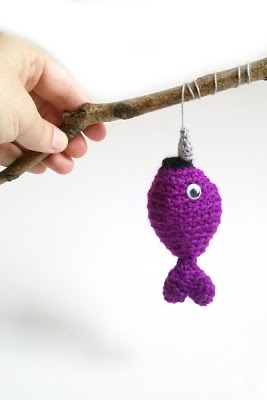
The Magnetic Hook
To make the magnetic portion as safe as possible, I crocheted a small encasement around the magnet leaving a small portion of the bottom of the magnet exposed.
Using crochet thread (size 5 cotton) and a size "B" hook.
Round 1: Crochet 10 scs into a Magic Circle. Pull the circle until the last sc meets up with the first sc. There will be a small opening in the center of the magic circle.
Round 2: *sc 2 tog* around.
Fasten off leaving an 18" tail.
Insert the magnet into the middle of the crocheted piece.
Using a yarn needle, pull the tail through one loop of each sc from Round 2. Pull the tail tightly to close up the hole on the top.
Fishing Pole
Cut a stick (or dowel rod) to approx. 10" long.
Wrap the long tail of the crochet thread around the fishing pole 3 times, then tie it off securely.
The fishing pond that doubles as a carrying bag is available as a kit exclusive!
The kit includes all the hard-to-find materials that you'll need to create the fishing game. I have already pre-cut the tree branches (and they all have a tiny handle for toddler hands). Plus, they've been cleaned and rubbed with organic coconut oil. The kit also comes with the wiggle eyes, washers, and magnet assembly PLUS the BONUS pattern for the pond and carrying bag.
Safety First
Magnets are not intended for use in toys for children under 3 years of age. Magnets can be harmful if swallowed as normal machines cannot be used to detect them. Never use two magnets in one project. If a child swallows two magnets, the magnets can stick together through the intestinal walls causing major damage. Please use caution when allowing your children to play with toys containing magnets.


