How to Crochet a Rainbow Chicken Amigurumi


Rainbow Chicken Amigurumi is a delightful and colorful crochet creation that is guaranteed to bring a smile to anyone's face! Imagine a cute little chicken with a vibrant rainbow tail, made with love and lots of colorful yarn. These whimsical crochet creatures are not only adorable but also a fun and creative way to add a touch of joy to your home décor or to give as a thoughtful handmade gift to brighten someone's day. So, grab your crochet hook and get ready to create your very own rainbow chicken amigurumi that will spread happiness wherever it goes!
Materials Needed
- Variety of number 4 medium weight yarn
- 5 mm crochet hook
- Scissors
- A little bit of stuffing
- Two glass beads
Finished Size
Approximately 4.5 inches wide and 3.5 inches tall
Abbreviations
- ch: chain
- sc: single crochet
- st: stitch
- sl st: slip stitch
- dc: double crochet
Instructions
Starting the Chain
Start with a slip knot.
Chain 15 (ch 15).
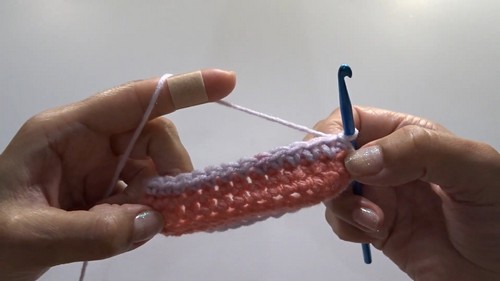
First Row
Work 1 single crochet into the second chain from the hook (do not count the loop on the hook) (sc in 2nd ch from hook). Work 1 single crochet into each remaining chain across (sc in each ch across). You should end up with 14 single crochets.
Second Row
Turn your work, chain 1 (ch 1). Work 1 single crochet into each stitch across until the end (sc in each st across).
Starting Rounds
Work single crochets all along the side of the chain to form a round. End with a slip stitch into the first single crochet (sl st in first sc). Chain 1 (ch 1).
Next Rounds
For the second round, start by working 1 single crochet into the first single crochet from the previous round. Continue around until you’ve completed the round. End with a slip stitch into the first single crochet (sl st in first sc). Chain 1 (ch 1).
Changing Colors
If changing colors, drop the current yarn and join the new color. Slip stitch into the first single crochet with the new color and chain 1 (sl st with new color, ch 1).
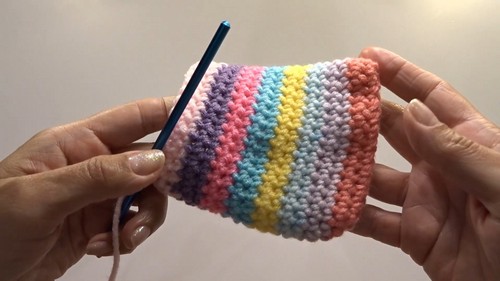
Continuing Rounds
Continue working rounds, changing colors every two rounds if desired, until you have completed 16 rounds in total.
Chicken Comb
Flatten your work. Count 4 rounds from the top.
Insert your hook into that space, draw in new color, and chain 1 (ch 1). Work 1 single crochet back into that space (sc back into space). In the next space (round 3), work 3 double crochets (3 dc).
Work a single crochet in the next space (round 1), and in another space between rounds, work another 3 double crochets (3 dc). Finish by slip stitching into the next stitch. Fasten off.
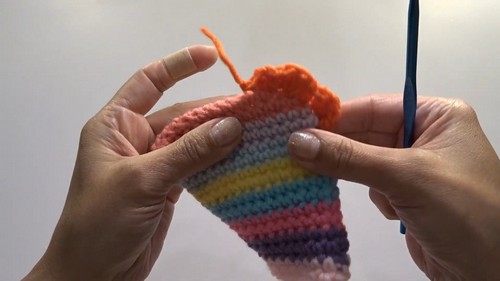
Chicken Beak
Skip one stitch, insert the hook into the next stitch, and pull through the new yarn (typically orange). Chain 3 (ch 3).
Slip stitch into the next stitch (sl st in next st). Chain 2 (ch 2) and slip stitch into the next stitch. Fasten off and hide yarn tails.
Finishing and Assembly
Turn your work inside out and pull yarn tails inside. Knot the yarn tails together to secure and hide them inside the chicken body. Stuff the chicken lightly for shape.
Closing the Back
To form the back end, slip stitch the two sides together: Measure and align the two sides evenly. Slip stitch together one loop from each side until closed. Fasten off and hide the yarn tails using your hook.
Adding Eyes
Using a needle and thread or hot glue, attach two glass beads for the eyes: Thread your needle with a suitable color. Position the beads and secure them by making knots at the inside of the work.
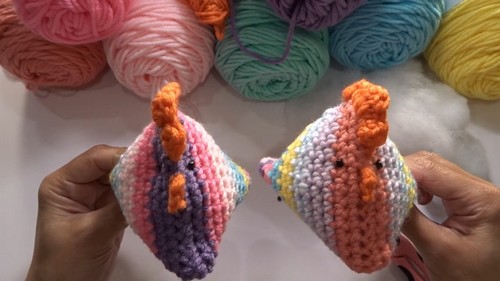
Finish Up
Make sure all yarn tails are hidden inside. You can use additional thread techniques to hide and secure any loose ends.