Crochet Top Pattern Instructions and Materials


You’ll Need:
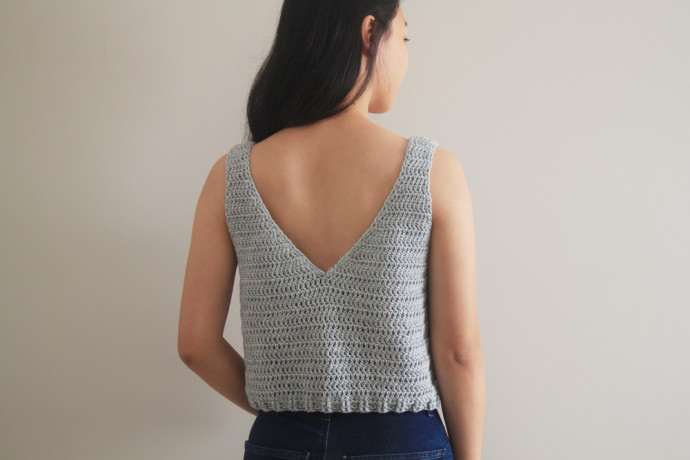
2(2, 3, 4, 4, 5, 5) skeins of Debbie Bliss Cotton Denim DK (100% cotton; 200m/100g) in Pale Blue;
Crochet hook 4.5 mm;
Darning needle;
Scissors.
Size:
S (M, L, XL, 2XL, 3XL).
Stitches Control:
13 sts x 9 rows = 10 x 10 cm.
Measurements (cm):
- Bust: 76(86, 96, 105, 115, 124, 133)
- Armhole: 19(21, 23, 25, 26.5, 28, 30)
- Length: 37(39, 41, 43, 45, 47, 49)
Measurements (inches):
- Bust: 30(34, 38, 41.5, 45, 49, 52.5)
- Armhole: 7.5(8.5, 9, 10, 10.5, 11, 12)
- Length: 14.5(15.5, 16, 17, 17.5, 18.5, 19)
Instructions
Left Triangle
*Once you’ve finished your left triangle, I highly recommend trying it on/holding it up to your body as bust size can vary greatly within the same size – you may need to size up or size down.
Foundation Chain: Ch 7.
ROW 1: DC into the 3rd chain from the hook, DC 4. <5>
ROWS 2-6: Ch 2, turn, DC 5. <5>
ROW 7: Ch 2, turn, 2DC, DC 4. <6>
ROW 8: Ch 2, turn, DC 5, 2DC. <7>
ROW 9: Ch 2, turn, 2DC, DC 5, 2DC. <9>
ROW 10: Ch 2, turn, DC 8, 2DC. <10>
ROW 11: Ch 2, turn, 2DC, DC 9. <11>
ROW 12: Ch 2, turn, DC 10, 2DC. <12>
ROW 13: Ch 2, turn, 2DC, 2DC, DC 10. <14>
ROW 14: Ch 2, turn, 2DC, DC 11, 2DC, 2DC. <17>
ROW 15: Ch 2, turn, 2DC, DC 15, 2DC. <19>
ROW 16: Ch 2, turn, 2DC, DC 17, 2DC. <21>
*Size XS – Fasten off. Proceed to Right Triangle instructions.
Sizes (S, M, L, XL, 2XL, 3XL)
ROW 17: Ch 2, turn, 2DC, 2DC, DC 18, 2DC. <24>
ROW 18: Ch 2, turn, 2DC, DC 22, 2DC. <26>
*Size S – Fasten off. Proceed to Right Triangle instructions.
Sizes (M, L, XL, 2XL, 3XL)
ROW 19: Ch 2, turn, 2DC, 2DC, DC until last st, 2DC into last stitch. <29>
ROW 20: Ch 2, turn, 2DC, DC until last 2 sts, 2DC, 2DC. <32>
*Size M – Fasten off. Proceed to Right Triangle instructions.
Sizes (L, XL, 2XL, 3XL) repeat ROWS 19-20 until ROW (22, 24, 26, 28).
<38, 44, 50, 56>
Fasten off.
Right Triangle
Foundation Chain: Ch 7.
ROW 1: DC into the 3rd chain from the hook, DC 4. <5>
ROWS 2-6: Ch 2, turn, DC 5. <5>
ROW 7: Ch 2, turn, DC 4, 2DC. <6>
ROW 8: Ch 2, turn, 2DC, DC 5. <7>
ROW 9: Ch 2, turn, 2DC, DC 5, 2DC. <9>
ROW 10: Ch 2, turn, 2DC, DC 8. <10>
ROW 11: Ch 2, turn, DC 9, 2DC. <11>
ROW 12: Ch 2, turn, 2DC, DC 10. <12>
ROW 13: Ch 2, turn, DC 10, 2DC, 2DC. <14>
ROW 14: Ch 2, turn, 2DC, 2DC, DC 11, 2DC. <17>
ROW 15: Ch 2, turn, 2DC, DC 15, 2DC. <19>
ROW 16: Ch 2, turn, 2DC, DC 17, 2DC. <21>
*Size XS – do not fasten off! Proceed directly to Joining Row instructions.
Sizes (S, M, L, XL, 2XL, 3XL)
ROW 17: Ch 2, turn, 2DC, DC 18, 2DC, 2DC. <24>
ROW 18: Ch 2, turn, 2DC, DC 22, 2DC. <26>
*Size S – do not fasten off! Proceed directly to Joining Row instructions.
Sizes (M, L, XL, 2XL, 3XL)
ROW 19: Ch 2, turn, 2DC, DC until last 2 sts, 2DC, 2DC. <29>
ROW 20: Ch 2, turn, 2DC, 2DC, DC until last st, 2DC into the last st. <32>
*Size M – do not fasten off! Proceed directly to Joining Row instructions.
Sizes (L, XL, 2XL, 3XL) repeat ROWS 19-20 until ROW (22, 24, 26, 28).
<38, 44, 50, 56>
Do not fasten off!
Joining Row
Ch 2, turn, 2DC, 2DC, DC 18(23, 29, 35, 41, 47, 53, 59), 2DC into last st of Right Triangle.
<24, 29, 35, 41, 47, 53, 59>
Place the Left Triangle (with the right side facing up) to the left of the Right Triangle.
2DC into the first st of the Left Triangle, DC 18(23, 29, 35, 41, 47, 53, 59), 2DC, 2DC.
<48, 58, 70, 82, 94, 106, 118>
Body
Row 1: Ch 2, turn, 2DC, 2DC, DC in each st until the last 2 sts, 2DC, 2DC.
<52, 62, 74, 86, 98, 110, 122>
Row 2: Ch 2, turn, DC in each st until the end of the row.
<52, 62, 74, 86, 98, 110, 122>
Repeat row 2 until row 13.
*You can add or remove rows to reach your desired length – please keep in mind that the ribbing adds 2cm/0.75”.
Ribbing
ROW 1: Ch 1, turn, SC in each st until the end of the row.
<52, 62, 74, 86, 98, 110, 122>
ROW 2: Ch 2, turn, *FpDC into the next 2 sts, BpDC into the next 2 sts; rep from * until last 2 sts, FpDC, DC.
<52, 62, 74, 86, 98, 110, 122>
ROW 3: Ch 2, turn, DC, BpDC, *FpDC 2, BpDC 2; rep from * until end, DC into the 2nd chain (at the beginning of ROW 2).
<53, 63, 75, 87, 99, 111, 123>
*The extra DC at the end helps the edges of the top stay straight and neat.
Repeat all steps for the 2nd side of the top.
Assembly
Lay the 2 pieces of the top directly on top of each other. Sew the straps and the sides of the top together.
Finishing
At the bottom of an armhole, insert hook, secure yarn and pull up a loop.
Ch 1, SC evenly along the edge of the armhole, making sure that your stitches are not too tight.
Sl st into first SC to join. Fasten off.
Repeat for the 2nd armhole.
Insert hook along the V-neck, secure yarn and pull up a loop.
Ch 1, SC evenly along the edge of the V-neck, making sure that your stitches are not too tight.
Sl st into first SC to join. Fasten off.
Weave in all of your ends.