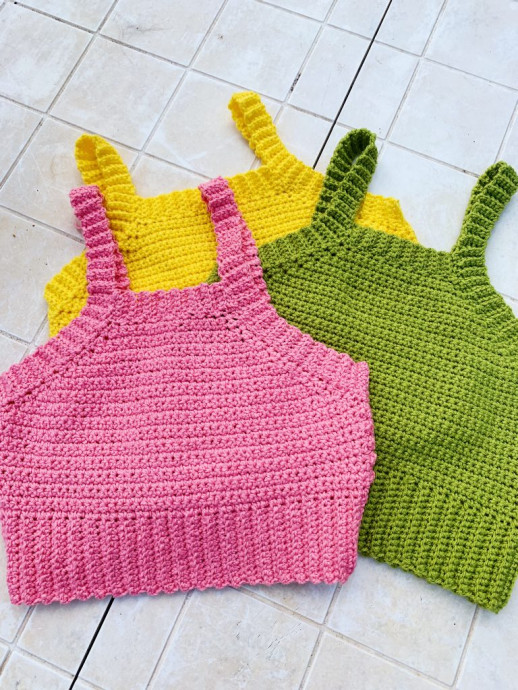
How to Crochet a Stylish Top


You’ll Need:
Any weight 3/DK/10 ply yarn of your choice. 100g/300m for S, M, L and 150g/450m for XL and 2XL;
Crochet hooks 4 mm and 5 mm;
Stitch marker;
Measuring tape.
Sizes:
S, M, L, XL, 2XL.
To fit bust: 34 (38, 42, 46, 50) inches.
Instructions
Using crochet hook 4 mm.
Begin ribbed bottom edge:
- Ch 14
- Row 1: sc in 2nd ch from hook, sc to end. Turn.
- Row 2: Ch 1, sc in BLO across. Turn (13 sc)
- Row 3: Repeat row 2 until you have a total of 102 (110, 118, 126, 134) rows.
Next, slip stitch two ends together to form a circle.
Change to crochet hook 5 mm.
Next round: Ch 1, sc 102 (110, 118, 126, 134) around. Slst into first sc to close round. Turn.
Repeat last round until top measures 7 inches in total, including the ribbed part.
Count 51 (55, 59, 63, 67) from where you are now. Place a stitch marker into that stitch.
Decreasing Stitches
Continuing on where your hook is now:
- Next row: Ch 1, turn, sc in same st, then sc2tog, sc across until you reach 3rd st from stitch marker, then sc2tog, sc in last st. Turn.
- Next row: Ch 1, sc in same st, sc2tog, sc across until 3 sts remain, sc2tog, sc in last st. Turn.
- Repeat last row until you have 17 (17, 19, 19, 21) sc.
Creating the Ribbed Edge
Change back to crochet hook 4 mm.
Next, continuing on from where you are now, we are going to ch 6. We will be making a ribbed edge across the top edge of the top.
- sc in 2nd ch from hook, sc in next 4 chains. Turn, slst into next 2 sc, *turn, sc in BLO in next 5 sc, ch 1, turn, sc in BLO of next 5 sc, slst into next 2 sc, repeat from * across top edge of top. Fasten off.
Turn your top around now so we can work a ribbed edge along the back. Attach your yarn to the far right corner of the back edge:
- Ch 6, sc in 2nd ch from hook, sc in next 4 chains. Turn, slst into next 2 spaces, *turn, sc in BLO in next 5 sc, ch 1, turn, sc in BLO of next 5 sc, slst into next 2 spaces, repeat from * across the back.
Continue up along the side edge of the top in the same manner and keep going all the way to the top so you are at the same level as the top edge ribbing.
Creating the Straps
When you are level with the top ribbed edge, we will begin straps so continue on from where you are now and turn.
- Next row: ch 1, sc 5 in BLO. Turn. Repeat this row until your strap has a total of 45-50 rows. It's best to measure yourself here to see how long you want the strap to be. It must be long enough to go over your shoulder and stitch to the back of the top.
Once your strap is long enough, fasten off leaving a long tail.
Now, attach your yarn to the bottom corner of the other side edge.
- Ch 6, sc in 2nd ch from hook, sc in next 4 chains. Turn, slst into next 2 spaces, *turn, sc in BLO in next 5 sc, ch 1, turn, sc in BLO of next 5 sc, slst into next 2 spaces, repeat from * all the way up along the side and keep going all the way to the top so you are at the same level as the top edge ribbing.
When you are level with the top ribbed edge we will begin straps so continue on from where you are now and turn:
- Next row: ch 1, sc 5 in BLO. Turn. Repeat this row until your strap has a total of 45-50 rows. It's best to measure yourself here to see how long you want the strap to be. It must be long enough to go over your shoulder and stitch to the back of the top.
Now you can slst or use a yarn needle to connect the straps to the back. It's best to put your top on here to see where you want to connect your straps.
You will notice on one of the corners of your top that the ribbed edge needs to be connected. Just slst that together and you are done.
Weave in any ends.
I like it!
Thank you for the help!
I'm pleased, that you like it