How to Create a Stylish Crochet Triangle Top


You’ll Need:
4 (4, 5, 5) balls of Paintbox Cotton Dk – light/weight 3/DK/8 ply ~50g/1.8oz/125m/137yds;
Crochet hook 3.5 mm and 5 mm;
Stitch markers;
Scissors;
Yarn needle.
Size:
S (M, L, XL)
Stitches Control:
15 sts x 21 rows = 10 x 10 cm.
Instructions
Using 3.5mm hook
Ch 16
Row 1: sc in 2nd ch from hook, sc in each ch to end. Turn.
Row 2: ch 1, sc in BLO in each st across. Turn.
Repeat row 2 until you reach row 102(110, 118, 126).
Slst the two ends together to form a circle. We will now be working in rounds.
Changing to a 5mm Crochet Hook
Round 1: ch 1, make 102(110, 118, 126) sc evenly around the top edge of ribbing. TURN.
Round 2: ch 1, sc in each st around. TURN.
Repeat round 2 until you have completed round 16(18, 20, 22). TURN
Mark the 51st(55th, 59th, 63rd) st.
Continuing from Current Position
Next row: ch 1, sc2tog, sc in each st across until you reach the second st from st marker, sc2tog. Turn.
Next row: ch 1, sc2tog, sc in each st across until 2 sts remain, sc2tog. Turn.
You should now have 47(51, 55, 59) sts.
Now mark the 23rd(25th, 27th, 29th) st.
Next Steps for the Body
Next row: ch 1, sc across to st marker. Turn.
Next row: ch 1, sc2tog, sc in each st until 2 sts remain, sc2tog. Turn.
Next row: ch 1, sc in each st across. Turn.
Next row: ch 1, sc2tog, sc in each st across until 2 sts remain, sc2tog. Turn.
Rep last 2 rows until 3 sts remain. Turn.
Next row: ch 1, sc in each of the 3 sts. Turn.
Next row: ch 1, sc3tog. Turn.
Next row: ch 1, sc in that last st.
Fasten off.
For the 2nd Triangle:
Skip the st directly beside the last “triangle and attach yarn to the next st.
Next row: ch 1, sc in each of the next 23(25, 27, 29) sts.
Next row: ch 1, sc2tog, sc in each st across until 2 sts remain, sc2tog. Turn.
Next row: ch 1, sc in each st across. Turn.
Next row: ch 1, sc2tog, sc in each st across until 2 sts remain, sc2tog. Turn.
Rep last 2 rows until 3 sts remain. Turn.
Next row: ch 1, sc in each of next 2 sts. Turn.
Next row: ch 1, sc3tog. Turn.
Next row: ch 1, sc in last remaining st.
Fasten off.
Working on the Back Triangles
Now turn your work and begin working on the two back “triangles”.
You should have 51(55, 59, 63) unworked here.
Attach your yarn to the stitch next to the triangle that you just finished.
Next row: ch 1, sc2tog, sc in each st across until 2 sts remain, sc2tog. Turn.
Next row: ch 1, sc2tog, sc in each st across until 2 sts remain, sc2tog. Turn.
Mark the 23rd(25th, 27th, 29th) st.
Continuing with Back Triangles
Next row: ch 1, sc in each st across until you reach marker. Turn.
Next row: ch 1, sc2tog, sc in each st across until 2 sts remain, sc2tog. Turn.
Next row: ch 1, sc in each st across. Turn.
Next row: ch 1, sc2tog, sc in each st across until 2 sts remain, sc2tog. Turn.
Rep last 2 rows until 3 sts remain. Turn.
Next row: ch 1, sc in each of 3 sts. Turn.
Next row: ch 1, sc3tog. Turn.
Next row: ch 1, sc in last remaining st.
Fasten off.
Making the 2nd Back Triangle
Skip the st directly beside the triangle just worked and attach yarn to the next st.
Next row: ch 1, sc in each of remaining 23(25, 27, 29) sts. Turn.
Next row: ch 1, sc2tog, sc in each st across until 2 sts remain, sc2tog. Turn.
Next row: ch 1, sc in each st across. Turn.
Next row: ch 1, sc2tog, sc in each st across until 2 sts remain, sc2tog. Turn.
Rep last 2 rows until 3 sts remain. Turn.
Next row: ch 1, sc in each of the 3 sts. Turn.
Next row: ch 1, sc3tog. Turn.
Next row: ch 1, sc in last remaining st. DO NOT FASTEN OFF.
Finishing Touches
Next row: ch 1 and sc all the way around the 4 triangles. Slst to the first sc you made.
Change to 3.5mm crochet hook
Ch 5, sc in 2nd ch from hook, sc in next 3 chains, slst in next 2 sc on the side of “triangle”, * turn, skip 2 slsts, sc in BLO in each of the next 4 sts, turn, ch 1, sc in BLO in next 4 sts, slst in next 2 sc on side of “triangle”, rep from * all the way around armhole until you reach the peak of the triangle directly behind. Fasten off.
Attach yarn to the peak of the other front “triangle” and repeat from **.
Next, attach yarn to the unworked middle stitch between the two front “triangles”.
Final Steps for Completing the Ribbing
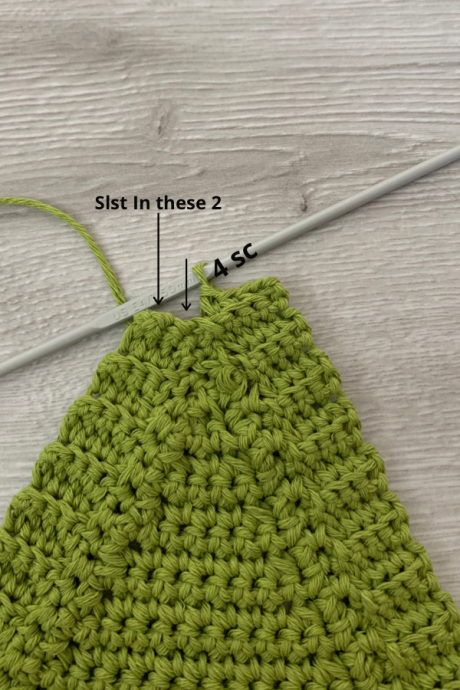
Ch 5, sc in 2nd ch from the hook, sc in next 3 chains, slst in next 2 sc on side of “triangle,” turn, skip 2 slsts, sc in BLO in next 4 sts, turn, ch 1, sc in BLO in next 4 sts, slst in next 2 sc on side of triangle, repeat from * all the way up along the inner edge of the triangle. The top of the triangle should be worked as shown in the photo below.
Next row: ch 1, turn. Sc in BLO of next 2 slsts, sc in BLO in next 4 sc. Turn (6 sc).
Next row: ch 1, sc in BLO in each of the next 6 sc. Turn.
Rep last row until you have a further 24 rows completed. Fasten off, leaving a long tail.
Now attach your yarn to the next available middle stitch between the two front triangles and repeat from **** to ****.
Now it’s time to work the ribbing towards the back of the top. This is done in the same way as the front so just follow those steps again but when you finish the straps on this side there is no need to leave a long tail when fastening off.
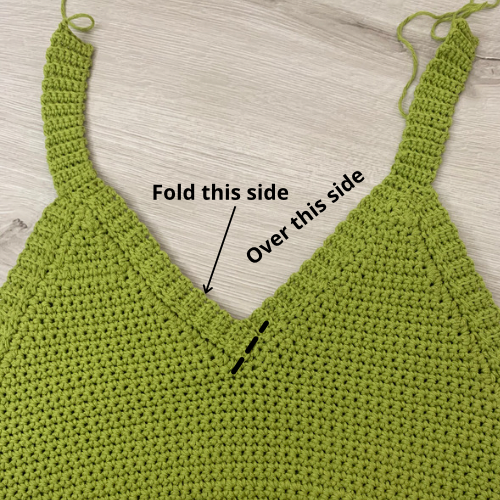
Now with your tail and yarn needle, make a few stitches to secure the inner “v” ribbing as shown below on both the front and back of the top.
Now turn your top wrong side out, and with your yarn needle and long tail, stitch the front (shoulder) strap to the back strap, creating one continuous strap. Repeat on the other side.