Crochet Chicken Baby Hat Tutorial

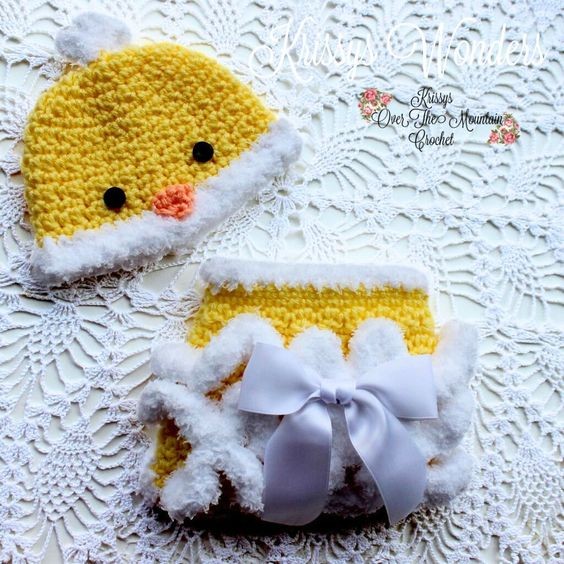
Create a charming baby hat adorned with a crochet chicken design. This adorable accessory is perfect for keeping your little one warm and stylish. Using soft yarn in vibrant colors, you can crochet a cozy hat that will surely be a hit at any baby shower or photo shoot. The intricate details of the chicken motif will make this hat a unique and eye-catching piece that will stand out in a crowd.
Whether you're a seasoned crocheter or a beginner looking for a fun project, this chicken baby hat is sure to bring joy to both the maker and the wearer. The handmade touch adds a special charm to this accessory, making it a thoughtful gift for new parents or a sweet treat for your own little one. The versatility of this hat allows it to be worn on various occasions, from everyday outings to special events. By customizing the colors and size, you can create a personalized hat that reflects your unique style and creativity.
Crocheting this chicken baby hat is not only a fun and rewarding experience, but it also allows you to showcase your skills and create a one-of-a-kind piece that will be treasured for years to come.
Materials
Yarn used:
Fuzzy Trims: Bulky (5) Bernat Pipsqueak; approx 100-150 yds.
Trim for the brim of the hat & diaper cover, and for the fuzzy bottom and chicken comb. I used white but if you want to use red for the comb that would be really cute for a boy’s hat.
Main Body: Any worsted weight (4) yarn. I used Hobby Lobby’s “I Love This Yarn”; approx. 200-250 yds.
Hook used:
H-8/5.00mm
Gauge
4″X4″ 13 SC Across X 14 Rows High
Pattern Notes:
Beginning chains do not count as a stitch.
Stitch Key
- MC = main color
- CC = contrasting color or specialty fuzzy yarn
- join w/ = join with
- slp st = slip stitch
- ch= chain
- sc = single crochet
- sc dec = single crochet decrease, single crochet 2 together
- hdc = half double crochet
- dc = double crochet
- blo = back loop only
- next = next
- * * = Repeat between the starts the number of times stated
- x = Times; between the starts the number of times stated
in = example “in next st” means you will be inserting the hook under the top two loops of the next st.
Supplies: Optional
2 buttons for eyes: Satin Ribbon to make a pull tie bow for Diaper Cover, approx. 1 yd; sewing needle and thread
Newborn Chicken Hat Pattern
ch3 and join in a ring or use the magic circle method
Round 1: ch2, 10 hdc in the ring; join w/slp st in top of 1st hdc made. (10 st)
Round 2: ch1, sc & dc in joining st; *sc & dc in next st;*9x; join w/slp st in top of 1st sc made. (20 st)
Round 3: ch1, sc in joining st; 2sc in next st; *sc in next st, 2sc in next st;*9x; join w/slp st in top of 1st sc made. (30 st)
Round 4: sc in joining st, dc in next st, sc & dc in next st; *sc in next st, dc in next st, sc & dc in next st;*9x; join w/slp st in top of 1st sc made. (40 st) 3 1/4″ diameter
Round 5: sc in joining st and in each st around; join w/slp st in top of 1st sc made. (40 st)
Round 6: sc in joining st, dc in next st; *sc in next st, dc in next st;* repeat between * * around; join w/slp st in top of 1st sc made. (40 st)
Round 7-13: Repeat round 5 & 6 consecutively. (NOTE: round 13 will end on round 5 which is a continuous sc round) Dropping MC at the last pull through of round 13, pulling up CC or specialty yarn at the join w/slp st in top of beg. sc st made at the end of Round 13 (40 st) Round 5-13 = 2 3/4″; crown to round 13, 4 3/4″
Round 14: (NOTE: you will be decreasing every 10th st in round 14)
ch1, sc in joining st, sc in next st 7x, sc Dec; *sc in next 8 st’s, sc dec;*3x; join w/slp st in top of 1st sc made (36 st)
Round 15: ch1, sc in joining st and in each st around; join w/slp st in top of first sc made; end off and secure and weave in all ends (36 st)
Finishing measurements: 12″ – 13″ around; crown to brim = 4.5″ – 5″; width folded in half = 6.5″
Little Beak
Row 1: ch2, sc2x in 2nd ch from hook
Row 2: ch1 & turn,*2sc in next st;*2x
Row 3: ch2& turn; 2sc in next st, sc in next 2 st’s; 2sc in next st; end off leaving a long tail to sew on to the hat.
Making a Little Face on the Chicken Hat
Squishy yellow and white is what’s needed for a girl. Brown or black with white trim for a boy. Do not add the increases to make the ruffles on the boy’s diaper cover. Use red for the chickens comb for the boy set as well.
- 1. Place the crocheted beak just about the brim of the hat and sew it in place.
- 2. Position the buttons on the hat to represent eyes. Use Scotch tape to hold the buttons in place.
- 3. Use a sewing needle and thread to sew the eyes in place. You can sew right through the Scotch tape. This keeps the buttons from shifting during the sewing process.
- 4. Remove the Scotch tape after you are finished sewing the buttons in place.
How to Crochet the Chicken's Comb onto the Hat
Use the specialty yarn in either white or red.
- 1. Attach the yarn at the crown with a slp st;
- 2. ch6; slp st beside 1st slp st made.
- 3. ch8; slp st beside the last slp st.
- 4. ch6, slp st beside the last slp st, end off and weave in the ends.