How to Crochet an Adorable White Bunny Amigurumi

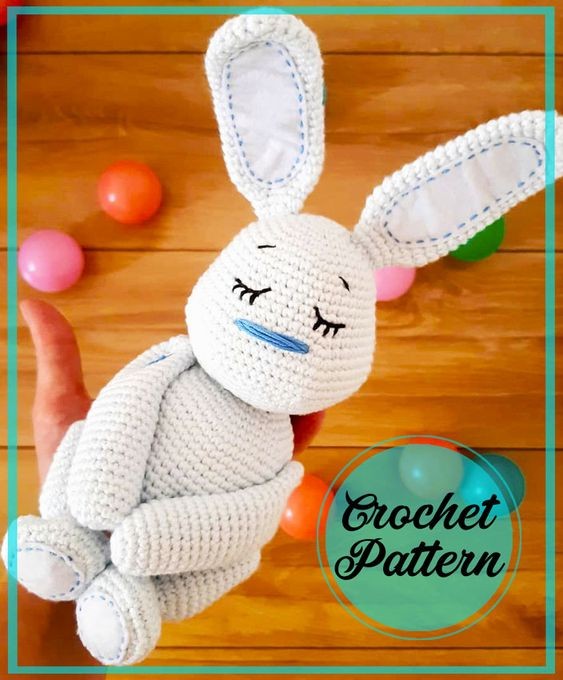
Create your very own adorable white bunny amigurumi with the art of crochet! This delightful craft allows you to bring a soft and cuddly bunny to life using just a hook and some yarn. With its fluffy tail, floppy ears, and cute button eyes, this crochet white bunny will surely melt your heart. Dive into the world of crochet and embark on a creative journey as you crochet a charming white bunny amigurumi. This handmade toy is perfect for both children and adults who appreciate the art of crafting. With its intricate stitches and attention to detail, this crochet bunny will become a cherished companion or a lovely gift for someone special. Let your imagination run wild as you choose the perfect yarn and bring this adorable bunny to life, stitch by stitch.
Materials
- Yarn
- Crochet Hook
Abbreviations
AR – Amigurumi Magic ring
MR – Amigurumi Magic ring
App – Application
ll – Lift loop
sc – Single Crochet
inc – Increase
dec – Decrease
tr – Triple Crochet/Treble Crochet
st – Stitch
dc – Double Crochet
hdc – Half Double Crochet
sl-st – Slip Stitch
ch – Chain
..in – Make increase into same stitch as many as the number which is given in front of “inc” abbreviation (e.g., 3inc, 4inc...).
FLO – Crochet into front loops only
BLO – Crochet into back loops only
BL – Bobble Stitch – do 5dc all in the same stitch and then yarn over and pull through all the loops on your hook (the original loop + 1 loop for each partially completed dc).
Crochet all followed, without closing the rounds.
Head and Body
Stuff as you crochet.
Start from the head:
1. 6 sc in magic ring /6
2. inc x6 /12
3. (1 sc, 1 inc) x6 /18
4. (2 sc, 1 inc) x6 /24
5. (3 sc, 1 inc) x6 /30
6. (4 sc, 1 inc) x6 /36
7. (5 sc, 1 inc) x6 /42
8-11. 1 sc in each st /42
12. (6 sc, 1 inc) x6 /48
13. 1 sc in each st /48
14. (7 sc, 1 inc) x6 /54
15. (8 sc, 1 inc) x6 /60
16. (9 sc, 1 inc) x6 /66
17-19. 1 sc in each st /66
20. (9 sc, 1 dec) x 6 /60
21. (8 sc, 1 dec) x 6 /54
22. (7 sc, 1 dec) x 6 /48
23. (6 sc, 1 dec) x 6 /42
24. (5 sc, 1 dec) x 6 /36
25. (4 sc, 1 dec) x 6 /30
26. (3 sc, 1 dec) x 6 /24
27. (2 sc, 1 dec) x 6 /18
Here we start the body:
28. 1 sc in each st /18
29. (2 sc, 1 inc) x6 /24
30. (3 sc, 1 inc) x6 /30
31. (4 sc, 1 inc) x6 /36
32. (5 sc, 1 inc) x6 /42
33. (6 sc, 1 inc) x6 /48
34. (7 sc, 1 inc) x 6 /54
35-49. 1 sc in each st /54
50. (7 sc, 1 dec) x 6 /48
51. (6 sc, 1 dec) x 6 /42
52. (5 sc, 1 dec) x 6 /36
53. (4 sc, 1 dec) x 6 /30
54. (3 sc, 1 dec) x 6 /24
55. (2 sc, 1 dec) x 6 /18
56. (1 sc, 1 dec) x 6 /12
57. dec x 6 /6
Fasten off.
Arms (Make 2)
Stuff loosely as you crochet to the half of the arm.
Shoulder part should be flat.
1. 6 sc in magic ring /6
2. inc x6 /12
3. (1 sc, 1 inc) x6 /18
4-25. 1 sc in each st /18
26. (1 sc, 1 dec) x 6 /12
27. dec x 6 /6
Fasten off.
Ears (Make 2)
1. 6 sc in magic ring /6
2. inc x6 /12
3. (1 sc, 1 inc) x6 /18
4. (5 sc, 1 inc) x 3 /21
5-20. 1 sc in each st /21
21. (5 sc, 1 dec) x 3 /18
22. (1 sc, 1 dec) x 6 /12
23-24. 1 sc in each st /12
Fasten off leaving a tail for sewing. Do not stuff.
Flatten the ears and sew a piece of felt to each one.
Legs (Make 2)
Stuff as you crochet but not too tight.
1. 6 sc in magic ring /6
2. inc x6 /12
3. (1 sc, 1 inc) x6 /18
4. (2 sc, 1 inc) x6 /24
5-14. 1 sc in each st /24
15. (2 sc, 1 dec) x 6 /18
16. (1 sc, 1 dec) x 6 /12
17. (1 sc, 1 inc) x6 /18
18. (2 sc, 1 inc) x6 /24
19. 9 sc, inc x6, 9 sc /30
20. 12 sc, inc x6, 12 sc /36
21-22. 1 sc in each st /36
23. (4 sc, 1 dec) x 6 /30
24. (3 sc, 1 dec) x 6 /24
25. (2 sc, 1 dec) x 6 /18
26. (1 sc, 1 dec) x 6 /12
27. dec x 6 /6
Fasten off. Sew a piece of felt to the foot part.
Assembly
Sew the ears to the head. You can fold the tip of the ear.
Sew one side of the head to the body (“shoulder”) to make the bunny look like it is sleeping.
Sew the arms and the legs to the sides of the body.
Sew them together very tight to keep them folded.
Embroider the eyes, nose, and eyebrows.