Crochet Amigurumi Ballerina Bunny Pattern

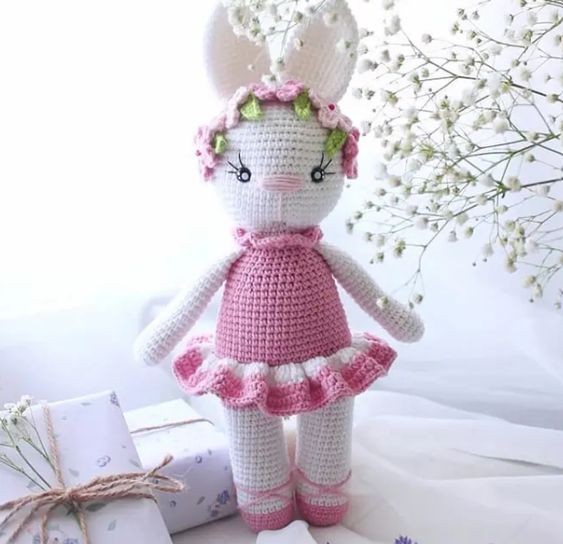
Introducing the charming Crochet Amigurumi Ballerina Bunny, a delightful creation that combines the cuteness of a bunny with the grace of a ballerina. This whimsical crochet piece is perfect for adding a touch of sweetness to any space or making a unique gift for someone special. With its fluffy ears, dainty ballet slippers, and adorable tutu, this Ballerina Bunny is sure to capture hearts and bring a smile to anyone who sees her. Whether you're a crochet enthusiast looking for a fun new project or simply appreciate the artistry of handmade creations, this little bunny is bound to enchant you with its whimsical charm and endearing personality.
Materials and Tools
Yarn
Hook
Thread for embroidery muzzle
Eyes for toys
Filler for toys
Pins
Glue
Needle for sewing details
Scissors
Conventions
KA – amigurumi ring
vp – air loop
ss – connecting column
sc – single crochet
ssn – double crochet
pssn – half-column with a crochet
pr – increase
ub — beauty
(…) xn – repeat n times
Legs (2 Parts)
We start knitting with a pink thread.
Instructions
1st row. In KA, we collect 6 sbn
2nd row. 6 pr
3rd row. 1 sc, inc x 6 times (18)
4th row. 2 sc, inc x 6 times (24)
5th-7th row. 24 sbn
Change the color to white and knit for the back loops.
8th-25th row. 24 sc
Change color to pink.
26th-27th row. 24 sc
We fix the thread and cut it off. We knit the second leg in the same way. Next, knit 3 more sc and dial 2 ch and connect with the first leg.
28th row. Knit 52 sc
29th-33rd rows. 52 sc
Torso
34th row. For the back loops, knit 52 sbn
35th row. 12 sc, dec, 24 sc, dec, 12 sc (50)
36th row. 50 sbn
37th row. 11 sc, dec, 23 sc, dec, 12 sc (48)
38th row. 48 sbn
39th row. 10 sc, dec, 22 sc, dec, 12 sc (46)
40th row. 46 sc
41st row. 9 sc, dec, 21 sc, dec, 12 sc (44)
42nd row. 44 sc
43rd row. 8 sc, dec, 20 sc, dec, 12 sc (42)
44th row. 42 sc
45th row. 5 sc, dec x 6 times (36)
46th-47th rows. 36 sbn
48th row. 4 sc, dec x 6 times (30)
49th-50th rows. 30 sc
51st row. 3 sc, dec x 6 times (24)
52nd row. For the back loops, 24 sc
Skirt
1st row. In the 34th row, knit in turn first 2 dc, and in the second loop 3 dc and so on until the end of the row.
2nd-3rd rows. 130 pssn
4th row. 130 sc
Collar
Also, in turn, we collect 2 dc in the first loop, and in the second 3 dc and so on until the end (60).
Head
1st row. For the loops of the previous row we knit 24 sbn
2nd row. 3 sc, inc x 6 times (30)
3rd row. 4 sc, inc x 6 times (36)
4th row. 5 sc, inc x 6 times (42)
5th row. 6 sc, inc x 6 times (48)
6th row. 7 sc, inc x 6 times (54)
7th row. 8 sc, inc x 6 times (60)
8th-17th rows. 60 sbn
18th row. 8 sc, dec x 6 times (54)
19th row. 7 sc, dec x 6 times (48)
20th row. 6 sc, dec x 6 times (42)
21st row. 5 sc, dec x 6 times (36)
22nd row. 4 sc, dec x 6 times (30)
23rd row. 3 sc, dec x 6 times (24)
24th row. 2 sc, dec x 6 times (18)
25th row. 1 sc, dec x 6 times (12)
26th row. 6 dec
Ears (2 Parts)
1st row. In KA, 6 sbn
2nd row. 1 sc, inc x 3 times (9)
3rd row. 2 sc, inc x 3 times (12)
4th row. 1 sc, inc x 6 times (18)
5th row. 2 sc, inc x 6 times (24)
6th-16th rows. 24 sbn
17th row. 2 sc, dec x 6 times (18)
18th row. 18 sc
Cut the thread and fasten off.
Handles (2 Parts)
1st row. In KA, dial 6 sbn
2nd row. 6 inc (12)
3rd row. 2 sc, inc x 4 times (16)
4th-6th rows. 16 sbn
7th row. 6 sc, dec x 2 times (14)
8th-24th rows. 14 sc
Flowers
In KA, dial 5 sb. Next, sl-st and cast on 3 ch and knit 3 dc, 3 ch and sl-st in the same loop. Knit the next petals in the same way.
Leaves (4 Parts)
We collect 11 ch and in the 2nd loop from the hook, knit sl-st, sc, 2 pss, 3 dc, pss, sl-st.
Assembling the Toy
Step by step we begin to collect our toy.
First, we sew handles on the sides, right under the collar and then on the top of the ears.
We make a tightening on the face. We start from the bottom, insert the needle between the 2nd and 3rd rows and withdraw between the 11th and 12th rows. The distance between the eyes is 11-12 sc.
Embroider eyelashes with sewing thread.
On the head with the help of pins, carefully fix the flowers and leaves. Then we also sew, but before that, I glue them with a small amount of glue.
All Finished.