Crochet Adorable Backpack

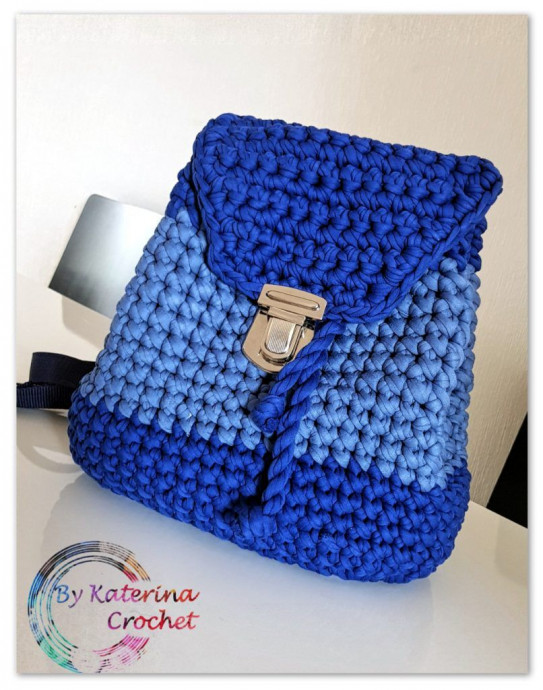
Crocheting an adorable backpack is such a fun and rewarding project! Imagine carrying around a unique, handmade bag that you created yourself. You can customize it to your heart's content with different colors, patterns, and even add cute embellishments. Not only is it a practical accessory to carry your essentials, but it's also a great conversation starter. Whether you're heading to school, work, or just out for a day of errands, your crochet backpack will definitely turn heads and make you feel extra special. So grab your yarn, hook, and creativity, and get ready to craft something truly delightful!
Materials You Will Need
I used t-shirt yarn from Hoooked (Hoooked Zpagetti).
You can try using more strands of yarn just to get to the thickness.
8 mm crochet hook (L – 11)
3 D rings (2.5 cm)
1 backpack closure
Bag band (optional if you don’t want to crochet the straps)
If you use a band like I did, you will need some press buttons so you don’t have to sew the straps on edges.
Abbreviations Used in This Pattern
- Ch – chain
- Sc – single crochet
- St(s) – stitch(es)
- Sl st – slip stitch
- Inc – increase (2 sc in the same st)
Creating the Base of the Backpack
We will begin with an oval base. So we will work in rounds making an oval.
Start with a chain of 10 stitches.
Round 1
Beginning with the second stitch, 1 sc in the next 8 sts (until you have 1 st left), 3 sc in the last st (mark the first and the last st), turn on the other side of the ch, 1 sc in the next 8 sts, 3 sc in the next (and the last st of the row), Sl st with the 1st sc.
Round 2
Ch 1, [1 sc in the next 8 sts, 1 inc in the next 3 sts] repeat this section on the other side of the chain. Sl st.
Round 3
Ch 1, [1 sc in the next 8 sts, (1 inc, 1 sc in next st) 3 times] repeat the section on the other side of the chain. Sl st.
Round 4
Ch 1, [1 sc in the next 8 sts, (1 inc, 1 sc in next st) 4 times] repeat the section on the other side of the chain. Sl st.
Round 5
Ch 1, [1 sc in the next 8 sts, (1 inc, 1 sc in next st) 5 times] repeat the section on the other side of the chain. Sl st.
The base of the backpack is done.
Continuing with the Backpack Body
Rounds 6 – 23
(or until you get to the desired height of your backpack)
Ch 1, 1 sc in each st around, Sl st.
Fasten off.
Creating the Backpack Flap
Fold the top of the backpack with the side edges in the interior. On the back side, mark the second stitch and the stitch before the last one. This will be the length of your backpack flap.
Row 1
Insert the hook and begin to make 1 sc in each st. Ch 1 and turn.
If you want a flap with straight edges, repeat the 1st row until you get to the desired length of the flap. If you want a flap with round edges, you will have to decrease and follow the rest of the pattern.
Rows 2 – 5
Repeat row 1.
Row 6 and Beyond
Continue until you get to the desired length of the flap. Decrease by 1 st at the beginning of the row (skip the first st) then continue with 1 sc in each st to the end of the row.
Make an edge in sc. After finishing the flap, the crocheted backpack is done. Attach the backpack closure, the D rings, and the straps, and you are done! If you want, you can put a lining but it is not mandatory.
- Funny Pictures
-
 Cute Cat Memes That Will Make Your Day Brighter
-
 Spot-on and Funny Memes About Introverts Struggles
-
 Top Wonderful Cat Memes on Their Way to Better Your Day
- Recipes
-
 Creamy Old Fashioned Rice Pudding
-
 Russian Tea Cakes (Snowball Cookies)
-
 Rigatoni with Sausage, Tomatoes, and Zucchini
- Lifehacks
-
 How to Crochet a Harlequin Stitch
-
 Removing The Toughest Stains
-
 Crochet Basics: Crumpled Griddle Stitch
- Crochet Ideas
-
 Crochet Christmas Tree
-
 Crochet Goblet of Fire
-
 Crochet Adorable Ammonite
- DIY
-
 DIY Snowman Wreath
-
 Mini Santa Sleigh Ornament
-
 Crochet Gingerbread House Blanket
- Knitting Ideas
-
 Knitted Easter Bunny
-
 Knitted Mobile Phone/Glasses Case
-
 Knitted Cabled Wallet