Crochet Summer Coaster

Introduction
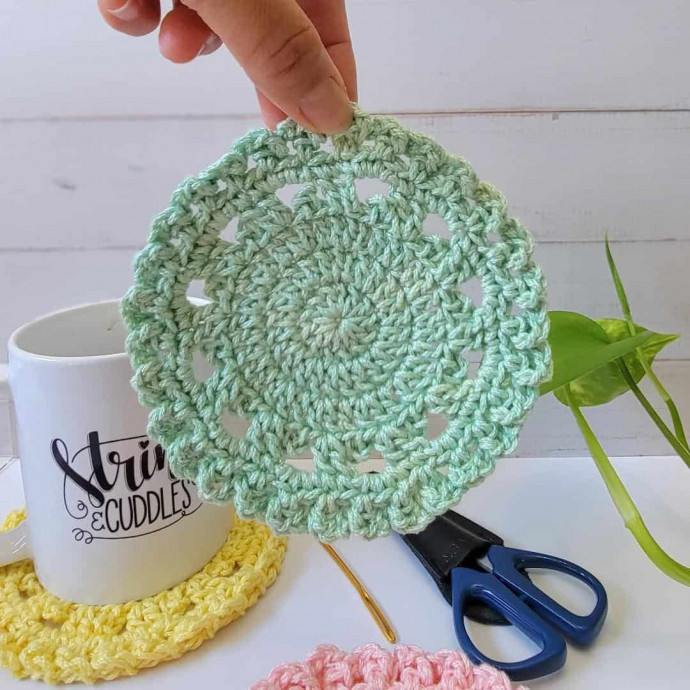
Looking to add a touch of charm to your summer dining experience? Why not try making some adorable crochet summer coasters? These little gems not only protect your table from pesky water rings but also bring a cheerful vibe to your setting. By using bright and vibrant yarn colors and fun crochet patterns, you can create a set of coasters that perfectly encapsulate the lively spirit of summer. Whether you're hosting a backyard BBQ or enjoying a refreshing drink indoors, these crochet coasters are sure to make a delightful addition to your decor. So grab your crochet hook, pick out your favorite yarn, and get ready to add a pop of summer fun to your next gathering!
Materials
- Clover Amour Crochet Hook G (4.0 mm)
- Clover Jumbo Tapestry Needle (Bent Point)
- Clover Patchwork Mini Scissors
- Clover Quick-Locking Stitch Marker
- Tape Measure
- Cotton worsted weight (#4) yarn
Notes
- Read the pattern carefully before starting.
- This pattern uses US crochet terms.
- This is a very simple pattern worked in the round.
- The gauge for this pattern is not particularly crucial. You can change the yarn weight and hook size to make your coaster larger or smaller.
- The beginning ch 1 and 2 do not count as a stitch.
- * * Repeat instructions between asterisks as many times as directed or repeat at specified locations.
- The number of stitches in each row is indicated by the numbers at the end of the row.
- I recommend using a stitch marker to mark the first stitch of each row so you will not miss it. Remember to move the stitch marker as you progress.
Gauge
Round 2 measures approximately 1.75 in (diameter, unblocked)
Skill Level
Adventurous Beginner – Intermediate
Finished Measurement
Approximately 5 in (diameter, unblocked)
Abbreviations
- ch(s): chain(s)
- dc: double crochet
- fpdc: front post double crochet
- mr: magic ring
- rep: repeat
- sc: single crochet
- sk: skip
- slst: slip stitch
- st(s): stitch(es)
p: picot – ch 3 and slip stitch in top of double crochet stitch

Start with a MR.
Instructions
Round 1
Ch 2 (does not count as a stitch throughout), 12 DC into the ring. Pull tight the yarn tail to close the ring and slst in the 1st st to close the round. 12 DC sts
Round 2
Ch 2, 2 DC in each st around. Slst in the 1st st to close the round. 24 DC sts
Round 3
Ch 2, *2 DC, 1 DC, P in top of DC*; Rep from * to * around. Slst in the 1st st to close the round. 36 DC sts, 12 P sts
Round 4
Slst in next st, ch 3 (counts as 1 DC st), 1 DC in the same st, ch 3, sk 2 DC and P sts, *2 DC in next st, ch 3, sk 2 DC and P sts*; Rep from * to * around. Slst in 1st st (top ch 3) to close the round. 24 DC sts, 12 ch-3-sps
Round 5
Ch 1 (does not count as a st throughout), 1 SC in each st and ch around. Slst in the 1st st to close the round. 60 SC sts
Round 6
Ch 1, *1 SC, ch 2, sk 1 st*; Rep from * to * around. Slst in the 1st st to close the round. 30 SC sts, 30 ch-2-sp
Round 7
Ch 1, *FPSC in next st, ch 3, slst in ch-2-sp*; Rep from * to * around. Slst in the 1st st to close the round. 30 FPSC sts, 30 ch-3-sp, 30 slsts
Fasten off and weave in all ends.

- Funny Pictures
-
 Hilarious Memes for Those Bored to Tears
-
 Weekly Treat of Funniest Parenting Memes for Good Laugh out Loud Right Now
-
 Really Funny Pics to End These Weekend Perfectly
- Recipes
-
 Crispy Baked Avocado Fries
-
 Scrambled Chickpea and Spinach Pitas
-
 Cinnamon Pancakes
- Lifehacks
-
 Crochet Basics: Aligned Cobble Stitch
-
 Brick Stitch Crochet Tutorial
-
 Crochet Basics: Wattle Stitch
- Crochet Ideas
-
 Crochet Snorlax Plushie Doll
-
 Crochet Beautiful Penguin Toy
-
 Crochet Tiny Snowman
- DIY
-
 DIY Santa Craft For Kids
-
 Paper Plate Angel Craft
-
 Upcycled Mason Jar Chicken Vase
- Knitting Ideas
-
 Knitted Bridger Cowl
-
 Knitted Keepsake Bag
-
 Knitted Cutie Cupcake Dolls