How to Crochet a Capybara in a Bathtub


Imagine the utter cuteness overload of a crochet capybara hanging out in a bathtub! The image of this lovable, cuddly creature crafted out of yarn, chilling in a cozy little tub, just brings a smile to your face, doesn't it? It's like a quirky, adorable scene straight out of a whimsical storybook - a delightful blend of creativity and coziness. Who knew that a capybara and a bathtub could make such a charming pair? It's a heartwarming reminder of the joy and laughter that can be found in the simplest and most unexpected places.
Materials and Preparation
Before starting the project, gather the following materials:
Yarn Type:
- Beige yarn for the body
- Brown yarn for the arms and pot
- Red and green yarn for accessories (e.g., apple decoration)
- White yarn for the scarf
Hook Size:
- 3.5mm crochet hook
Additional Tools:
- Stitch marker (or contrasting yarn for marking)
- Scissors
- Wool sewing needle
- Felt circle for stabilizing the pot
- Glue (optional for felt attachment)
Yarn Weight Requirements:
Medium weight (4) yarn
Abbreviations & Notes
Familiarize yourself with the following abbreviations commonly used in this pattern:
- SC: Single crochet
- DC: Double crochet
- CH: Chain stitch
- INC: Increase (2 single crochets in one stitch)
- DEC: Decrease (crocheting together two front loops of adjacent stitches)
- SL ST: Slip stitch
Notes:
- Always use a stitch marker to keep track of rounds or rows.
- Ensure stitches are tight but not overly so; this will help maintain shape.
For the apple and neck strap, adjust yarn lengths as desired for size and fit.
Gauge, Approximate Size, and Special Techniques
- Gauge: 5 single crochets per inch (adjust hook/yarn size if necessary).
- Finished Dimensions: Approximately 6" high and 4" wide.
- Special Techniques: Magic circle, decreasing stitches, and back loop crocheting for the pot edging.
Step-by-Step Pattern
Let’s break this project into manageable parts:
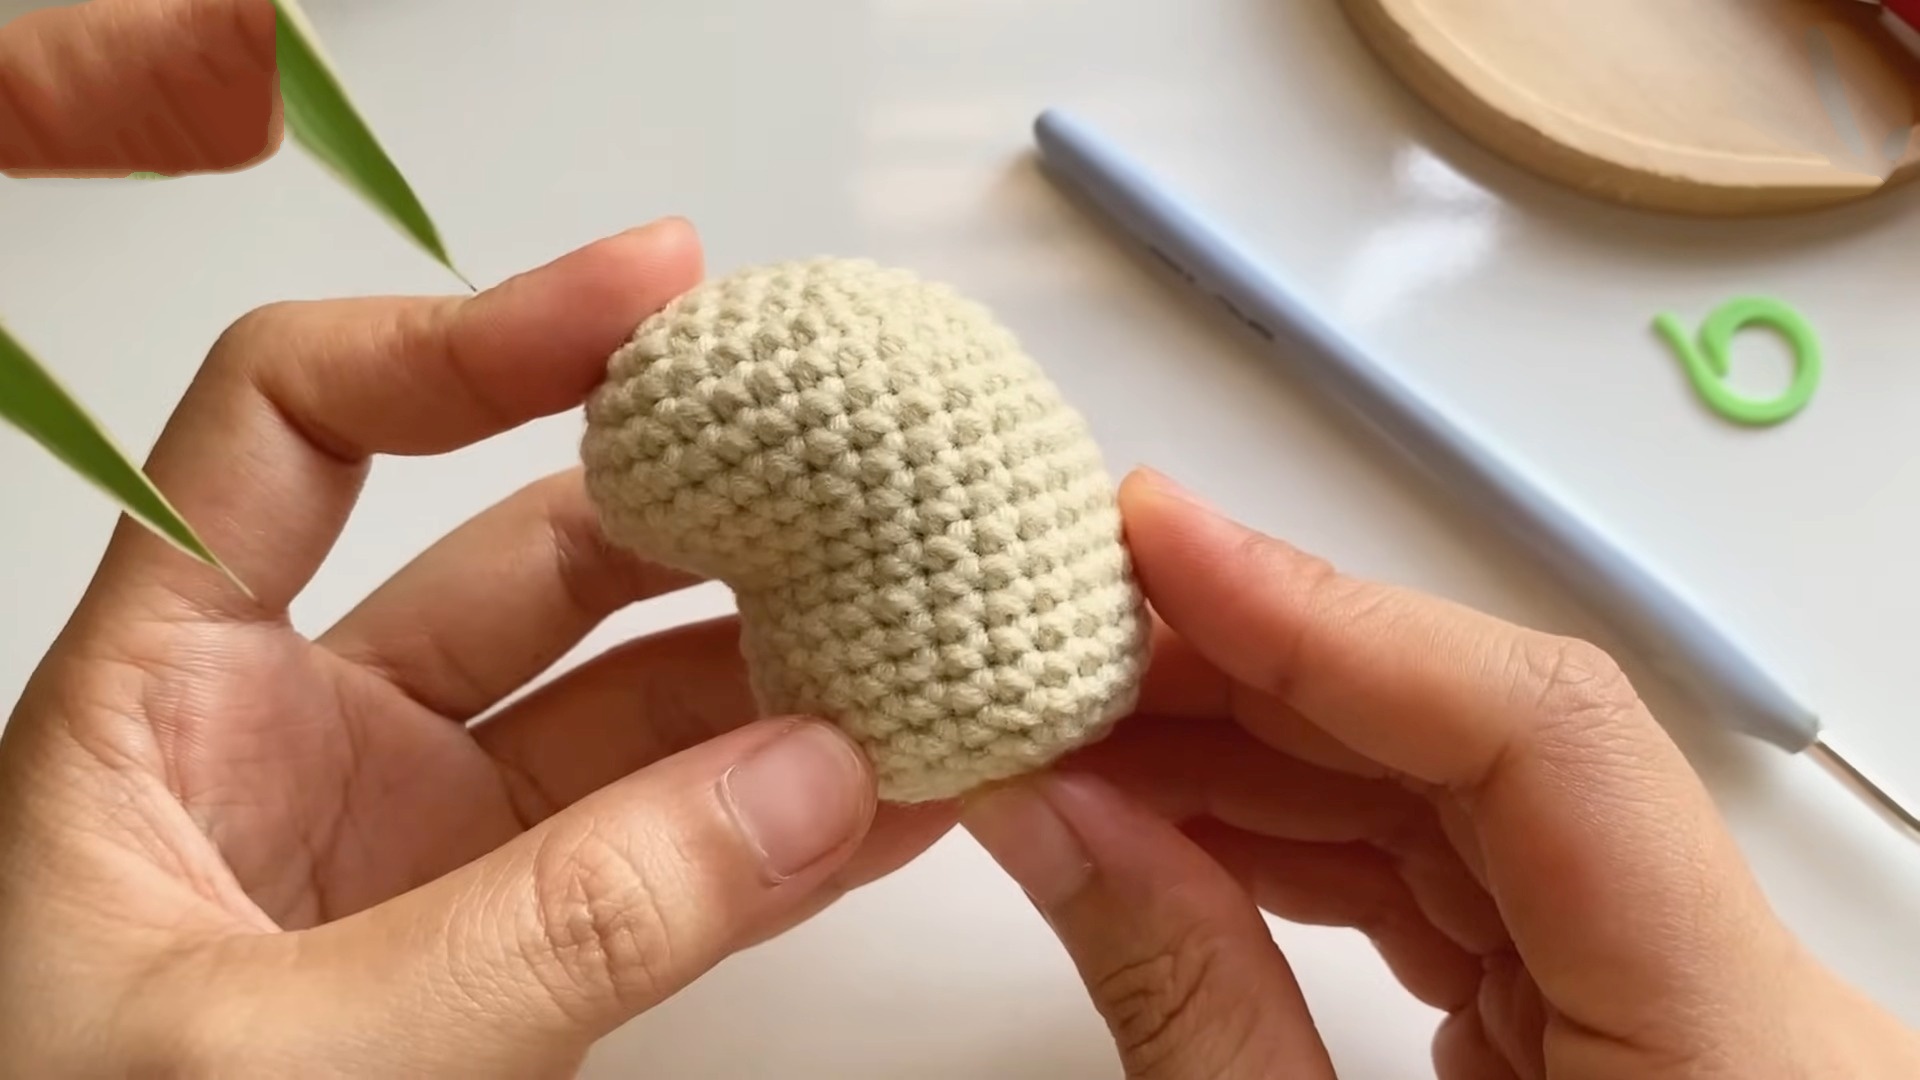
Part 1: Body of the Capybara
Round 1:
Make a magic circle with beige yarn and crochet 6 single crochets inside. Pull it tight. Use a stitch marker for the first stitch (optional).
Round 2:
Increase all stitches around (INC in each stitch) to create 12 single crochets.
Rounds 3–7:
Continue following this formula:
- Round 3: Alternate INC and SC around (18 stitches).
- Round 4: Alternate 2 SC and INC around (24 stitches).
- Round 5: Alternate 3 SC and INC around (30 stitches).
- Rounds 6–7: SC into each stitch to maintain shape (30 stitches).
Round 8:
SC into 7 stitches, DEC twice, SC, DEC twice, SC into the next 8 stitches. Use additional DEC and INC as needed for shaping.
Rounds 9–18:
Continue working SC and occasional DEC/INC for shaping. Stuff the body with fiberfill as you go.
To finish, close off the top using decreasing stitches (DEC across last row). Sew loose ends.
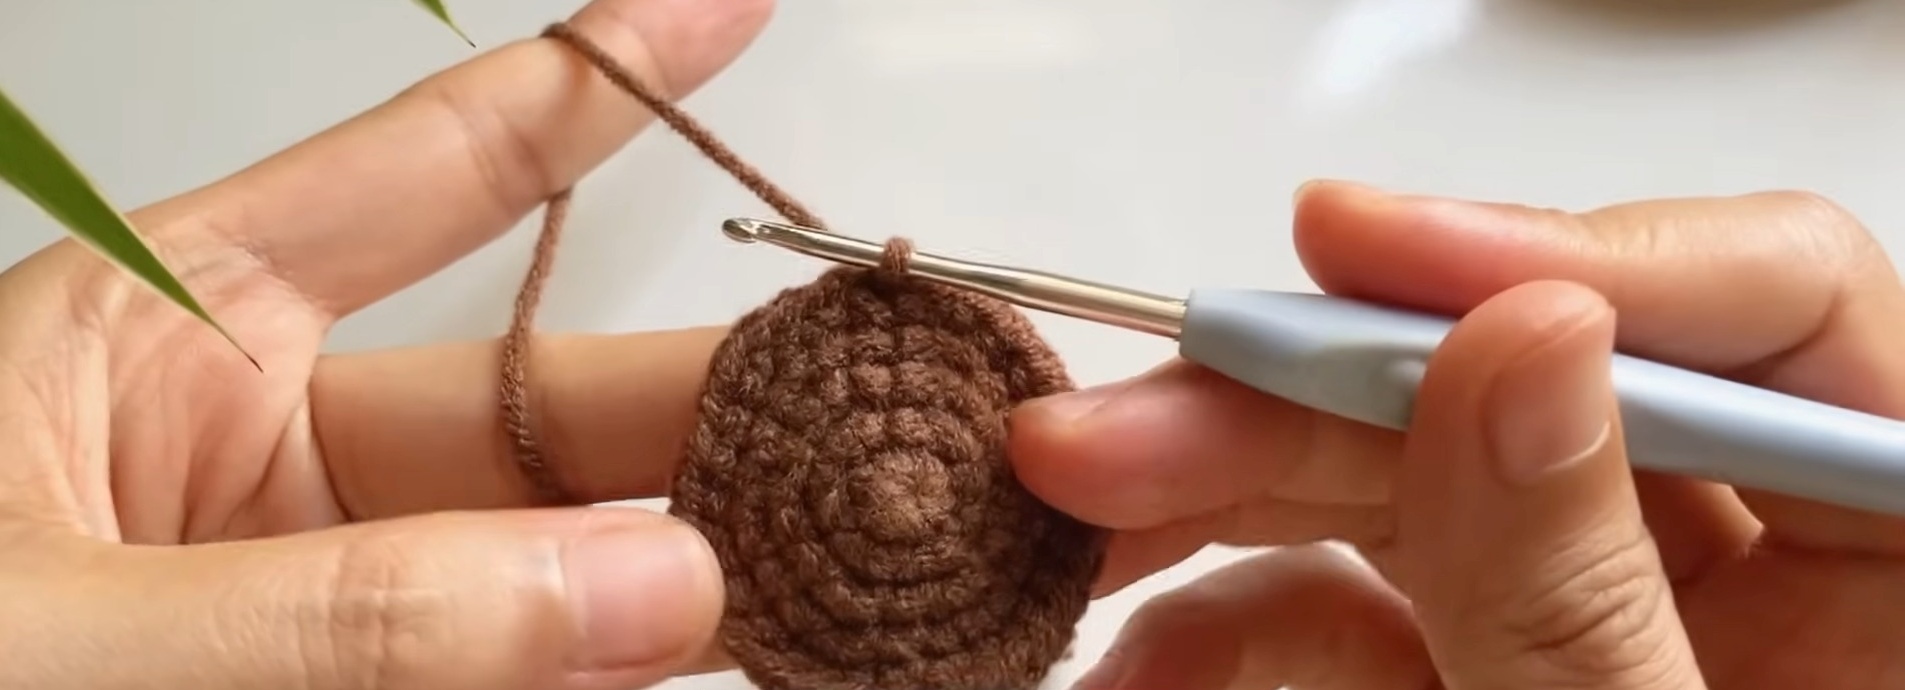
Part 2: Pot and Stabilizer
Round 1:
Start with brown yarn to create a magic circle. Crochet 6 SC into the circle and tighten.
Rounds 2–5:
Increase:
- Round 2: INC in each stitch (12 stitches).
- Round 3: Alternate SC and INC (18 stitches).
- Round 4: Alternate 2 SC and INC (24 stitches).
- Round 5: Alternate 3 SC and INC (30 stitches).
Round 6:
Switch to back loop crocheting with DC around to form edging.
Rounds 7–8:
DC into each stitch using regular loops.
Add a felt circle to the inside base using glue for stabilization.
Part 3: Arms
Round 1:
Using brown yarn, start with a magic circle and crochet 6 SC. Tighten the magic circle and leave a yarn tail for sewing.
Make two identical arms.
Part 4: Scarf
Row 1:
Using white yarn, crochet 11 CH stitches. SC into the second CH from the hook and across (10 SC).
Rows 2–10:
Chain 1, turn, and SC across. Repeat for desired scarf length.
Tie off yarn and sew loose ends into scarf.
Part 5: Apple with Leaves
Apple:
Using red yarn, make a magic circle and crochet 8 DC inside. Tie off and tighten.
Leaves:
Using green yarn, create 3 CH stitches. Slip stitch into the first CH to form leaf shape.
Attach the apple and leaves to the Capybara’s head.
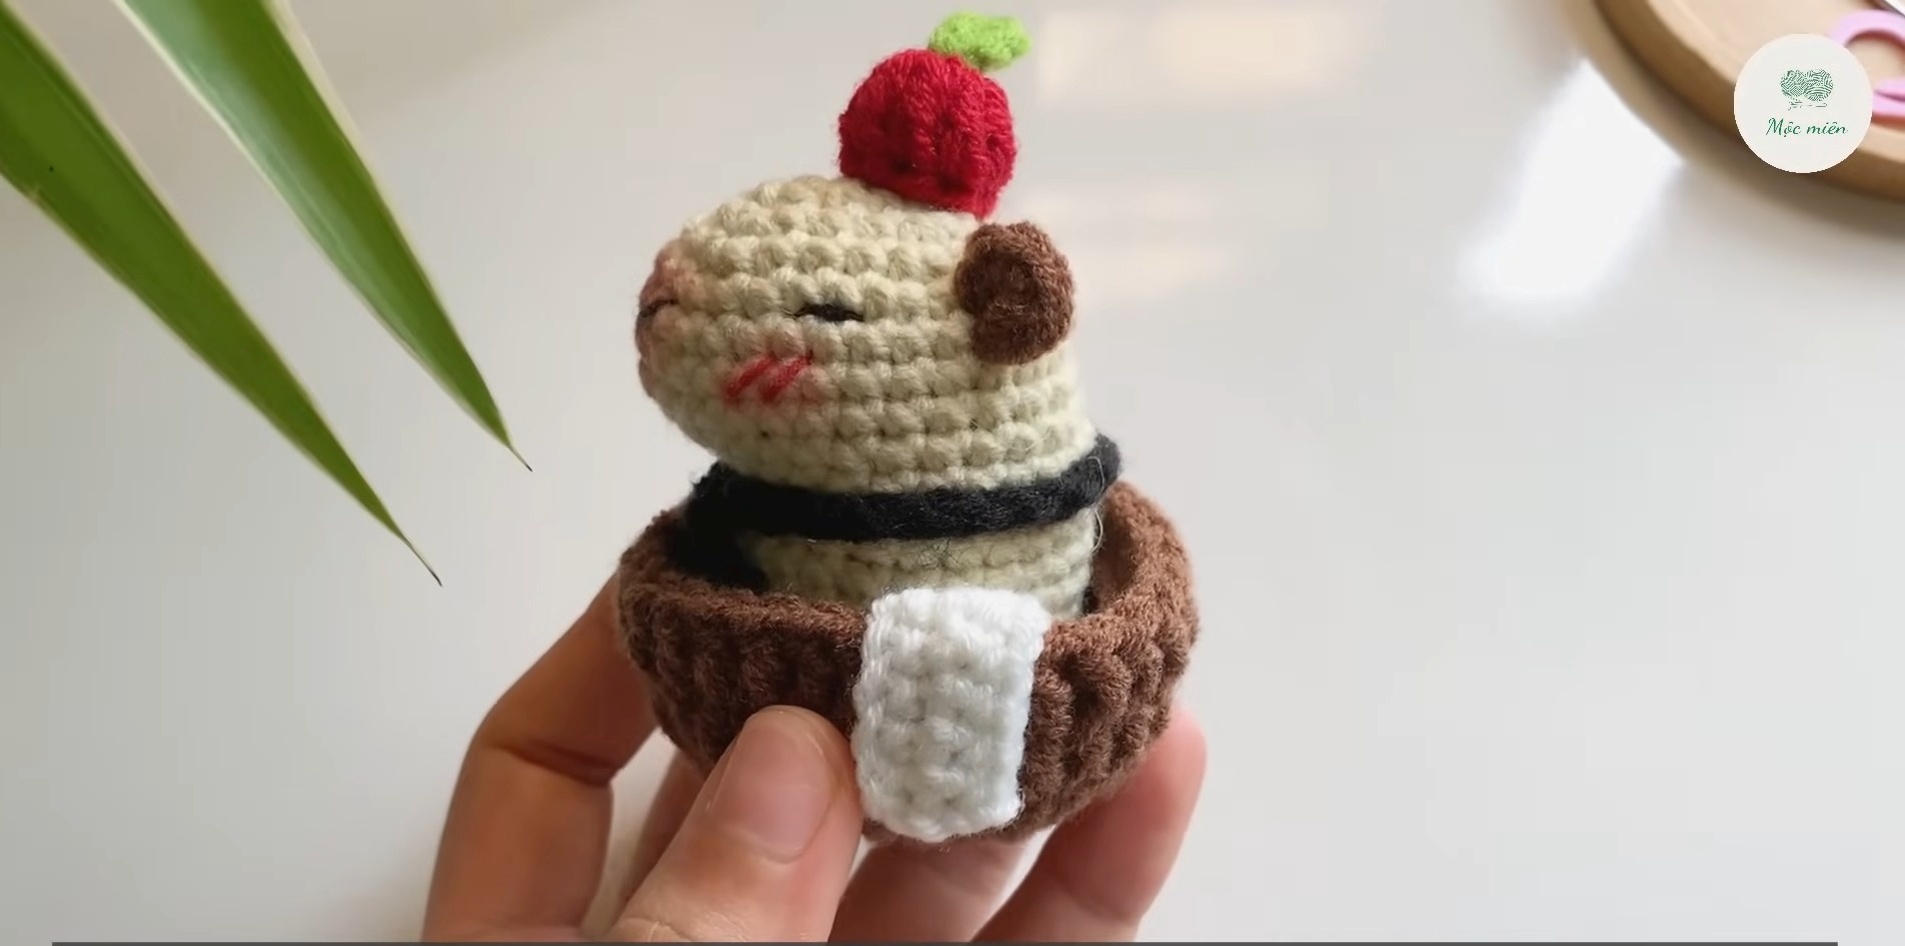
Part 6: Neck Strap
Row 1:
Crochet 30 CH stitches using black yarn. Adjust the length to suit. Tie off yarn, sew loose ends, and wrap around the Capybara’s neck.
Assembly and Final Touches
- Attach arms to the body using the sewing needle.
- Place the body into the pot and secure it with stitches or glue.
- Wrap the scarf around the neck and adjust.
- Sew on the apple and facial features (nose and eyes).
- Funny Pictures
-
 Pics to Get the Excitement Today
-
 Funny Christmas Meme Dump
-
 Funniest Relatable Felines in the Form of Memes
- Recipes
-
 Cappuccino Brownies
-
 Chicken Mushroom Tortellini Bake
-
 Spinach Pie
- Lifehacks
-
 8 Necessary Tips for Baking Bread
-
 Tips & Hacks for Clean Carpets
-
 10 Uses For Old TV Armoires
- Crochet Ideas
-
 Crochet Watermelon Amigurumi
-
 Crochet Shark Applique
-
 Crochet Pineapple Amigurumi
- DIY
-
 Yarn Wrapped Christmas Wreath Ornaments
-
 Egg Carton Snowman Ornament
-
 Stick Peppermint Candy Ornament
- Knitting Ideas
-
 Knitted Star Square Dishcloth
-
 Knitted Free 2025 Year Dishcloth
-
 Knitted Ribbed Adult Hat