How to Crochet an Adorable Wolf with a Stylish Pullover

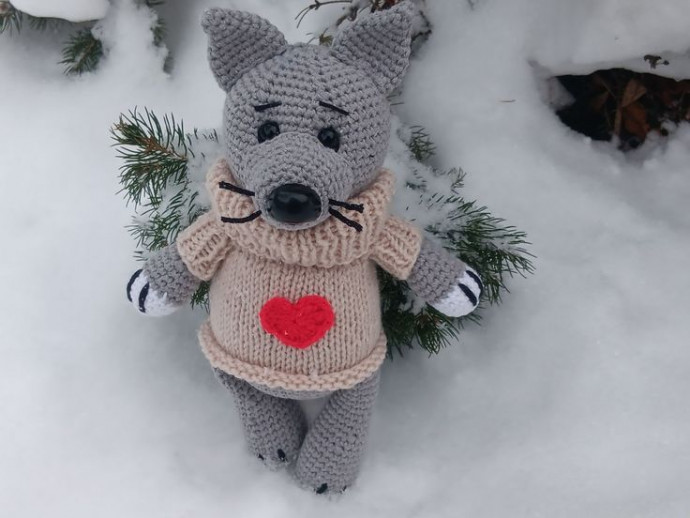
Imagine a cozy evening by the fireplace, sipping hot cocoa with a delightful crochet wolf in a pullover on your lap. This charming handmade creation adds a touch of whimsy to your home decor and brings a smile to your face every time you see it. The intricate details of the crocheted design, from the little paws to the fluffy tail, showcase the skill and creativity of the artisan who crafted this adorable piece. It's not just a decoration; it's a heartwarming companion that exudes warmth and comfort in its stylish pullover, making it a must-have for any animal lover or crochet enthusiast.
Supplies You Will Need
To create your crochet wolf, gather the following materials:
- cotton yarn (e.g. Schachenmayr Catania 125m/50g) in three colors: grey, beige, and white
- a bit of black for the eyebrows
- crochet hook 3 mm
- safety eyes or 2 black little beads
- safety nose
- scissors
- yarn needle
- Fiberfil stuffing
- velcro fastener or 3 little buttons
Skill Level
Intermediate
Size
The ready amigurumi is approximately 20 cm, but can be made bigger or smaller depending on the yarn and hook you use.
Skills You Need
- chain
- single crochet
- double crochet
- half double crochet
- slip stitch
- increase
- decrease
Abbreviations
- Ch = chain
- St = stitch
- Sc = single crochet
- Sl st = slip stitch
- Dec = decrease stitch (two single crochets together)
- Inc = increase stitch (two single crochets in the one stitch)
- Dc = double crochet
- Rnd = Round
- * = repeat instructions for the times indicated
- (...) = total amount of stitches
Tips for Successful Crocheting
- Do not join rounds; work in a continuous spiral.
- Use a stitch marker or piece of yarn to keep track of the last stitch in each round.
- All stitches are worked into both loops, unless stated otherwise in the pattern.
- When filling with polyester stuffing, pull apart each large chunk into many smaller chunks to ensure an even distribution of firmness within the amigurumi.
- Amigurumi can be made in any desired colors.
Seamless Way of Changing Color
Pick up the new color at the end of the round: insert your hook into the stitch, yarn over the new color, and pull through the stitch and the loop on your hook to complete the stitch.
Instructions
The wolf consists of several parts which you crochet separately and then sew them together.
To Make a Magic Ring
- Loop the thread twice around your middle finger.
- Put the hook under both loops, pull the yarn under the loops, and hook the thread again.
- Pull the thread through the new loop. The first crochet stitch is ready!
- Repeat the number of times needed.
- Pull the inner threads to tighten the ring.
Arm (2x)
Start with white color yarn.
Round 1: 6 single crochets into Magic Ring
Round 2: increase 6 times (12 stitches)
Round 3: *single crochet in the next stitch, increase* (18 stitches)
Rounds 4-6: single crochet in each of the next 18 stitches
Change the yarn color to grey
Round 7 (working into the back loop): single crochet in each of the next 18 stitches
Rounds 8-10: single crochet in each of the next 18 stitches
Round 11: *decrease, single crochet in each of the next 4 stitches* (15 stitches)
Rounds 12-15: single crochet in each of the next 15 stitches
Stuff the arm slightly.
Round 16: *decrease, single crochet in each of the next 3 stitches* (12 stitches)
Rounds 17-20: single crochet in each of the next 12 stitches
Bind off. Work the second arm the same way.
Leg (2x)
Work using grey color yarn.
Round 1: 6 single crochets into Magic Ring
Round 2: increase 6 times (12 stitches)
Round 3: *single crochet in the next stitch, increase* (18 stitches)
Round 4: *single crochet in the next 2 stitches, increase* (24 stitches)
Rounds 5-10: single crochet in each of the next 24 stitches
Round 11: *single crochet in each of the next 6 stitches, decrease* (21 stitches)
Round 12: single crochet in each of the next 21 stitches
Round 13: *single crochet in each of the next 5 stitches, decrease* (18 stitches)
Rounds 14-15: single crochet in each of the next 18 stitches
Round 16: *single crochet in each of the next 4 stitches, decrease* (15 stitches)
Rounds 17-21: single crochet in each of the next 15 stitches
Round 22: *single crochet in each of the next 3 stitches, decrease* (12 stitches)
Rounds 23-24: single crochet in each of the next 12 stitches
Stuff the leg firmly till round 20.
Bind off. Work the second leg the same way.
Body and Head
Work shift stitch every 3-4 rounds.
Shift Stitch
Sometimes during the work of the spiral amigurumi, you need to keep the work symmetrical. As work tends to twist to the right, you need to adjust the position of the marker periodically (beginning of the round).
The shift stitch is an extra stitch you work at the end of a round to make your work look symmetrical. If you notice that the marker moves right, you need to work one extra stitch at the end of the round and move the marker for one stitch (now the second stitch of the round becomes the first). This is a shift stitch.
The shift stitch is not included in the round description. To check if it’s time to work a shift stitch, fold your work in half and check if the marker still goes straight or use a yarn that marks a straight line.
Body Instructions
Round 1: 6 single crochets into Magic Ring
Round 2: increase 6 times (12 stitches)
Round 3: *single crochet in the next stitch, increase* (18 stitches)
Round 4: *single crochet in each of the next 2 stitches, increase* (24 stitches)
Round 5: *single crochet in each of the next 3 stitches, increase* (30 stitches)
Round 6: *single crochet in each of the next 4 stitches, increase* (36 stitches)
Round 7: *single crochet in each of the next 5 stitches, increase* (42 stitches)
Round 8: *single crochet in each of the next 6 stitches, increase* (48 stitches)
Round 9: single crochet in each of the next 48 stitches
Round 10: *single crochet in each of the next 7 stitches, increase* (54 stitches)
Round 11: single crochet in each of the next 54 stitches
In the next round, attach the legs (ensure that the legs are located in the middle and make several shift stitches if needed):
Round 12: single crochet in each of the next 11 stitches, 6 single crochets both through hand and body, single crochet in each of the next 21 stitches, 6 single crochets both through hand and body, single crochet in each of the next 10 stitches.
Rounds 13-20: single crochet in each of the next 54 stitches
Round 21: *decrease, single crochet in each of the next 7 stitches* (48 stitches)
Rounds 22-23: single crochet in each of the next 48 stitches
Start stuffing the body.
Round 24: *decrease, single crochet in each of the next 6 stitches* (42 stitches)
Round 25: *decrease, single crochet in each of the next 5 stitches* (36 stitches)
Round 26: single crochet in each of the next 36 stitches
Round 27: *decrease, single crochet in each of the next 4 stitches* (30 stitches)
In the next round, attach the hands (ensure that the hands are located in the middle and make several shift stitches if needed):
Round 28: single crochet in each of the next 5 stitches, 6 single crochets both through hand and body, single crochet in each of the next 10 stitches, 6 single crochets both through hand and body, single crochet in each of the next 3 stitches.
Round 29: *decrease, single crochet in each of the next 3 stitches* (24 stitches)
Round 30: single crochet in each stitch till the end of the round.
Stuff the body firmly. Do not bind off.
Head Instructions
Continue crocheting in rounds using grey color yarn.
Round 1: *single crochet in the next stitch, increase* (36 stitches)
Round 2: *single crochet in each of the next 2 stitches, increase* (48 stitches)
Round 3: *single crochet in each of the next 7 stitches, increase* (54 stitches)
Round 4: *single crochet in each of the next 8 stitches, increase* (60 stitches)
Rounds 5-15: single crochet in each of the next 60 stitches
Round 16: *decrease, single crochet in each of the next 8 stitches* (54 stitches)
Round 17: single crochet in each of the next 54 stitches
Round 18: *decrease, single crochet in each of the next 7 stitches* (48 stitches)
Round 19: *decrease, single crochet in each of the next 6 stitches* (42 stitches)
Mark where you want the safety eyes to be placed with pins and attach them at a distance of 8-10 stitches from the head of your amigurumi.
Round 20: *decrease, single crochet in each of the next 5 stitches* (36 stitches)
Round 21: *decrease, single crochet in each of the next 4 stitches* (30 stitches)
Round 22: *decrease, single crochet in each of the next 3 stitches* (24 stitches)
Stuff the head firmly.
Round 23: *decrease, single crochet in each of the next 2 stitches* (18 stitches)
Round 24: *decrease, single crochet in the next stitch* (12 stitches)
Round 25: *decrease*, repeat 6 times.
Bind off. Hide yarn ends.
Ear (2x)
Crochet using grey color yarn.
Round 1: 6 single crochets into Magic Ring
Round 2: single crochet in each of the next 6 stitches
Round 3: *single crochet in the next stitch, increase* (9 stitches)
Round 4: *decrease, single crochet in each of the next 2 stitches* (12 stitches)
Round 5: *decrease, single crochet in each of the next 3 stitches* (15 stitches)
Round 6: *decrease, single crochet in each of the next 4 stitches* (18 stitches)
Round 7: single crochet in each of the next 18 stitches
Round 8: *decrease, single crochet in each of the next 5 stitches* (21 stitches)
Round 9: single crochet in each of the next 21 stitches
Bind off leaving a long tail for sewing. Work the second ear the same way.
Tail
Start crocheting with white color yarn.
Round 1: 6 single crochets into a Magic Ring
Round 2: single crochet in each of the next 6 stitches
Round 3: *single crochet in the next stitch, increase* (9 stitches)
Round 4: single crochet in each of the next 9 stitches
Round 5: *single crochet in each of the next 2 stitches, increase* (12 stitches)
Round 6: single crochet in each of the next 12 stitches
Round 7: *single crochet in the next stitch, increase* (18 stitches)
Rounds 8-9: single crochet in each of the next 18 stitches
Change the yarn color to grey
Round 10 (working into the back loop): single crochet in each of the next 18 stitches
Round 11: *single crochet in each of the next 5 stitches, increase* (21 stitches)
Rounds 12-14: single crochet in each of the next 21 stitches
Round 15: *decrease, single crochet in each of the next 5 stitches* (18 stitches)
Rounds 16-17: single crochet in each of the next 18 stitches
Round 18: *decrease, single crochet in each of the next 4 stitches* (15 stitches)
Round 19: single crochet in each of the next 15 stitches
Round 20: *decrease, single crochet in each of the next 3 stitches* (12 stitches)
Rounds 21-23: single crochet in each of the next 12 stitches
Bind off leaving a long tail for sewing.
Muzzle
Work with grey color yarn.
Round 1: 6 single crochets into a Magic Ring
Round 2: increase 6 times (12 stitches)
Round 3: *single crochet in the next stitch, increase* (18 stitches)
Round 4: *single crochet in the next 2 stitches, increase* (24 stitches)
Round 5: single crochet in each of the next 24 stitches
Round 6: *single crochet in the next 3 stitches, increase* (30 stitches)
Round 7: single crochet in each of the next 30 stitches
Round 8: *single crochet in the next 4 stitches, increase* (36 stitches)
Rounds 9-16: single crochet in each of the next 36 stitches
Fix safety nose now or embroider it later using black color yarn.
Assembly
Since all the elements of your amigurumi wolf are crocheted, it’s time to sew them together. Use a blunt sewing needle.
Sew the muzzle to the head of your wolf.
Mark where you want the eyes to be placed with pins and sew them with a distance of 6-8 stitches to the head of your wolf. Ears are attached to the head now. Position ears and, using the yarn left, sew them to the head of your wolf. Be sure to step back and take a look to make sure they are even.
Attach the tail to the body.
Embroider eyebrows with black color yarn. You can also add eyelashes and a mouth if desired. Hide the yarn tails inside the head.
Embroider claws using black color yarn.
Knitting Pattern for Pullover with Crochet Heart
Materials
Approximately 30-40 grams Schachenmayr Catania 50g/136 yards, DK (11 wpi) or any yarn of your choice, circular and double pointed needles 3 mm, 3 buttons, or Velcro fastener.
Abbreviations
- ks = knit stitch
- ps = purl stitch
- yo = yarn over
- R = row
- Rnd = round
Edge Stitches
Slip the first stitch and purl the last stitch of every row.
Garter Stitch
Knit every row. When working in the round, purl one round and knit one round.
Stocking Stitch
Row 1: knit all stitches.
Row 2: purl all stitches.
When working in the rounds, knit all stitches every round.
1x1 Rib
This is formed by alternating 1 knit stitch and 1 purl stitch. Care must be taken to purl the stitches that were knitted on the previous row and vice versa.
Collar
Cast on 60 stitches including edge stitches.
Rows 1-18: knit 18 rows in 1x1 rib.
Row 19: In the next row, decrease evenly 18 knit stitches (42 stitches left).
Row 20: ES, 3 garter stitches, purl all stitches, 3 garter stitches, ES, turn.
Row 21: ES, 3 garter stitches, 5 knit stitches (back), place 6 sleeve stitches on holder, cast on 4 stitches, 12 knit stitches (front), place 6 sleeve stitches on holder, cast on 4 stitches, 5 knit stitches (back), 3 garter stitches, ES, turn.
Row 22: ES, 3 garter stitches, purl 30 stitches, 3 garter stitches, ES, turn.
Row 22: ES, 3 garter stitches, increase every 3rd stitch, 3 garter stitches, ES, turn.
Work 20 rounds in stockinette stitch. Bind off all stitches. Hide the yarn ends.
Sleeve
Transfer 6 sleeve stitches and cast on 8 stitches to needles and divide them onto two needles.
Work 20 rounds in 1x1 rib. Bind off all stitches. Hide the yarn ends.
Knit the second sleeve the same way.
Heart
Into the magic ring work: chain 3 stitches, 3 triple crochets, 3 double crochets, 1 triple crochet, 3 double crochets, 3 triple crochets, chain 3 stitches, slip stitch to the top of chain 3.
Cast off leaving a long tail for sewing the heart to the pullover.
Final Assembly
Sew velcro fastener or buttons to the pullover. Attach a little heart to the front side of the pullover.
- Funny Pictures
-
 Pics to Get the Excitement Today
-
 Funny Christmas Meme Dump
-
 Funniest Relatable Felines in the Form of Memes
- Recipes
-
 Cinnamon Sugar Swirl Cupcakes
-
 Cheesy Bacon Ranch Roasted Potatoes
-
 Blooming Onion Bites with Dipping Sauce
- Lifehacks
-
 7 Toilet and Bathroom Cleaning Hacks
-
 Tips & Hacks for Clean Carpets
-
 7 Kitchen Hacks & Simple Solutions
- Crochet Ideas
-
 Crochet Watermelon Amigurumi
-
 Crochet Shark Applique
-
 Crochet Pineapple Amigurumi
- DIY
-
 Yarn Wrapped Christmas Wreath Ornaments
-
 Egg Carton Snowman Ornament
-
 Stick Peppermint Candy Ornament
- Knitting Ideas
-
 Knitted Star Square Dishcloth
-
 Knitted Free 2025 Year Dishcloth
-
 Knitted Belle Finger Puppet