Crochet Bunny in Flowerpot Amigurumi Tutorial

The Crochet Bunny in Flowerpot Amigurumi
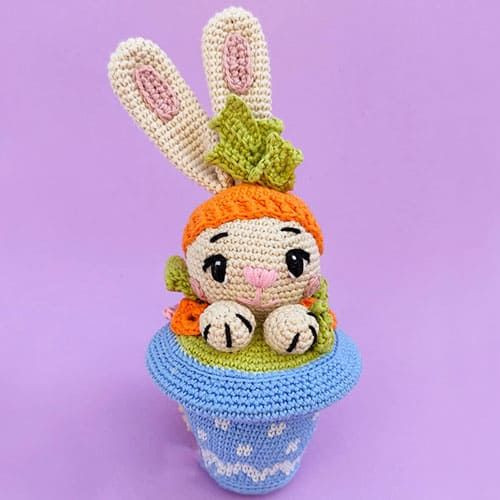
The Crochet Bunny in Flowerpot Amigurumi is an adorable and charming addition to any craft collection. This sweet little bunny nestled in a flowerpot brings a touch of whimsy and coziness to any space. The intricate crochet work creates a detailed and lovable character that is sure to bring a smile to anyone's face. Whether displayed as a cute decoration or given as a heartfelt gift, this delightful amigurumi piece is bound to be a treasured favorite for both children and adults alike.
Materials
Croche Estrela Tricot Baby (100% cotton) (1.8 oz (50g)) = approx 180m
- Colors: 749- Baby pink
- 759- Orange
- 547-Green
- 711-Pink
- 216- Blue
- 238- Blue
- 087-Beige
Crochet hook 2.00mm
Tapestry needle
Filling
Cardboard
Abbreviations
MR- magic ring
sc- single crochet
inc- increase
dec- decrease
ch- chain
slst- slip stitch
dc- double crochet
hdc- half double crochet
BLO- back loop only
** – repeat information between
()- number of stitches in the round
Instructions
Head
Croche Estrela Tricot Baby 087- Beige
RND 1: 6sc in MR (6)
RND 2: *inc* (12)
RND 3: *1sc, inc* (18)
RND 4: *2sc, inc* (24)
RND 5: *3sc, inc* (30)
RND 6: *4sc, inc* (36)
RND 7: *5sc, inc* (42)
RND 8: *6sc, inc* (48)
RND 9: *sc* (48)
RND 10: *sc* (48)
RND 11: *7sc, inc* (54)
RND 12-14: *sc* (54)
RND 15: *8sc, inc* (60)
RND 16: *sc* (60)
RND 17: *8sc, dec* (54)
RND 18: *7sc, dec* (48)
RND 19: *6sc, dec* (42)
RND 20: *5sc, dec* (36)
RND 21: *4sc, dec* (30)
RND 22: *3sc, dec* (24)
Fasten off and leave a long thread to attach the head to the vase later.
Carrot
Croche Estrela Tricot Baby 759- Orange
RND 1: 6sc in MR (6)
RND 2: *inc* (12)
RND 3: *1sc, inc* (18)
RND 4: *2sc, inc* (24)
RND 5: *3sc, inc* (30)
RND 6: *4sc, inc* (36)
RND 7: *5sc, inc* (42)
RND 8: *6sc, inc* (48)
RND 9: *7sc, inc* (54)
RND 10-12: *sc* (54)
RND 13-14: *FLO sc, BLO sc* (54)
Fasten off and leave a long thread to attach the carrot to the head.
Ears (x2)
Croche Estrela Tricot Baby 087-Beige
RND 1: 6sc in MR (6)
RND 2: *inc* (12)
RND 3: *1sc, inc* (18)
RND 4-24: *sc* (18)
Fasten off and leave a long thread to attach the ears to the carrot. Fold the base before attaching.
Inside the Ears (x2)
Croche Estrela Tricot Baby 711- Pink
7ch, inc in the second ch from the hook, 3sc, 3sc in the first ch, 4sc, inc
Attach to the ears.
Legs (x2)
Croche Estrela Tricot Baby 087-Beige
RND 1: *6sc in MR* (6)
RND 2: *inc* (12)
RND 3: *1sc, inc* (18)
RND 4-6: *sc* (18)
RND 7: *1sc, dec* (12)
Fasten off and leave a long thread to attach the legs to the vase.
Cheeks (x2)
Croche Estrela Tricot Baby 711-Pink
RND 1: 6sc in MR, slst (6)
Fasten off and leave a long thread to attach the cheeks to the head.
Pot
Croche Estrela Tricot Baby 216- Dark Blue
For the pot, you should cut 2 cardboard bases. One for the base and another for the top.
RND 1: 6sc in MR (6)
RND 2: *inc* (12)
RND 3: *1sc, inc* (18)
RND 4: 1sc, inc, *2sc, inc*, 1sc (24)
RND 5: *3sc, inc* (30)
RND 6: 2sc, inc, *4sc, inc*, 2sc (36)
RND 7: *5sc, inc* (42)
Cut the first base.
RND 8-9: BLO *sc* (42)
RND 10: BLO *6sc, inc* (48)
RND 11: *(dark blue) 3sc, (light blue) 2sc* x 9, (d.b) 3sc (48)
RND 12: (l.b) 1sc, (d.b) 1sc, *(l.b) 4sc, (d.b) 1sc* x 9, (d.b) 1 sc (48)
RND 13: *(l.b) 4sc, (d.b) 1sc* x 9, (l.b) 3sc (48)
RND 14: (l.b) 3sc, *(d.b) 3sc, (l.b) 2sc* x 9 (48)
RND 15: (d.b) *7sc, inc* x 6 (54)
RND 16: (d.b) 4sc, inc, *8sc, inc* x 6, 4sc (60)
RND 17-18: *(d.b) 5sc, (l.b) 2sc* x 8, (d.b) 4sc (60)
RND 19-20: (d.b) *sc* (60)
RND 21-22: (d.b) 2sc, *(l.b) 2sc, (d.b) 5sc* x 8, (l.b) 2sc (60)
RND 23-24: (d.b) *sc* (60)
RND 25: (d.b) *9sc, inc* (66)
RND 26: (l.b) BLO *sc* (66)
RND 27: (l.b) BLO *10sc, inc* (72)
RND 28: (l.b) BLO *sc* (72)
Fasten off.
To Close The Pot
Croche Estrela Tricot Baby 547- Green
RND 1: 6sc in MR (6)
RND 2: *inc* (12)
RND 3: *1sc, inc* (18)
RND 4: 1sc, inc, *2sc, inc*, 1sc (24)
RND 5: *3sc, inc* (30)
RND 6: 2sc, inc, *4sc, inc*, 2sc (36)
RND 7: *5sc, inc* (42)
RND 8: 3sc, inc, *6sc, inc*, 3sc (48)
RND 9: *7sc, inc* (54)
RND 10: 4sc, inc, *8sc, inc*, 4sc (60)
RND 11: *9sc, inc* (66)
Croche Estrela Tricot Baby 238- Light Blue
RND 12: 5sc, inc, *10sc, inc*, 5sc (72)
Cut the second base.
Fasten off and leave a long thread to attach the piece to close the pot.
Edge Of The Pot
Croche Estrela Tricot Baby 216- Dark Blue
72 ch, slst on the first chain.
RND 1: *11sc, inc* (78)
RND 2: 6sc, inc *12sc, inc* x 6, 6sc (84)
RND 3: *13sc, inc* (90)
RND 4-7: *sc* (90)
RND 8: *13sc, dec* (84)
RND 9: 6sc, dec *12sc, dec* x 6, 6sc (78)
RND 10: *11sc, dec* (72)
Close with slst.
Fasten off and leave a long thread to attach the edge of the pot to the vase.
This piece should be attached to row 12 of the piece to close the pot.
Flowers (x4)
Croche Estrela Tricot Baby 759- Orange, 749- Baby Pink
Make 2 in pink and 2 in orange.
In a MR, repeat the following instruction 5 x: *1slst, 1sc, 1hdc, 1dc, 1hdc, 1sc*
Carrot Leaf Big (x3)
Croche Estrela Tricot Baby 547-Green
8ch
6sc starting from the second ch from the hook, 3sc in the first ch
Continue on the other side
5sc, 3ch, turn
BLO start from the fourth ch from the hook:
*5sc, 3sc together on the next sc, 4sc, 3ch, turn* (repeat x 3)
Carrot Leaf Small (x4)
Croche Estrela Tricot Baby 547-Green
5ch
3sc starting from the second ch from the hook, 3sc in the first ch
Continue on the other side
2sc, 3ch, turn
BLO start from the fourth ch from the hook:
*3sc, 3sc together on the next sc, 2sc, 3ch, turn* (repeat x 2)
Assembly
Embroider the face.
Attach the cheeks to the face.
Attach the carrot to the head.
Attach the ears to the carrot.
Attach the leaves to the carrot.
Fill the head.
Embroider the details on the legs.
Fill the legs.
Insert the first base into the pot and fill it.
Insert the second base.
Attach the piece to close the pot, stitch by stitch.
Attach the edge of the pot to the pot, at row 12 of the piece to close the pot.
Attach the head and the legs to the pot.
Make a pom-pom the same color as the bunny and attach it to the back of the pot.
Attach the rest of the leaves and the flowers next to the bunny's head.
- Funny Pictures
-
 Relatable and Funny Memes to Distract You From the Routine
-
 Hilarious Cat Snapchats That Will Leave You With the Biggest Smile
-
 Today’s Top Funny Tweets to Scroll Before Bed
- Recipes
-
 Cappuccino Brownies
-
 Chicken Mushroom Tortellini Bake
-
 Spinach Pie
- Lifehacks
-
 8 Necessary Tips for Baking Bread
-
 Tips & Hacks for Clean Carpets
-
 10 Uses For Old TV Armoires
- Crochet Ideas
-
 Crochet Watermelon Amigurumi
-
 Crochet Shark Applique
-
 Crochet Pineapple Amigurumi
- DIY
-
 Yarn Wrapped Christmas Wreath Ornaments
-
 Egg Carton Snowman Ornament
-
 Stick Peppermint Candy Ornament
- Knitting Ideas
-
 Knitted Star Square Dishcloth
-
 Knitted Free 2025 Year Dishcloth
-
 Knitted Ribbed Adult Hat