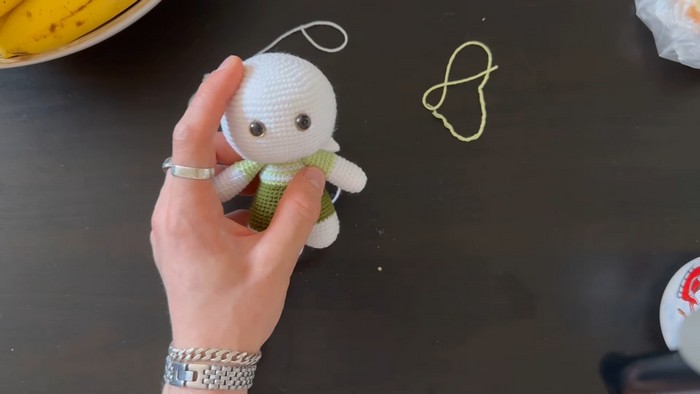
Crochet Amigurumi Kitty in Cute Dress

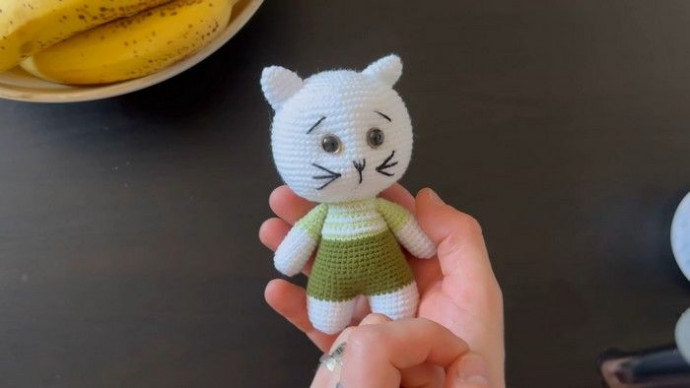
Crocheting an amigurumi kitty in a cute dress is a delightful and heartwarming project that makes your heart smile every time you look at it. The combination of fluffy yarn, intricate stitches, and tiny details coming together to create an adorable little kitty wearing a charming dress is simply irresistible. Not only is it a fun way to express your creativity, but it also brings a sense of joy and whimsy to your surroundings. It's the perfect blend of creativity and cuteness that will surely capture the hearts of anyone who sees it. So grab your crochet hook, select your favorite yarn colors, and let's create a little feline friend that will brighten up your day!
Materials Needed
To begin, gather the following materials:
- White yarn (main body color)
- Dark green yarn (pants)
- Light green yarn (accent color)
- Crochet hook: Size 2 mm
- Stuffing: Fiberfill for stuffing the body and head
- Scissors
- Embroidery needle
- Small safety eyes (1 mm size)
- Optional: Stitch marker (to help mark rows while crocheting)
Pattern Instructions
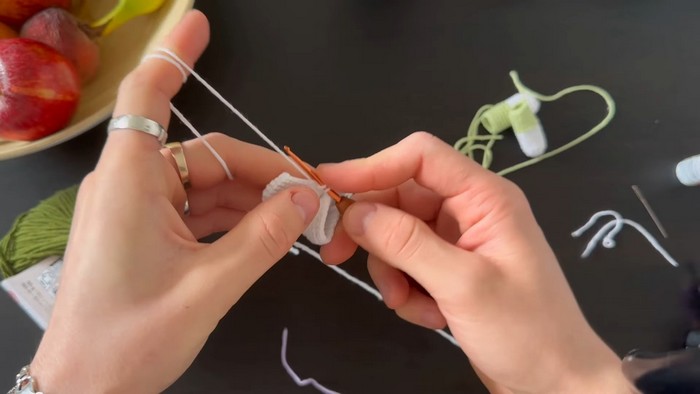
1. Arms (Hands)
Start with White Yarn:
- Create a magic ring with 7 stitches.
Increase Round:
- Make 7 increases (2 stitches in each stitch). You should now have 14 stitches.
Build Height:
- Crochet up 7 rows of 14 stitches (without increases or decreases).
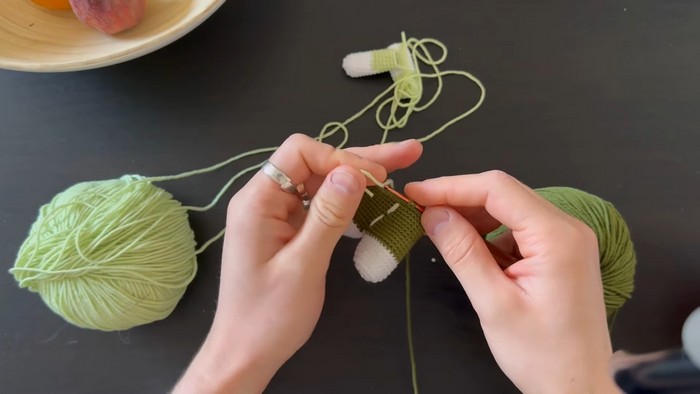
Change to Light Green Yarn:
- On the last stitch of the white yarn, switch to light green by pulling through the new color.
- Crochet 6 rows of 14 stitches in light green.
Finish with a closing stitch and leave a yarn tail for sewing later.
Repeat this process to make the second arm.
2. Legs and Body
First Leg (White Yarn):
Create a magic ring with 8 stitches.
- Add 8 increases (2 stitches in each stitch). Now you have 16 stitches.
Increase and Build:
- Make 1 stitch, 1 increase all around (24 stitches).
- Crochet up 5 rows of 24 stitches (without changes). Cut the yarn and fasten off.
Second Leg (White Yarn):
Repeat the same steps for the second leg, but do not cut the yarn.
Join the Legs:
Position the legs side by side with the stitch markers aligned.
Use Dark Green Yarn to join the legs and begin the body.
Body Setup:
Crochet 24 stitches per leg around (totaling 48 stitches for the round).
To avoid a gap, decrease by crocheting a stitch from the first leg, a stitch from the second leg, and pulling them together.
Build the Body:
- Work 5 rows of 48 stitches in dark green.
- Transition to light green yarn to create pants using 36 stitches.
- Alternate between light green and white rows:
- Thread light green yarn for 1 row green, 1 row white, alternating for a total of 5 alternating rounds.
- Decrease to shape the body by reducing 1 stitch every few rows:
- For example, crochet 6 stitches, 1 decrease, and repeat; then continue with 5 stitches, 1 decrease, until reaching 24 stitches.
3. Head
Start with White Yarn:
- Create a magic ring with 8 stitches.
- Add 8 increases in the next row (16 stitches).
Follow an increase pattern:
- 1 stitch, 1 increase (24 stitches)
- 2 stitches, 1 increase (32)
- Continue every row until you reach 72 stitches.
Build the Height:
- Crochet 12 rows of 72 stitches.
Shaping and Decreasing:
- Start decreasing with 7 stitches, 1 decrease, followed by a row without decreases.
- Then do 6 stitches, 1 decrease, working your way down to 2 stitches, 1 decrease, leaving 24 stitches.
Add Eyes:
Insert safety eyes between rows 14 and 15 from the top. Keep them 9 stitches apart.
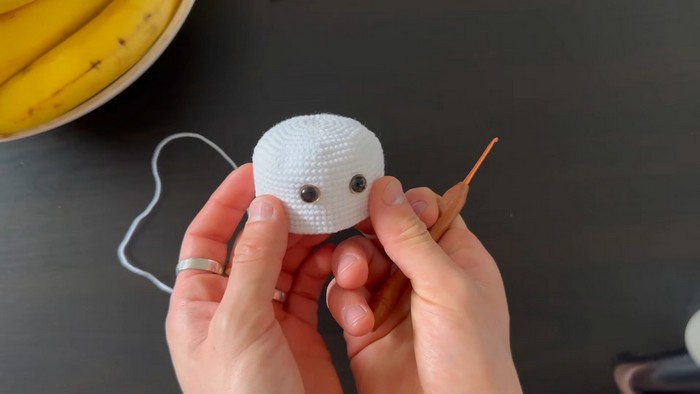
Stuff and Finish:
- Stuff the head firmly and close it with a slip stitch, leaving a tail for sewing.
4. Ears
Magic Ring (White Yarn):
- Create a magic ring with 4 stitches.
Increase Rounds:
- Work 4 increases to reach 8 stitches.
- Follow a pattern of 3 stitches, 1 increase (10 stitches).
- Continue increasing until you reach 6 stitches, 1 increase (16 stitches).
Finishing:
- Slip stitch the last row and leave a yarn tail for sewing.
5. Assembly
Attach the Arms:
- Place the arms on the second row of the body (next to the neckline), ensuring they are above the legs. Sew them securely.
Attach the Head:
- Position the head onto the body and sew it along the neckline. Be sure to align it properly so the kitty’s face faces forward.
Attach the Ears:
- Sew the ears 4 rows down from the top of the head and align them symmetrically.
Facial Detailing
Tighten the Cheeks:
Use white yarn to cinch the area between the eyes. Pass the needle through the eye regions multiple times and tighten the thread to create a rounded cheek effect.
Add Eyebrows:
Use dark green yarn and embroider small, slanted lines 2 stitches away from the eyes.
Add Whiskers:
Embroider three lines on each cheek area for whiskers using the same color yarn as the body.
Add Mouth:
Stitch a small triangle shape just beneath the eyes to create the nose, then add the mouth shape directly below it.
- Funny Pictures
-
 Hilarious Memes for Those Bored to Tears
-
 Weekly Treat of Funniest Parenting Memes for Good Laugh out Loud Right Now
-
 Really Funny Pics to End These Weekend Perfectly
- Recipes
-
 Crispy Baked Avocado Fries
-
 Scrambled Chickpea and Spinach Pitas
-
 Cinnamon Pancakes
- Lifehacks
-
 Crochet Basics: Aligned Cobble Stitch
-
 Brick Stitch Crochet Tutorial
-
 Crochet Basics: Wattle Stitch
- Crochet Ideas
-
 Crochet Snorlax Plushie Doll
-
 Crochet Beautiful Penguin Toy
-
 Crochet Tiny Snowman
- DIY
-
 DIY Santa Craft For Kids
-
 Paper Plate Angel Craft
-
 Upcycled Mason Jar Chicken Vase
- Knitting Ideas
-
 Knitted Bridger Cowl
-
 Knitted Keepsake Bag
-
 Knitted Cutie Cupcake Dolls