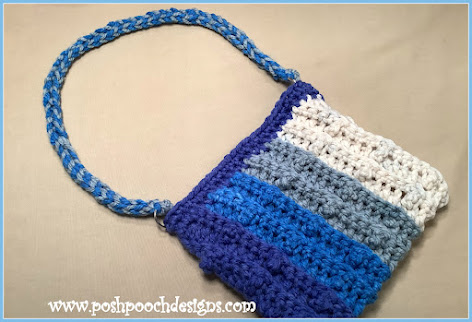
Stylish Crochet Shoulder Bag Tutorial


Looking for a stylish and practical accessory to add to your collection? Look no further than the crochet shoulder bag! This trendy and versatile accessory is not only perfect for carrying your essentials but also adds a touch of boho-chic flair to any outfit. With its handmade charm and intricate yarn work, the crochet shoulder bag is a must-have for anyone looking to showcase their unique sense of style. Whether you're heading to the beach, running errands, or meeting up with friends, this bag is sure to be your go-to accessory for any occasion!
Skill Level
Materials
- Crochet Hook – J / 6.00 MM
- Yarn - Bulky (5) 3 oz. (I used leftover O’Go Yarn – Overboard)
- Yarn Needle
- 2 Rings - 1 inch (Can be metal, or wood and any size you prefer)
Stitches Used
- Chain (ch)
- Slip Stitch (slst)
- Single Crochet (sc)
- Double Crochet (dc)
- Triple Crochet (tr)
- Back Loop Only (BLO)
Size
8 X 8 Inches, not including the handle
Multiples: 5 + 5 Chs
4 chs = 1 inch
2 Rows = 1 inch
Notes
- Ch1 does not count as a st.
- I separated all my colors from the O’Go ‘skein’ into 5 separate balls; I only used 4 colors.
- The striping is up to you.
- When changing color, Ch1 after the color change.
Pattern Instructions
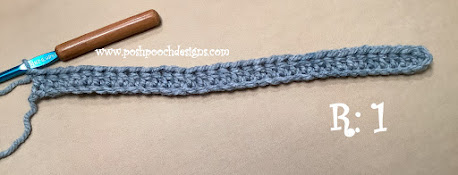
RND 1: Ch 35, 1 hdc in the 2nd ch from the hook, 1 hdc in each ch across, turn, ch 1 (34 hdc)
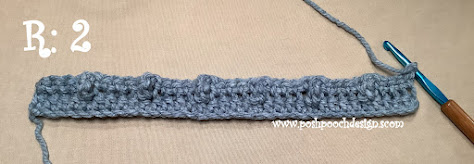
RND 2: BLO, 1 sc in the 1st 4 hdc, *1 tr in the next hdc, 1 sc in the next 4 hdc*
Repeat from * to * 5 more times, turn, ch 3 (6 tr, 28 sc)
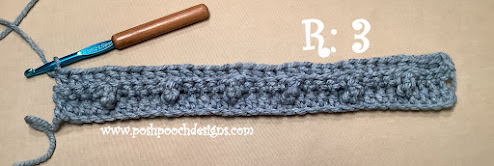
RND 3: BLO, 1 hdc in each st across, turn, ch 1 (34 hdc)
RND 4: Repeat RND 2
RND 5 - RND 16: Repeat RND 3 and RND 4, alternating every other row
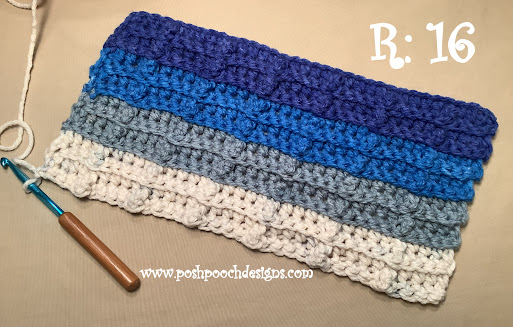
RND 17: Repeat RND 3
RND 18: Fold bag in half, wrong side out,
stitch closed the 1st side stitching slsts evenly, tie off, weave in the ends.
RND 19: Attach yarn to the bottom corner of the other side, evenly slst closed this 2nd side, do not tie off.
RND 20: Flip bag right side out, evenly st sc around the top edge of the bag,
join to the 1st sc, ch 1
RND 21: 1 sc in each sc around, join, and tie off
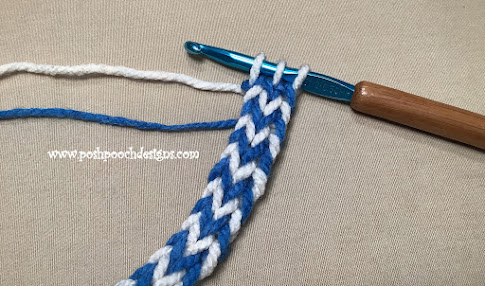
Bag Handle - I Cord
Using 2 strands of yarn held together, I like to use 2 different colors. I tie a knot in the bottom of the 2 strands to make it easier to hold. I untie that knot when I am finished.
With 1 strand, make a slip knot, ch 3,
slip hook through each ch and pull up a loop. (3 loops on the hook)
**Slide off the 2nd and 3rd loop carefully,
with the 2nd strand, slst in the 1st loop,
insert hook in the 2nd loop and pull through a loop from the 2nd strand, and repeat on the 3rd loop**
Using the 1st strand of yarn, repeat ** to **
Continue to repeat from * to * alternating the 2 strands of yarn,
stop when the cord/handle is as long as you want it.
Slst in the 1st loop, pull the 1st loop through the 2nd loop,
pull the 2nd loop through the 3rd loop, tie off and weave in your ends.
With a needle and matching yarn, sew a ring on each side of the bag.
Sew the ends of the I cord to each ring securely.
- Funny Pictures
-
 Hilarious Memes for Those Bored to Tears
-
 Weekly Treat of Funniest Parenting Memes for Good Laugh out Loud Right Now
-
 Really Funny Pics to End These Weekend Perfectly
- Recipes
-
 Crispy Baked Avocado Fries
-
 Scrambled Chickpea and Spinach Pitas
-
 Cinnamon Pancakes
- Lifehacks
-
 Crochet Basics: Aligned Cobble Stitch
-
 Brick Stitch Crochet Tutorial
-
 Crochet Basics: Wattle Stitch
- Crochet Ideas
-
 Crochet Snorlax Plushie Doll
-
 Crochet Beautiful Penguin Toy
-
 Crochet Tiny Snowman
- DIY
-
 DIY Santa Craft For Kids
-
 Paper Plate Angel Craft
-
 Upcycled Mason Jar Chicken Vase
- Knitting Ideas
-
 Knitted Bridger Cowl
-
 Knitted Keepsake Bag
-
 Knitted Cutie Cupcake Dolls