Crochet Easter Egg Belly Buddies Tutorial

Celebrate Easter with Crochet
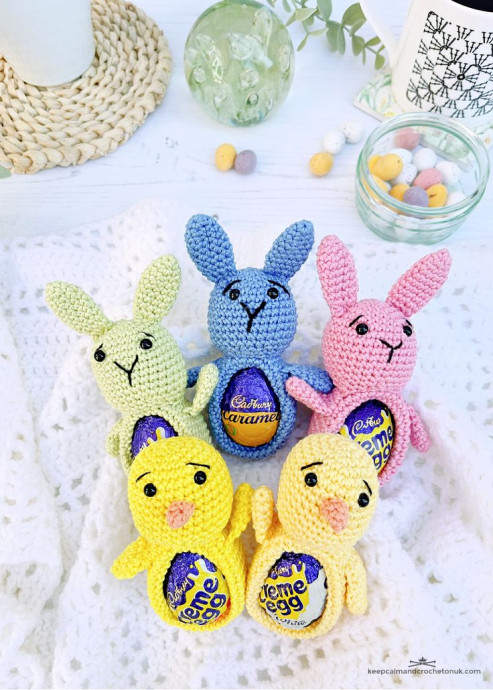
Celebrate Easter in style with these adorable Crochet Easter Egg Belly Buddies! These little buddies are the perfect addition to your holiday decor or a thoughtful gift for a loved one. Their charming design will bring a smile to anyone's face and add a touch of whimsy to your Easter celebrations. Whether you're a seasoned crocheter or just starting out, creating these cute Easter Egg Belly Buddies will surely be a fun and rewarding project. So grab your crochet hooks and yarn, and get ready to bring some Easter magic to life!
Project Details
Skill Level: Easy
Yarn and Colors
Suggested colours below; however, any colours can work for this pattern:
Chick
- YARN A – 280 Lemon OR 403 Lemonade
- YARN B – 524 Apricot (Beak)
Bunny
- YARN C – 247 Bluebird OR 392 Lime Juice OR 518 Marshmallow
Additional Materials Required
- 2 x 6 mm black safety eyes (per chick or bunny)
- 5 cm [2″] high chocolate eggs
- Black embroidery thread
- Small amount of stuffing
- A yarn needle
- Stitch markers
- Scissors
Dimensions and Gauge
Finished Dimensions: 11 cm [4.3”] chick / 13 cm [5.1″] bunny
Gauge: 5dc / 5 rows = 2cm [0.8″]. Obtaining the correct gauge is critical for this project; otherwise, it may not fit the 5 cm [2″] small chocolate egg size. To save time, take the time to check the gauge.
Crochet Abbreviations
- Slip Stitch (sl st): Insert hook in st indicated, yarn over and draw through all loops.
- Chain (ch): Bring yarn over hook from back to front and grab it with the hook. Draw hooked yarn through slip knot and onto the hook.
- Space (sp): The gap between stitches or chains.
- Single Crochet (sc): Insert hook in st indicated and pull up a loop [two loops on hook], yarn over, pull through both loops on hook.
Pattern Notes
Magic ring: is also known as a Drawstring Ring or Magic Loop and is often used as a start for working amigurumi. If you are not familiar with this technique, you could substitute with a ch2 and then work in the second ch from the hook.
Working in the round: Most of the sections of this pattern are worked in the amigurumi style without joining in continuous rounds. Place the stitch marker in the top of the first st to mark the start of each round.
[…] Repeat section in square brackets until specified
Pattern Instructions
Chick / Bunny Body
Rnd 1: With A / C; working into a magic ring, 6 dc. (6 sts)
Rnd 2: [2 dc in each st] six times. (12 sts)
Rnd 3: [1 dc in the next st, 2 dc in next st] six times. (18 sts)
Rnd 4: [1 dc in the next 2 sts, 2 dc in next st] six times. (24 sts)
Rnd 5: [1 dc in the next 3 sts, 2 dc in next st] six times. (30 sts)
Rnd 6: [1 dc in the next 4 sts, 2 dc in next st] six times. (36 sts)
Rnds 7 – 21: dc around
Rnd 22: [1 dc in the next 4 sts, dc2tog] six times. (30 sts)
Rnd 23: [1 dc in the next 3 sts, dc2tog] six times. (24 sts)
Rnd 24: [1 dc in the next 2 sts, dc2tog] six times. (18 sts)
Rnd 25: [1 dc in the next 1 st, dc2tog] six times. (12 sts)
Rnd 26: [dc2tog] six times. (6 sts)
Fasten off with a sl st to the next st, but leave a long yarn tail. Use the tail end to sew up the remaining 6 sts.
Push the top towards the starting magic ring to create a bowl shape that your egg will fit into.
Chick / Bunny Head
Rnds 1 – 5: With A / C; make as BODY. (30 sts)
Rnds 6 – 13: dc around
Rnd 14: [1 dc in the next 3 sts, dc2tog] six times. (24 sts)
Rnd 15: [1 dc in the next 2 sts, dc2tog] six times. (18 sts).
Fasten off but leave a long yarn tail.
Add eyes between rnds 6 -7 approx. 4 sts apart.
With black thread, embroider eye brows just above the eyes using the photos as a guide.
Bunny Only: With black thread, embroider nose and mouth using the photos as a guide.
Stuff the head.
Bunny Arms
Make 2.
Rnd 1: With C; working into a magic ring, 8 dc. (8 sts)
Rnds 2 – 6: dc around
Fold the sides of the arms together so the stitches align. Work dc in each st. (4 sts)
Fasten off but leave a long yarn tail.
Bunny Ears
Make 2.
Rnd 1: With C; working into a magic ring, 6 dc. (6 sts)
Rnd 2: [1 dc in the next 2 sts, 2 dc in next st] twice. (8 sts)
Rnd 3: [1 dc in the next 3 sts, 2 dc in next st] twice. (10 sts)
Rnds 4 – 8: dc around
Rnd 9: [1 dc in the next 3 sts, dc2tog] twice. (8 sts)
Rnd 10: [1 dc in the next 2 sts, dc2tog] twice. (6 sts)
Fasten off with a sl st to the next st, but leave a long yarn tail.
Chick Wings
Make 2.
Rnd 1: With A; working into a magic ring, 6 dc. (6 sts)
Rnd 2: [1 dc in the next 2 sts, 2 dc in next st] twice. (8 sts)
Rnd 3: [1 dc in the next 3 sts, 2 dc in next st] twice. (10 sts)
Rnds 4 – 5: dc around
Rnd 6: [1 dc in the next 3 sts, dc2tog] twice. (8 sts)
Fold the sides of the wings together so the stitches align. Work dc, through both sides, in each st. (4 sts)
Fasten off but leave a long yarn tail.
Chick Beak
Rnd 1: With B; working into a magic ring, 4 dc. (4 sts)
Rnd 2: [1 dc in the next st, 2 dc in next st] twice. (6 sts)
Rnd 3: dc around
Fasten off with a sl st to the next st, but leave a long yarn tail.
Finishing Touches
Bunny
- Attach the ears on top of the head.
- Attach head to the top of the body.
- Attach arms on either side of the body.
- Add an egg treat to the tummy.
Chick
- Attach the beak onto the head, between the eyes, over rnds 7-8.
- Attach head to the top of the body.
- Attach wings on either side of the body.
- Add an egg treat to the tummy.
And that’s it!
- Funny Pictures
-
 Hilarious Memes for Those Bored to Tears
-
 Weekly Treat of Funniest Parenting Memes for Good Laugh out Loud Right Now
-
 Really Funny Pics to End These Weekend Perfectly
- Recipes
-
 Crispy Baked Avocado Fries
-
 Scrambled Chickpea and Spinach Pitas
-
 Cinnamon Pancakes
- Lifehacks
-
 Crochet Basics: Aligned Cobble Stitch
-
 Brick Stitch Crochet Tutorial
-
 Crochet Basics: Wattle Stitch
- Crochet Ideas
-
 Crochet Snorlax Plushie Doll
-
 Crochet Beautiful Penguin Toy
-
 Crochet Tiny Snowman
- DIY
-
 DIY Santa Craft For Kids
-
 Paper Plate Angel Craft
-
 Upcycled Mason Jar Chicken Vase
- Knitting Ideas
-
 Knitted Bridger Cowl
-
 Knitted Keepsake Bag
-
 Knitted Cutie Cupcake Dolls