Crochet Bunny Buddies: A Charming Crochet Guide

Crochet Bunny Buddies are the cutest little companions to brighten up your day. These handmade critters are crafted with love and care, each stitch contributing to their adorable charm. Whether you're gifting them to a friend or keeping one for yourself, these bunnies bring a touch of whimsy and warmth to any space. Their soft yarn and intricate detailing make them irresistible to snuggle with and display proudly. With their floppy ears and tiny noses, it's easy to see why Crochet Bunny Buddies have become a favorite among both children and adults. So, why not add a little hoppy happiness to your life with these delightful creations?
Materials
- Worsted weight yarn
- White, dark and light blue, pink, purple, and white thread
- Hook size 3.5mm (E)
- 16mm Safety Eyes (option 2), crochet eyes (option 1), or an alternative form of eyes
- Stitch Marker
- PolyFill
- Tapestry Needle
- Scissors
- Sewing Pins
US Terminology and Abbreviations
- Rd(s) – Round(s)
- MR – Magic Ring
- St(s) – Stitch(es)
- Ch – Chain
- Sl St – Slip Stitch
- Sc – Single Crochet
- Pc – Popcorn Stitch
- 5 dc in the same st, take the loop off your hook, insert your hook through the 1st dc, put the loop back on and pull through, ch 1
- Hdc – Half Double Crochet
- Hdc Inc – Half Double Crochet Increase
- Dc – Double Crochet
- Inc – Increase
- Dec – Invisible Decrease
- In front loops only, pick up the next 2 loops, yarn over, and pull through twice.
- Fdc – Foundation Single Crochet
- Ch 2 (for this pattern you will only ch 1), *YO, insert hook into the 2nd ch from your hook (into the ch), YO, pull through ch, YO, pull through 1 loop to create the ch, YO, and pull through all 3 loops, repeat from * for the desired number of fsc, but insert your hook into the ch created before.
- FO – Fasten Off
- BLO – Back Loop Only
- FLO – Front Loop Only – for closing up holes and others
Notes
- Magic Ring Alternative – chain 2 and single crochet in the 2nd chain from the hook
- This will be crocheted in the round.
- If not specified or in (), repeat to the end of the round.
- Stuff as you go.
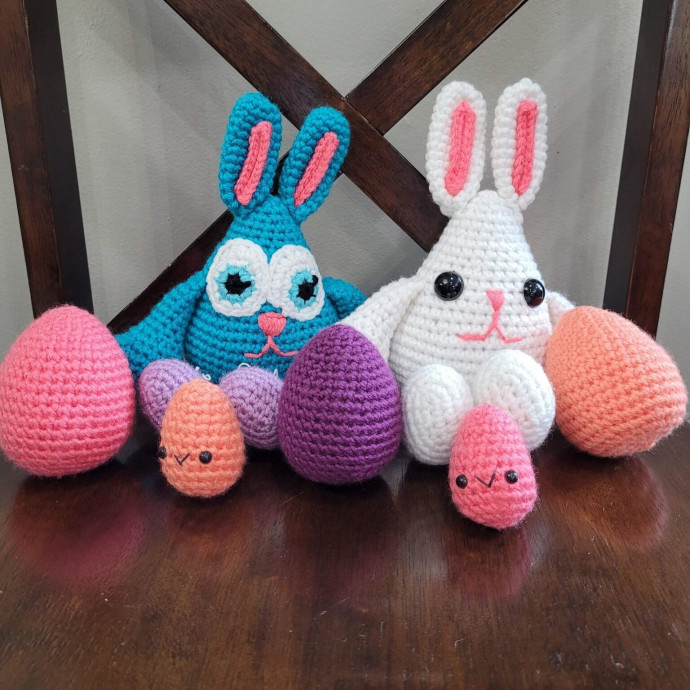
This is a mix and match type of pattern. There are multiple options for eyes, legs, and arms. Pick the option you would like and go for it! The Bunny on the left is option 1 and the Bunny on the right is option 2.
Arms
Option 1: Blue Arms (Make 2)
Rd 1: sc 6 in MR
Rd 2: inc (12)
Rd 3: sc, inc (18)
Rds 4-5: sc around (18) (2 rounds)
Rd 6: sc, pc, sc 16 (18) (17 sc, 1 pc)
Rd 7: sc around (18)
Rd 8: sc, dec (12)
Rd 9: sc 2, dec (9)
Rds 10-15: sc around (9) (6 rounds) Stuff the hand well and the arm loosely.
Rd 16: sc 2, fold in half and sc through both sides. Sc 4 times to close the arm.
FO with a short tail.
Option 2: White Arms (Make 2)
Rd 1: sc 6 in MR
Rd 2: inc (12)
Rd 3: sc, inc (18)
Rds 4-7: sc around (18) (4 rounds)
Rd 8: sc, dec (12)
Rd 9: sc 2, dec (9)
Rds 10-15: sc around (9) (6 rounds) Stuff the hand well and the arm loosely.
Rd 16: fold in half and sc through both sides. Sc 4 times to close the arm.
FO with a short tail.
Legs
Option 1: Purple Legs (Make 2)
Ch 5
Rd 1: sc in the 2nd ch from the hook. 2 sc, 3 sc in the last ch and continue working around the ch, sc 2, inc (10)
Rd 2: inc, sc 2, inc x3, sc 2, inc x2 (16)
Rd 3: sc, inc, sc 2, (sc, inc) x3, sc 2, (sc, inc) x2 (22)
Rds 4-6: sc around (22) (3 rounds)
Rd 7: sc 5, (sc, dec) x3, sc 8 (19)
Rd 8: sc 5, 3 dec, sc 8 (16)
Rd 9: sc 4, 2 dec, sc 8 (14)
Rd 10: sc 3, 2 dec, sc 7 (12)
Switch to Blue
Rd 11: BLO sc 2, dec (9)
Rds 12-17: sc around (9) (5 rounds) Stuff the foot well and the leg loosely.
Rd 18: sc 3, fold in half, sc through both sides. Sc 4 times to close the leg.
FO with a short tail.
For the shoelaces, start on rd 7, lace-up 3 rds, and tie in a bow.
Option 2: White Legs (Make 2)
Ch 5
Rd 1: sc in the 2nd ch from the hook. 2 sc, 3 sc in the last ch and continue working around the ch, sc 2, inc (10)
Rd 2: inc, sc 2, inc x3, sc 2, inc x2 (16)
Rd 3: sc, inc, sc 2, (sc, inc) x3, sc 2, (sc, inc) x2 (22)
Rds 4-6: sc around (22) (3 rounds)
Rd 7: sc 5, (sc, dec) x3, sc 8 (19)
Rd 8: sc 5, 3 dec, sc 8 (16)
Rd 9: sc 4, 2 dec, sc 8 (14)
Rd 10: sc 3, 2 dec, sc 7 (12)
Rd 11: sc 2, dec (9)
Rds 12-17: sc around (9) (5 rounds) Stuff the foot well and the leg loosely.
Rd 18: sc 3, fold in half. Sc through both sides. Sc 4 times to close the leg.
FO with a short tail.
Inner Ear
Pink Inner Ear (Make 2)
Ch 11, sc in the 2nd ch from the hook. Sc 8, 4 sc in the last ch and continue around the ch, sc 9.
FO, leaving a tail, and sew to the ear.
Outer Ears
Body Color Outer Ears (Make 2)
Rd 1: sc 6 in MR
Rd 2: inc (12)
Rds 3-13: sc around (12) (11 rounds)
Attach the pink inner ear.
Row 14: fold in half, and half again, sc 3 through all 4 folded halves.
FO. You will weave in your ends as you are attaching.
Body
Body Color
Ch 13
When attaching the legs make sure the toes are pointing away from the ch.
Rd 1: sc in the 2nd ch from the hook. Sc 10, 4 sc in the last ch and continue working around the ch. Sc. This is where you will add the leg. Insert your hook through both the leg and the body for the next 4 sc, while sewing in the end for the first leg. Repeat the attach instructions for the 2nd leg, (over the next sts weave in the ends as you go) sc. 3 sc in the last stitch (28)
Rd 2: inc, sc 10, inc x4, sc 10, inc x3 (36)
Rd 3: sc, inc, sc 10, inc, sc, inc, sc 2, inc, sc, inc, sc 10, inc, sc, inc, sc 2, inc (44)
Rds 4-8: sc around (44) (5 rounds)
Rd 9: sc 18, dec, sc 20, dec, sc 2 (42)
Rd 10: sc 5, dec (36)
Rds 11-12: sc around (36) (2 rounds)
Rd 13: sc 2, dec, (sc 4, dec) x2, this is where you will add the arm. Insert your hook through the 1st st of the arm and then through the body by doing a (sc 4), dec, (sc 4, dec) x2 (weaving your ends in as you sc), this is where you will add the 2nd arm, insert your hook through the 1st st of the arm and then through the body by doing a (sc 4) (last 2 sc are the first 2 sc of the next rd) (as you continue to crochet, weave in your ends) (30)
Rds 14-15: sc around (30) (2 rounds)
Rd 16: sc 3, dec (24)
Rds 17-18: sc around (24) (2 rounds)
Rd 19: sc 2, dec (18) (Option 2. Insert your eyes between rds 13 and 14, 6 sts apart.
Rd 20: sc around (18)
Rd 21: sc 8, this is where you will add the 1st ear. Insert your hook through the 1st st of the ear and body by doing a (sc 3), sc 6 (weaving in your ends as you sc), this is where you will add the 2nd ear. Insert your hook through the 1st st of the ear and body by doing a (sc 2, dec) (the last 2 sts are the first 2 sc of the next rd) (as you continue to crochet, weave in your ends) (18) Stuff
Rd 22: sc, dec (12)
Rd 23: sc around (12)
Rd 24: dec (6)
FO and sew in ends
You can either tack the ears up or keep them floppy.
Nose and Mouth
For the nose, make a triangle between the eyes with pink yarn, 2 sts wide, and fill in the nose. For the mouth at the base of the triangle, go down 3 rds and over 3 sts in either direction, tack down to make the L shape on either side.
Eyes
Option 1: Crochet Eyes (Make 2)
Black-
Rd 1: sc 6 in MR
Change to light blue
Rd 2: inc (12)
Change to white
Rd 3: sc, in (18)
Rd 4: this is a half rd. Hdc, hdc inc, dc 2, hdc inc, hdc, sc, sl st.
FO, leaving a tail for sewing. Attach the eyes,, starting below rd 18, with the eyes barely touching.
Belly Patch Options
Pick which one of the below options or none at all.
Option 1: Pink Trapezoid
Row 1: fsc 10
Row 2: dec, sc 8 (9)
Row 3: dec, sc 7 (8)
Row 4: dec, sc 6 (7)
Row 5: dec, sc 5 (6)
Sc around the patch, putting 2 sc in the corners to help turn.
FO, leaving a tail for sewing and attach to the belly.
Option 2: Heart
Rd 1: sc 7 in MR
Rd 2: inc. At the end, sl st into the first st (14)
Rd 3: ch, sc in the 1st st, ch, dc 2, hdc, sc 2, hdc, ch, dc, ch, hdc, sc 2, hdc, dc 2, sc in the 1st st of the rd, ch, sl st.
FO, leaving a tail for sewing and attach to the belly.
Option 3: Oval
Ch 3
Rd 1: sc in the 2nd ch from the hook. 3 sc in the last ch and continue around the ch, inc (6)
Rd 2: inc (12)
Rd 3: sc, inc (18)
Rd 4: sc 2, inc (24)
FO, leaving a tail for sewing and attach to the belly.
Tail
Body Color
Make a pom-pom. Tie the pompom centered, to the back of the bunny, attached between rds 5 and 6. My pom-pom is about an inch round.
- Funny Pictures
-
 Cute Cat Memes That Will Make Your Day Brighter
-
 Spot-on and Funny Memes About Introverts Struggles
-
 Top Wonderful Cat Memes on Their Way to Better Your Day
- Recipes
-
 Creamy Old Fashioned Rice Pudding
-
 Russian Tea Cakes (Snowball Cookies)
-
 Rigatoni with Sausage, Tomatoes, and Zucchini
- Lifehacks
-
 How to Crochet a Harlequin Stitch
-
 Removing The Toughest Stains
-
 Crochet Basics: Crumpled Griddle Stitch
- Crochet Ideas
-
 Crochet Christmas Tree
-
 Crochet Goblet of Fire
-
 Crochet Adorable Ammonite
- DIY
-
 DIY Snowman Wreath
-
 Mini Santa Sleigh Ornament
-
 Crochet Gingerbread House Blanket
- Knitting Ideas
-
 Knitted Easter Bunny
-
 Knitted Mobile Phone/Glasses Case
-
 Knitted Cabled Wallet