How to Make Adorable Crochet Baby Snakes

Crochet Baby Snakes Overview
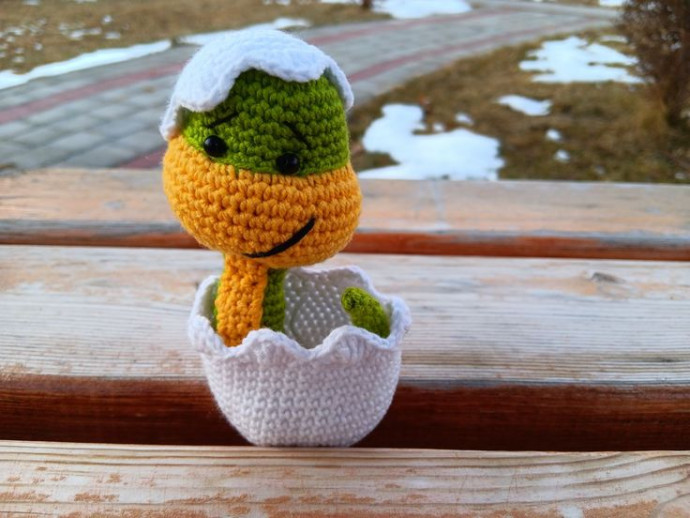
Crochet Baby Snakes are adorable little creations that make the perfect cuddly companion for any child. With their soft yarn and charming colors, these handmade toys bring a touch of whimsy and playfulness to any nursery or playroom. Whether you're looking for a unique gift for a baby shower or simply want to add a cute touch to your child's toy collection, a Crochet Baby Snake is sure to bring smiles and joy to everyone who meets it. Not only are these little critters cute, but they are also perfect for stimulating imaginative play and sensory development in infants and toddlers. So grab one today and let the giggles and snuggles begin!
Supplies Needed
To create your Crochet Baby Snake, gather the following supplies:
- Cotton yarn (e.g. Schachenmayr Catania 125m/50g) in the following colors: yellow, green, and white
- Crochet hook 2.5 mm
- Two black beads or safety eyes
- Scissors
- Yarn needle
- Fiberfil stuffing
Skill Level
Easy
Size Information
The ready amigurumi is approximately 19 cm long, and can be made bigger or smaller depending on the yarn and hook you use.
Skills Needed
To successfully create the Crochet Baby Snake, you should be familiar with the following skills:
- Chain
- Single crochet
- Double crochet
- Half double crochet
- Slip stitch
- Increase
- Decrease
Abbreviations Used
Here are some common crochet abbreviations that you will encounter:
- Ch = chain
- St = stitch
- Sc = single crochet
- Sl st = slip stitch
- Dec = decrease stitch (two single crochets together)
- Inc = increase stitch (two single crochets in the one stitch)
- Dc = double crochet
- Rnd = round
- * = repeat instructions for the times indicated
- (...) = total amount of stitches
Tips for Creating Your Crochet Baby Snake
- Do not join rounds, work in a continuous spiral.
- Use a stitch marker or piece of yarn to keep track of the last stitch in each round.
- All stitches are worked into both loops, unless stated otherwise in the pattern.
- When filling with polyester stuffing, pull apart each large chunk into many smaller chunks. This ensures an even distribution of firmness within the amigurumi.
- Amigurumi can be made in any desired colors.
Seamless Way of Changing Color When Working in the Round
To change colors without a seam, pick up the new color at the end of the round: insert your hook into the stitch, yarn over the new color, and pull through the stitch and the loop on your hook to complete the stitch.
How to Make a Magic Ring
- Loop the thread twice around your middle finger.
- Put the hook under both loops, pull the yarn under the loops and hook the thread again.
- Pull the thread through the new loop. The first crochet stitch is ready!
- Repeat the needed number of times.
- Pull the inner threads to tighten the ring.
Shift Stitch
Sometimes, to maintain symmetry in spiral amigurumi, you may need to adjust the position of the marker. If you notice that the marker is shifting to the right, you need to work one extra stitch at the end of the round. This extra stitch, known as the shift stitch, is not included in the round description. To see if a shift stitch is necessary, fold your work in half and check if the marker still goes straight.
Instructions for Making Your Crochet Baby Snake
The pattern is worked from head to tail, and the length can be easily adjusted to make a longer or shorter snake.
Eggshell Section
Work using white color yarn.
Part 1: Create the Body
Round 1: 6 single crochets into Magic Ring
Round 2: Increase 6 times (12 stitches)
Round 3: *Single crochet in the next stitch, increase* (18 stitches)
Round 4: *Single crochet in each of the next 2 stitches, increase* (24 stitches)
Round 5: *Single crochet in each of the next 3 stitches, increase* (30 stitches)
Round 6: *Single crochet in each of the next 4 stitches, increase* (36 stitches)
Round 7: Single crochet in each of the next 36 stitches
Round 8: *Single crochet in each of the next 5 stitches, increase* (42 stitches)
Rounds 9-16: Single crochet in each of the next 42 stitches
Repeat these rounds until you reach the desired height.
Round 17: *Skip the next stitch, slip stitch in the next stitch, skip the next stitch, sc and hdc in the next stitch, dc+tc+dc in the next stitch, hdc and sc in the next stitch*, repeat from * to * till the end of the round.
Bind off and hide yarn ends.
Part 2: Continue the Body
Crochet using white color yarn.
Round 1: 6 single crochets into Magic Ring
Round 2: Increase 6 times (12 stitches)
Round 3: *Single crochet in the next stitch, increase* (18 stitches)
Round 4: *Single crochet in each of the next 2 stitches, increase* (24 stitches)
Round 5: *Single crochet in each of the next 3 stitches, increase* (30 stitches)
Round 6: *Single crochet in each of the next 4 stitches, increase* (36 stitches)
Round 7: Single crochet in each of the next 36 stitches
Repeat these rounds until you reach the desired height.
Round 8: *Skip the next stitch, slip stitch in the next stitch, skip the next stitch, sc and hdc in the next stitch, dc+tc+dc in the next stitch, hdc and sc in the next stitch*, repeat from * to * till the end of the round.
Bind off and hide yarn ends.
Head Section
Start your work using green color yarn.
Round 1: 6 single crochets into Magic Ring
Round 2: Increase 6 times (12 stitches)
Round 3: *Single crochet in the next stitch, increase* (18 stitches)
Round 4: *Single crochet in each of the next 2 stitches, increase* (24 stitches)
Rounds 5-9: Single crochet in each of the next 24 stitches
Change the yarn color to yellow
Round 10 (working into the back loop): *Single crochet in each of the next 3 stitches, increase* (30 stitches)
Round 11: *Single crochet in each of the next 4 stitches, increase* (36 stitches)
Rounds 12-14: Single crochet in each of the next 36 stitches
Round 15: *Decrease, single crochet in each of the next 4 stitches* (30 stitches)
Round 16: *Decrease, single crochet in each of the next 3 stitches* (24 stitches)
Stuff the head firmly.
Round 17: *Decrease, single crochet in each of the next 2 stitches* (18 stitches)
Round 18: *Decrease, single crochet in the next stitch* (12 stitches)
Body Section
Crochet using green color yarn.
Rounds 1-2: Single crochet in each of the next 12 stitches
Stuff the body of the snake while crocheting. You may leave almost half of the body unstuffed for maximum flexibility. You can also add wire.
Round 3: *Single crochet in each of the next 3 stitches, increase* (15 stitches)
Rounds 4-13: Single crochet in each of the next 15 stitches
Round 14: *Decrease, single crochet in each of the next 3 stitches* (12 stitches)
Rounds 15-20: Single crochet in each of the next 12 stitches
Round 21: *Decrease, single crochet in each of the next 2 stitches* (9 stitches)
Rounds 22-26: Single crochet in each of the next 9 stitches
Round 27: *Decrease, single crochet in the next stitch* (6 stitches)
Rounds 28-30: Single crochet in each of the next 6 stitches
Round 31: *Decrease, single crochet in the next stitch* (4 stitches)
Rounds 32-33: Single crochet in each of the next 4 stitches
Cut the yarn, leaving a tail, and pull through the last stitch. Weave the yarn tail through the front loops only of the final round and pull to close. Hide the end inside the snake.
Belly Section
Crochet using yellow color yarn.
Round 1: 3 sc into a magic ring, chain 1 stitch, turn the work.
Rounds 2-20: Single crochet in each of the next 3 stitches, chain 1 stitch, turn the work.
Cut the yarn, leaving a tail for sewing the belly to the body of your snake.
Assembly Instructions
You can also add a tongue to your snake:
Ch 6, sl st in the second chain from the hook and the next chain, chain 3 stitches, sl st in the second chain from the hook and next chain, sl st in the remaining 3 chains of the starting chain.
Bind off leaving a long tail. Sew the tongue to the head of your snake using the yarn tail.
Place the eyes in their right place on the head and sew them to the snake's head.
Embroider the eyebrows with black color yarn. Add a mouth if desired. Proceed to the smile if desired. You can also add eyelashes. Weave in all ends.
Sew the belly to the body of your snake. Your Crochet Baby Snake is ready!
- Funny Pictures
-
 Cute Cat Memes That Will Make Your Day Brighter
-
 Spot-on and Funny Memes About Introverts Struggles
-
 Top Wonderful Cat Memes on Their Way to Better Your Day
- Recipes
-
 Creamy Old Fashioned Rice Pudding
-
 Russian Tea Cakes (Snowball Cookies)
-
 Rigatoni with Sausage, Tomatoes, and Zucchini
- Lifehacks
-
 How to Crochet a Harlequin Stitch
-
 Removing The Toughest Stains
-
 Crochet Basics: Crumpled Griddle Stitch
- Crochet Ideas
-
 Crochet Christmas Tree
-
 Crochet Goblet of Fire
-
 Crochet Adorable Ammonite
- DIY
-
 DIY Snowman Wreath
-
 Mini Santa Sleigh Ornament
-
 Crochet Gingerbread House Blanket
- Knitting Ideas
-
 Knitted Easter Bunny
-
 Knitted Mobile Phone/Glasses Case
-
 Knitted Cabled Wallet