Crochet Baby Beanie Tutorial


Description
Crochet baby beanies are not only adorable but also a practical and thoughtful gift for any newborn. The soft yarn, intricate stitching, and charming designs make them perfect for keeping tiny heads warm and cozy. Whether you opt for a simple pastel color or a fun animal-inspired pattern, each beanie is lovingly handcrafted with care and attention to detail. It's truly heartwarming to imagine a precious little one nestled snugly in a handmade beanie, feeling the warmth and comfort of something made with love. So, whether you're creating one as a gift for a friend's baby shower or treating your own little bundle of joy, a crochet baby beanie is sure to be a treasured keepsake for years to come.
Materials Needed
- Red Heart Super Saver Stripes Yarn (Latte color, size 4 medium)
- Size I (5.5 mm) crochet hook
- Yarn needle
- Scissors
Abbreviations
- ch – chain
- dc – double crochet
- sl st – slip stitch
- fpsc – front post single crochet
- fpdc – front post double crochet
- sc – single crochet
- hdc – half double crochet
- fphdc – front post half double crochet
- bphdc – back post half double crochet
Hat Crown Instructions
Round 1
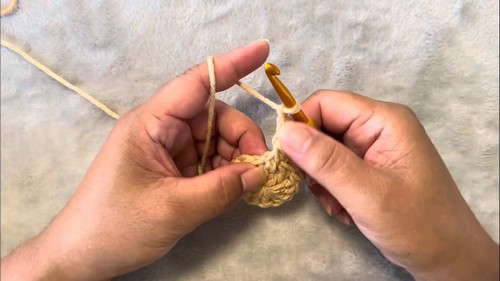
Make a magic ring. Into the ring, make 13 dc (count beginning ch-3 as first dc). Close the ring securely. Join with a sl st to the top of the beginning ch-3.
Round 2
Make 1 fpsc around the same stitch as joining. Ch 2 (counts as first fpdc). Make 1 dc in between the first and second dc. Make 1 fpdc around the next dc. Repeat: 1 dc between stitches, then 1 fpdc around the next dc. Before joining, make 1 dc in between the first and last dc. Total stitches: 26. Join with a sl st on top of the beginning ch-2.
Round 3
Make 1 fpsc around the joining stitch. Ch 2 (counts as fpdc). Make 2 dc between the front post and next dc. Skip the next dc. Make 1 fpdc around the next fpdc. Repeat: 2 dc in between, skip 1 dc, 1 fpdc around fpdc. End with 2 dc between the last fpdc and last dc. Total stitches: 39. Join with a sl st on top of the beginning ch-2.
Round 4
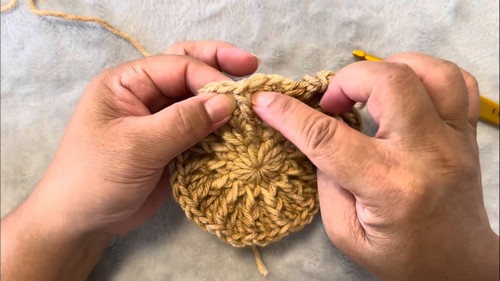
Make 1 fpsc around the same stitch. Ch 2. Make 3 dc in between the front post and next dc. Skip 2 dc. Make 1 fpdc around the next fpdc. Repeat: 3 dc in between, skip 2 dc, 1 fpdc. End with 3 dc as last stitch. Total stitches: 52. Join with a sl st.
Round 5
Make 1 fpsc around the joining stitch. Ch 2. Make 4 dc between the front post and next dc. Skip the next 3 dc. Make 1 fpdc around the next fpdc. Repeat: 4 dc, skip 3 dc, 1 fpdc. Total stitches: 65. Join with sl st to the beginning ch-2.
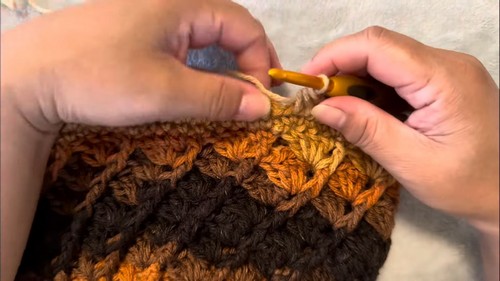
Round 6
Make 1 fpsc around the joining stitch. Ch 2. Make 4 dc in between the front post and next dc. Skip the next 4 dc. Make 1 fpdc around the next fpdc. Repeat: 4 dc in between, skip 4 dc, 1 fpdc. Join with sl st on top of the beginning ch-2.
Continue Rounds
Repeat Round 6 until the hat measures approximately 6.5 inches from the crown.
Hat Brim Instructions
Brim Round 1
Ch 1. Make 1 sc in the same stitch. Sc in the next 4 stitches. Make 1 sc in the next fpdc. Continue sc in each stitch around. In the last stitch, make 2 sc. Total stitches: 66. Join with sl st to the first sc.
Brim Round 2
Ch 2 (counts as first hdc). Make 1 hdc in each stitch around. Total stitches: 66. Join with sl st on top of the beginning ch-2.
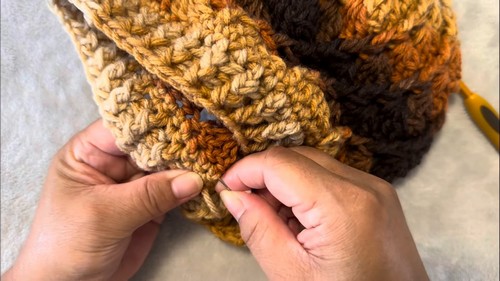
Brim Round 3
Ch 2 (counts as hdc). Make 1 fphdc around the next hdc. Make 1 bphdc around the next hdc. Repeat: fphdc, bphdc around alternating stitches. End with fphdc. Join with sl st on top of the beginning ch-2.
Brim Round 4
Ch 2. Continue ribbing by making 1 fphdc around each fphdc and 1 bphdc around each bphdc. End with fphdc. Join with sl st on top of the beginning ch-2.
Optional
For a longer brim, repeat Brim Round 4 one or two more times.
Finishing
Cut the yarn, leaving a tail. Use a yarn needle to weave in the tail through the stitches (especially the sc line) back and forth 2–3 times. Trim any excess yarn.
Final Size & Fit
Finished hat measures approximately 7.5 inches long. Circumference fits approximately 17 to 20 inches, suitable for children aged 10 years to small adults.
- Funny Pictures
-
 Hilarious Memes for Those Bored to Tears
-
 Weekly Treat of Funniest Parenting Memes for Good Laugh out Loud Right Now
-
 Really Funny Pics to End These Weekend Perfectly
- Recipes
-
 Crispy Baked Avocado Fries
-
 Scrambled Chickpea and Spinach Pitas
-
 Cinnamon Pancakes
- Lifehacks
-
 Crochet Basics: Aligned Cobble Stitch
-
 Brick Stitch Crochet Tutorial
-
 Crochet Basics: Wattle Stitch
- Crochet Ideas
-
 Crochet Snorlax Plushie Doll
-
 Crochet Beautiful Penguin Toy
-
 Crochet Tiny Snowman
- DIY
-
 DIY Santa Craft For Kids
-
 Paper Plate Angel Craft
-
 Upcycled Mason Jar Chicken Vase
- Knitting Ideas
-
 Knitted Bridger Cowl
-
 Knitted Keepsake Bag
-
 Knitted Cutie Cupcake Dolls