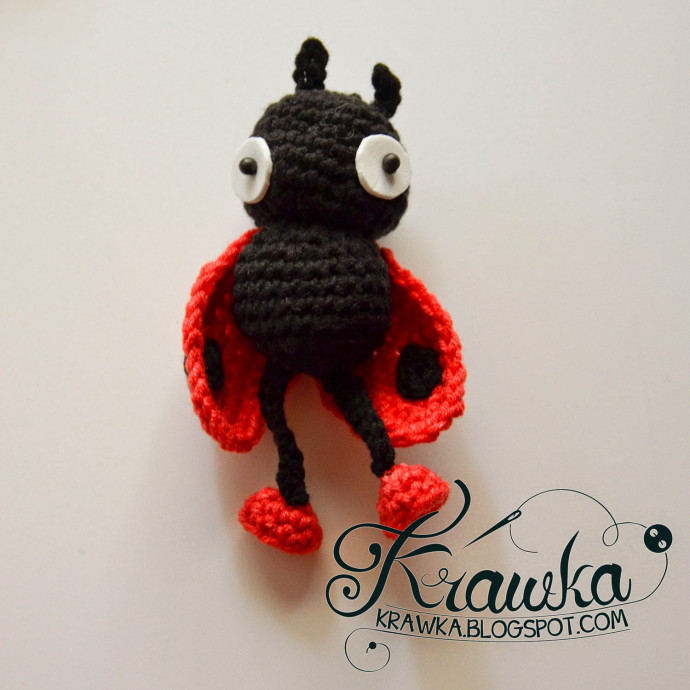
How to Crochet a Charming Ladybug

If You're Looking for a Cute Crochet Project
If you are looking to add a touch of cuteness to your crochet collection, why not try your hand at crocheting a beautiful ladybug? This delightful little critter is not only fun to make but also makes for a charming addition to your crafts. With its bright colors and adorable design, the crochet ladybug is sure to bring a smile to your face. Whether you're a seasoned crocheter or new to the craft, creating a lovely ladybug is a rewarding project that will bring joy to both the maker and the beholder. So grab your yarn and hook, and let's get started on crafting a sweet little ladybug that will brighten up your day!
Materials Needed
- Black and red yarn (I use yarn with a gauge of 24.0 to 30.0 sts = 4 inches)
- 3 mm hook
- White sheet of foam (mine is 1 mm thick) for eyes
- 2 black beads (4 mm would be best)
- Clothespin (the smaller version - 3 cm is best)
- Hot glue gun
- Cotton or another material to use as filament
Beginning the Crochet Ladybug Pattern
Head
For the head, use black yarn.
R1: 6 sc in MR (6)
R2: inc around (12)
R3: * sc, inc * X6 (18)
R4: * sc 2, inc * X6 (24)
R5: sc around (24)
R6: sc around (24)
R7: * sc 3, inc * X6 (30)
R8: sc around (30)
R9: * sc 4, inc * X6 (36)
R10: * sc 3, dec * around (31)
R11: * sc, dec * around (21)
R12: * sc, dec * around (14)
Stuff the head.
R13: dec around (7)
R14: dec around (4) FO
From the white foam, cut two circles for the eyes. If you don't like the edges of your foam, you can use a nail file to smooth them.
Sew them to the head with the bead in the center.
Antennas (Make 2)
For the antennas, use black yarn.
R1: 4 ch (4)
R2: Starting from 2-nd ch, ss 3 (3) FO
Sew the antennas to the head.
Body of the Ladybug
For the body, use black yarn.
R1: 6 sc in MR (6)
R2: inc around (12)
R3: * sc, inc * X6 (18)
R4: * sc 2, inc * X6 (24)
R5 - R8: sc around (24)
R9: * sc 2, dec * X6 (18)
Stuff the body!
R10: * sc, dec * X6 (12) FO
The end of this section is where you will sew the body to the head.
Legs (Make 2)
For the legs, use black yarn.
R1: 10 ch
R2: Starting from 2-nd ch, ss 9 (9) FO
Feet (Make 2)
For the feet, use red yarn.
R1: 6 sc in MR (6)
R2: * sc, inc * X3 (9)
R3: sc around, ss last one (9) FO
Wings (Make 2)
For the wings, use red yarn.
R1: 10 ch (10)
R2: 9 sc on one side of the chain, 9 sc on the other (18)
R3: 3 sc in 1, sc 7, 3 sc in 1, 3 sc in 1, sc 7, 3 sc in 1 (26)
R4: inc 2, sc 2, hdc, dc 3, hdc, sc 2, inc 4, sc 2, hdc, dc 3, hdc, sc 2, ss FO
Dots (Make 8: 4 for Each Wing, 2 for Each Side)
For the dots, use black yarn.
R1: 6 sc in MR (6)
R2: ss in the 1-st sc from R1 FO
Sew two dots on each side of the wing.
Finally, sew the head, body, both legs, and wings together in any order.
The last step is attaching the mini clothespin. I glued it with a hot glue gun in the desired position.
- Funny Pictures
-
 Relatable and Funny Memes to Distract You From the Routine
-
 Hilarious Cat Snapchats That Will Leave You With the Biggest Smile
-
 Today’s Top Funny Tweets to Scroll Before Bed
- Recipes
-
 Cappuccino Brownies
-
 Chicken Mushroom Tortellini Bake
-
 Spinach Pie
- Lifehacks
-
 8 Necessary Tips for Baking Bread
-
 Tips & Hacks for Clean Carpets
-
 10 Uses For Old TV Armoires
- Crochet Ideas
-
 Crochet Watermelon Amigurumi
-
 Crochet Flower Hat for your Pet
-
 Crochet Shark Applique
- DIY
-
 Crochet Titus the Barn Owl
-
 Crochet Rainbow Bunny
-
 DIY Washer Ornaments
- Knitting Ideas
-
 Knitted Star Square Dishcloth
-
 Knitted Free 2025 Year Dishcloth
-
 Knitted Ribbed Adult Hat