Adorable Crochet Ladybug Amigurumi Pattern

Penelope
Jun 01, 2024 09:59 AM
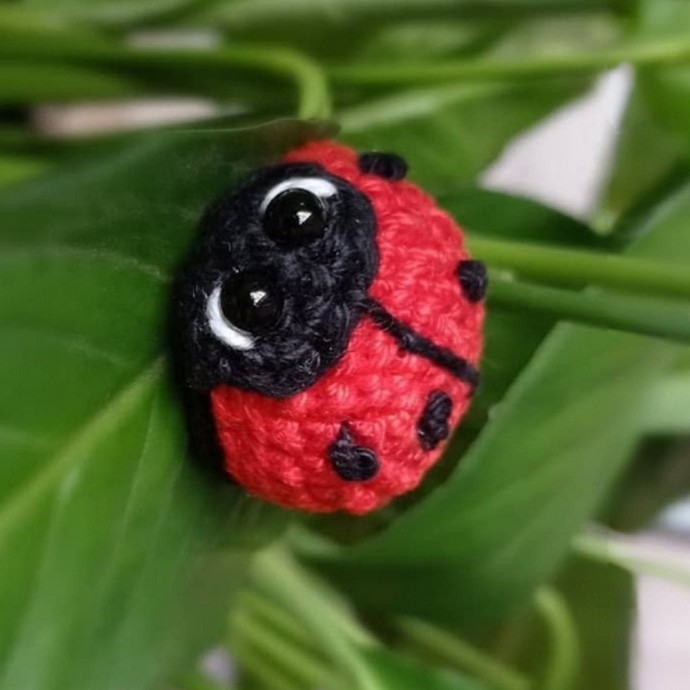
Create your very own adorable crochet ladybug amigurumi with this fun and easy-to-follow pattern! This cute little insect is perfect for adding a touch of whimsy to your home decor or as a delightful gift for a loved one. With its vibrant red and black colors, this ladybug will surely catch everyone's attention.
Abbreviations
- Mr: Magic ring
- Ch: Chain
- Sc: Single crochet
- Inc: 2sc in the next stitch.
- F. O: Fasten off
Materials
- 100% cotton yarn Scheepjes
- Catona in color Red and Black.
- Crochet 2.5mm hook
- Safety eyes 5mm
- Needle
Step By Step Pattern
Body (Red)
- 1: 6sc in Mr
- 2: 6 inc (12)
- 3: [1sc, 1 inc] x6 (18)
- 4: [2sc, 1 inc] x6 (24)
- 5, 6, 7: sc around
- F. O.
Body (Black)
- Repeat the same for the red body until round 4 (included)
Head (Black)
- 1: ch 4, start from the 2nd loop from the hook, 2sc, 3sc in the same loop, sc, inc (8)
- 2: inc, sc, 3inc, sc, 2inc (14)
- F. O.
- Insert the safety eyes where you like. I have cut, burned, and crushed so that it is flat and does not come out.
- You can embroider the eyes to make it look cuter.
Assembly
- Sew the red and black body together.
- Sew the head covering the end of the body joint.
Details
- Draw the middle line with black thread.
- You can create the dots by embroidering or knitting them using felt or beads. The creator made them with a French knot.
And finished. You already have a ladybug to decorate your plants or whatever you want.
No comments
Write a comment
- Funny Pictures
-
 Relatable and Funny Memes to Distract You From the Routine
-
 Hilarious Cat Snapchats That Will Leave You With the Biggest Smile
-
 Today’s Top Funny Tweets to Scroll Before Bed
- Recipes
-
 Cappuccino Brownies
-
 Chicken Mushroom Tortellini Bake
-
 Spinach Pie
- Lifehacks
-
 8 Necessary Tips for Baking Bread
-
 Tips & Hacks for Clean Carpets
-
 10 Uses For Old TV Armoires
- Crochet Ideas
-
 Crochet Watermelon Amigurumi
-
 Crochet Flower Hat for your Pet
-
 Crochet Shark Applique
- DIY
-
 Crochet Titus the Barn Owl
-
 Crochet Rainbow Bunny
-
 DIY Washer Ornaments
- Knitting Ideas
-
 Knitted Star Square Dishcloth
-
 Knitted Free 2025 Year Dishcloth
-
 Knitted Ribbed Adult Hat