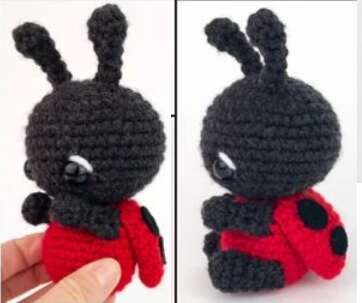
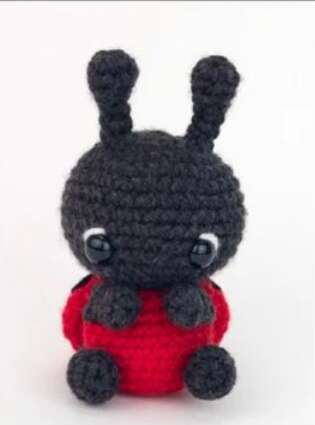
How to Crochet Your Own Adorable Ladybug

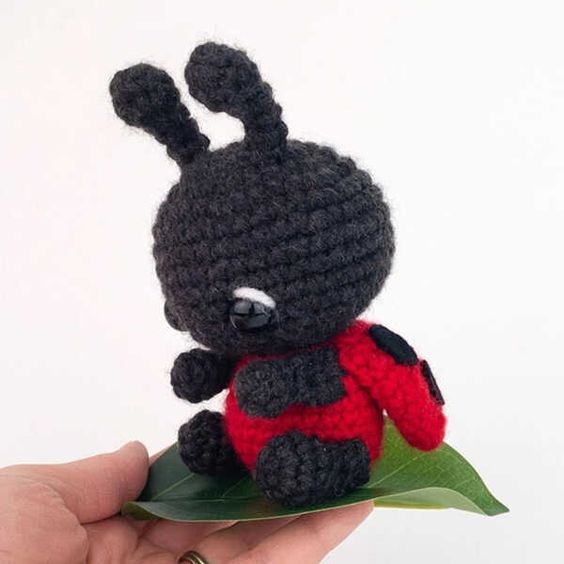
If you're looking for a fun and creative crochet project, why not try making your very own little ladybug? Crocheting is a wonderful hobby that allows you to create unique and personalized items, and this cute ladybug pattern is perfect for beginners and experienced crocheters alike. With just a few basic stitches and some colorful yarn, you can bring this adorable insect to life. Crocheting your own little ladybug is not only a fun and relaxing activity, but it also allows you to create something truly special. Whether you're a seasoned crocheter or just starting out, this project is sure to bring a smile to your face and brighten up your day. So grab your crochet hook and get ready to bring this charming insect to life with your own hands.
Materials Needed
Yarn (color: black, red, white)
Eye accessories - 12mm
Crochet hook - 3.75mm
Toy stuffing
Needle
Finished Size
11.5 cm high
Abbreviations
- MR - Magic Ring
- sc - Single Crochet
- inc - Increase
- dec - Decrease
- ch - Chain stitch
Head Instructions
Make with black color
- R1: MR 6 sc (6)
- R2: 6 inc (12)
- R3: (1 sc, 1 inc)*6 (18)
- R4: (2 sc, 1 inc)*6 (24)
- R5: (3 sc, 1 inc)*6 (30)
- R6: (4 sc, 1 inc)*6 (36)
- R7-12: 36 sc (36)
- R13: (4 sc, 1 dec)*6 (30)
- R14: (3 sc, 1 dec)*6 (24)
- R15: (2 sc, 1 dec)*6 (18)
- R16: (1 sc, 1 dec)*6 (12)
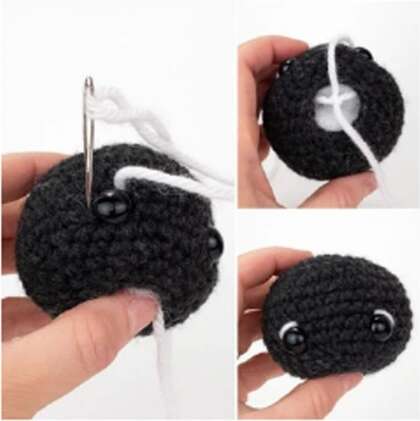
Filling, install eyes between R11 and R12, 5 stitches apart. The white thread is inserted into the needle from the bottom to embroider the eyelids and tied with a knot at the bottom.
Antenna Instructions
x 2, make with black color
- R1: MR 6 sc
- R2: 1 inc, 5 sc (7)
- R3: 7 sc
- R4: 1 dec, 3 sc, 1 dec (5)
- R5-7: 5 sc
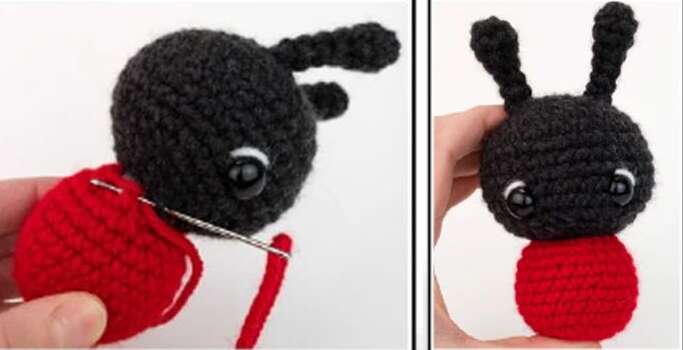
Filling. Leave a long thread and sew to the top of the head.
Body Instructions
Make with red color
- R1: MR 6 sc
- R2: 6 inc (12)
- R3: (1 sc, 1 inc)*6 (18)
- R4: (2 sc, 1 inc)*6 (24)
- R5-10: 24 sc
- R11: (2 sc, 1 dec)*6 (18)
- R12: (1 sc, 1 dec)*6 (12)
Filling. Leave a long thread to sew the body and head together.
Hand Instructions
x 2, make with black color
- R1: MR 6 sc
- R2: 6 sc
- R3: 1 dec, 4 sc (5)
- R4-5: 5 sc
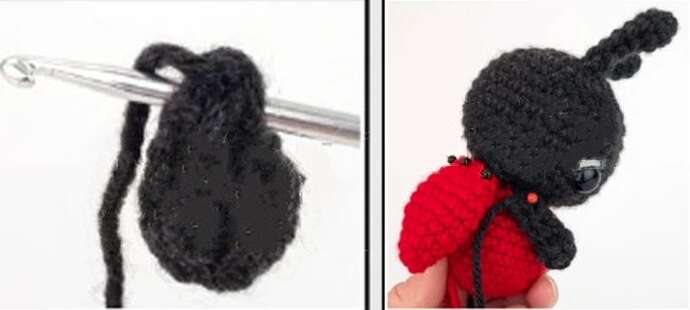
Filling. Fold in half and crochet 1 ch, 3 sc. Fasten off and leave a long end for sewing. Sew the arms to 1 row below the head and 4 rows behind the eyes.
Wing Instructions
x 2, make with red color
- R1: MR 4 sc
- R2: (1 sc, 1 inc)*2 (6)
- R3: (1 sc, 1 inc)*3 (9)
- R4: (2 sc, 1 inc)*3 (12)
- R5: (3 sc, 1 inc)*3 (15)
- R6-8: 15 sc (15)
- R9: (3 sc, 1 dec)*3 (12)
- R10: (2 sc, 1 dec)*3 (9)
Fasten off and leave a long end for sewing. Sew the wings to the back, snugly against the top of the body. Embroider 2 black spots on the wings, or cut out black circles from non-woven fabric and paste them on the wings.
Leg Instructions
x 2, make with black color
- R1: MR 6 sc
- R2: (1 sc, 1 inc)*3 (9)
- R3: 9 sc
- R4: (1 sc, 1 dec)*3 (6)
- R5-6: 6 sc
Filling. Fold in half and crochet 1 ch, 3 sc. Sew the legs to the sides of the body, 3 rows below the hands.
- Funny Pictures
-
 Cute Cat Memes That Will Make Your Day Brighter
-
 Spot-on and Funny Memes About Introverts Struggles
-
 Top Wonderful Cat Memes on Their Way to Better Your Day
- Recipes
-
 Creamy Old Fashioned Rice Pudding
-
 Russian Tea Cakes (Snowball Cookies)
-
 Rigatoni with Sausage, Tomatoes, and Zucchini
- Lifehacks
-
 How to Crochet a Harlequin Stitch
-
 Removing The Toughest Stains
-
 Crochet Basics: Crumpled Griddle Stitch
- Crochet Ideas
-
 Crochet Christmas Tree
-
 Crochet Goblet of Fire
-
 Crochet Adorable Ammonite
- DIY
-
 DIY Snowman Wreath
-
 Mini Santa Sleigh Ornament
-
 Crochet Gingerbread House Blanket
- Knitting Ideas
-
 Knitted Easter Bunny
-
 Knitted Mobile Phone/Glasses Case
-
 Knitted Cabled Wallet