How to Crochet Pine Twigs and Lemon Slices for Natural Home Decor

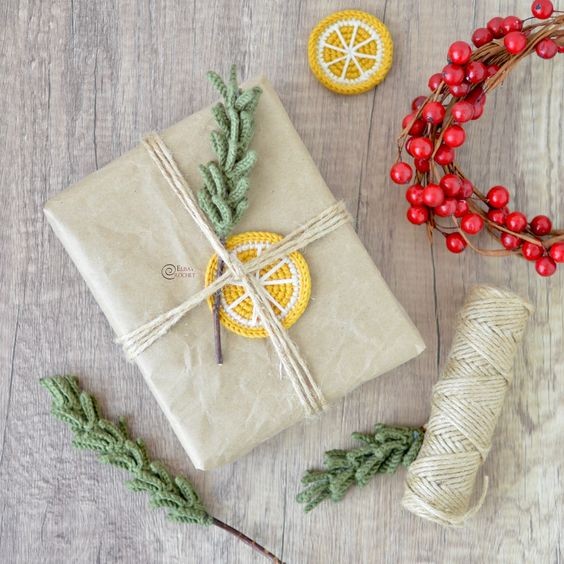
Crocheting pine twigs and incorporating dried lemon slices into your crafts is a delightful way to add a touch of natural charm to your creations. The earthy scent of pine combined with the citrusy aroma of lemons brings a refreshing and cozy vibe to any space. Whether you're making festive decorations, ornamental pieces, or even holiday gifts, the combination of these elements creates a visually appealing and aromatic experience that is sure to brighten up your home. So, grab your yarn, needles, pine twigs, and lemon slices, and let your creativity flow as you bring nature's beauty into your crochet projects with a bit of zest!
Materials
YARN
- Light Yarn (3) in Green (A)
- Light Yarn (3) in Mustard (B)
- Light Yarn (3) in White (C)
Crochet hook size B (2.25 mm)
Embroidery Needle
Wood Twigs
Glue Gun
Dimensions
- Small Lemon Slice = about 2 in. (5 cm) tall.
- Large Lemon Slice = about 2¼ in. (6.5 cm) tall.
- Pine Twig = about 8 in. (20.3 cm) tall.
Abbreviations
- ch = chain
- rep = repeat
- rnd(s) = round(s)
- sc = single crochet
- sl st = slip stitch
- st(s) = stitch(es)
Skill Level
Easy
Gauge
28 sc + 28 rnds = about 4 in. (10 cm).
Pine Twig
With A
Row 1: Ch 31, 1 sc in 2nd ch from the hook, sc in next 29 chs – 30 sc.
Row 2: Ch 7, 1 sl st in 2nd ch from hook, 1 sl st in next 5 chs, 1 sl st in st where you started the chain, (1 sl st in next st, ch 7, 1 sl st in 2nd ch from hook, 1 sl st in next 5 chs) rep across – 30 spikes.
Fasten off, leaving a yarn tail.
Flatten the piece with an iron.
Wrap the piece around a twig, and glue it to it with a glue gun.
Small Lemon Slice
With B
Rnd 1: 8 sc in a magic ring – 8 sc.
Rnd 2: 2 sc in each st around – 16 sc.
Rnd 3: (sc in next st, 2 sc in next st) rep around – 24 sc.
Rnd 4: (sc in next 2 sts, 2 sc in next st) rep around – 32 sc.
Rnd 5: switch to C, (sc in next 3 sts, 2 sc in next st) rep around – 40 sc.
Rnd 6: switch back to B, sc in each st around – 40 sc.
Rnd 7: working in front loop only, sl st in each st around – 40 sl st.
Fasten off and weave in ends.
With C, embroider straight lines for membrane walls (create 8 segments).
Large Lemon Slice
With B
Rnd 1: 8 sc in a magic ring – 8 sc.
Rnd 2: 2 sc in each st around – 16 sc.
Rnd 3: (sc in next st, 2 sc in next st) rep around – 24 sc.
Rnd 4: (sc in next 2 sts, 2 sc in next st) rep around – 32 sc.
Rnd 5: (sc in next 3 sts, 2 sc in next st) rep around – 40 sc.
Rnd 6: switch back to C, (sc in next 4 sts, 2 sc in next st) rep around – 48 sc.
Rnd 7: switch back to B, sc in each st around – 48 sc.
Rnd 8: working in front loop only, sl st in each st around – 48 sl st.
Fasten off and weave in ends.
With C, embroider straight lines for membrane walls (create 8 segments).
- Funny Pictures
-
 These are the Pics That Simply Describe Your Life
-
 Hilariously Accurate Parenting Memes That Show the Other Side of Parenthood
-
 Great Pics That Just Depict Our Lives
- Recipes
-
 Crispy Baked Avocado Fries
-
 Baked Beans and Hot Dogs with Biscuit Topping
-
 Roasted Rosemary Lemon Chicken Breasts
- Lifehacks
-
 Crochet Basics: Twisted Fringe
-
 7 Crochet Tips And Tricks
-
 How To Work Crochet Into Denim
- Crochet Ideas
-
 Crochet Snorlax Plushie Doll
-
 Crochet Cat in 1 Row
-
 Crochet Beautiful Penguin Toy
- DIY
-
 Popsicle Stick and Jingle Bell Christmas Tree Ornament
-
 Upcycled Mason Jar Chicken Vase
-
 Crochet Namaste Stephanie Doll
- Knitting Ideas
-
 Knitted Keepsake Bag
-
 Knitted Textured Heart Dishcloth
-
 Knitted Snowfall Dishcloth